Thursday, 26 January 2012
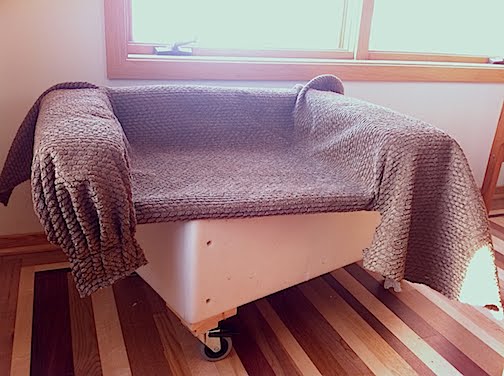
Rolling Dog Beds
Materials: Ikea Ektorp Bromma Ottoman, Ikea wheel kit (2), Poang sheepskin stool cover
Description: I made 2 of these. The ottomans were without covers (except the base of one of them) as they were purchased in the "As is" department (about $45.00 @), so were the Poang footstool lambswool cushions ($19.99@).
NOTE: PLEASE MEASURE, MEASURE, MEASURE! These instructions are what worked for me (twice), but I can also "adjust on the fly". Please read through thoroughly before you start. It's worth it!
TOOLS: Sewing machine, Scissors, Staple gun (1/4" staples), hammer (to finish staples), saw to cut feet off ottoman.
MATERIALS: You will need about 94" of Velcro (fuzzy side only, no hook side) and 2' of both hook and loop Velcro, 3/4" wide is fine. Also, 3 yards of 55" wide upholstery fabric, thread to match. 2 Packages of Ikea large wheels. Wide tape to temporarily hold fabric in place (optional).
WHEELS:
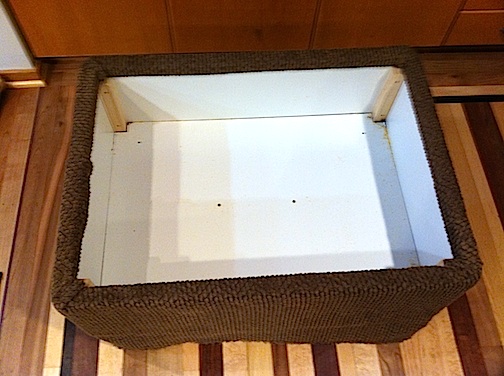
1) Cut off existing wood legs, flush with the base.
2) Cut square pieces of 3/4" to 1" wood and screw to base in each of 4 corners, screw Ikea wheels to those corner pieces (predrill all holes).
TOP:
3) Place your Poang footstool pad (or other) on top of the ottoman, matching front edges, centering side to side (of course you can customize this). Trace around the outline of the pad with permanent marker.
4) With a sharp long knife (I used a relegated-to-toolbox breadknife) cut out the shape all the way down to the base. I then grabbed the ottoman cushion firmly and cut between the wood base and the foam to finally release this marked piece of thick foam. This is work!
5) Unscrew the black plastic feet that are located in the corners, underneath the ottoman top. Note: I did not replace them, as I did not want to take the time and effort to make holes in the new upholstery top...gravity and the weight of the dogs are working just fine.
6) Make sure one cut edge of your upholstery fabric is straight across, not slanted. Recut if necessary.
7) Place the upholstery fabric on top of the newly carved out ottoman top, aligning the straight cut edge with the front, and then adjust so this front edge wraps around to the underside and connects with the existing Velcro (it will probably stick a bit, which really helps a lot) or you can tape it in place temporarily.
This whole time, the right and left sides of the fabric are wrapping around the ottoman top and the selvedge edges align with the Velcro underneath (or tape it in place). The rear of the ottoman top will have a lot of extra fabric (to use on the bottom). CAREFULLY adjust all the fabric so that the 3 edges are taped in place and you are creating a "well" the shape and size of the cushion to be placed in this "well". Once it is all in place, you can determine how much to cut off the back, leaving enough to wrap around underneath to connect to the Velcro along the back edge. Cut the excess to be used for the bottom of the ottoman.
TOP CORNERS:
8) Since I didn't want to take the time and effort to piece together a perfectly fitted top with piping, etc. (capable, not motivated), I simply gathered the extra fabric that was in the corners, pinned them together about 4-5" wide, took the whole fabric off the ottoman and to the sewing machine, and sewed them straight across at a location that the stitching wouldn't be seen.
9) Sew on a 4" strip of LOOP side Velcro about 2 " away from the first stitching. I did this on all 4 corners, fitted it back on the ottoman top (took a bit of adjusting to get it "right" again) and took the HOOK side of Velcro and stapled that in place after adjustments and figuring out where to place it.
BOTTOM:
10) Measure around the base and it's length to determine amount of fabric (I bought 3 yards of 55" upholstery fabric to cover both top and bottom).
11) Cut fabric to your desired length (I used the selvedge edge - factory edge as the bottom so I didn't need to create a hem), making sure to include as part of the length the amount needed to wrap over the top edge of the ottoman bottom to hook onto the existing Velcro.
12) Sew the pieces together to create about 111" total around the entire base (you will need to cut 2 pieces and sew them together).
13) Sew the fuzzy Velcro onto the top cut edge of the fabric (I left about 2" without Velcro at each corner to relieve bulk).
14) There is about an extra 5" of fabric overlap as you wrap it around the base, I sewed the raw edge 1/4 under to create a finished edge and, on the inside of the ottoman, about where it would be Velcroed in, I simply put a safety pin there to hold it. I want it to be washable, so no permanent attachments.
15) Celebrate. You are done. Simply place the top on the bottom and let gravity do the rest. The dogs LOVE them! I even made "handles" (one ottoman already had them attached to the top of the ottoman) and attached them to the bottom inside of the ottoman so the dogs can pull them around. Well, that's the theory anyway, just need to teach them that new skill...Enjoy!
~ DeAnna Brandt, Minnesota
Subscribe to:
Post Comments (Atom)


No comments:
Post a Comment