Showing posts with label Moppe. Show all posts

Saturday, 16 August 2014

Ikea Moppe Hack


Materials: Moppe, old stool legs, yarn, power drill, 4 screws, drill bit, needle

Description: I think every body has a storage system like Moppe at home. It's like the Billy. I had mine now for - let me think - 7 years. Oh my. I painted one of the drawers red(-ish) back then to make it more fitting to the desk it sat on. But know it gets a make-over and definitely more purpose in life.

1. Draw with the chalk arrows on the mini chest. The chalk gives you the opportunity to draft and delete as you go along.

2. Take the drawers out of the chest and drill holes in the ends of each line and in the joints of the arrow.


3. Then you just need to stitch the lines. I made a little knot so it doesn't pull through and wrapped the ends of the yarn around one of the lines in the back to fix it afterwards.

4. Attach the stool legs to the bottom of the mini chest with the 4 screws. Make sure that the screws don'€™t go through the wood or you won't be able to insert the drawers afterwards.

See more of the Moppe storage.

~ Sarah, Vienna, Austria

Saturday, 8 February 2014

Ikea Moppe Hack


Materials: Moppe, old stool legs, yarn, power drill, 4 screws, drill bit, needle

Description: I think every body has a storage system like Moppe at home. It's like the Billy. I had mine now for - let me think - 7 years. Oh my. I painted one of the drawers red(-ish) back then to make it more fitting to the desk it sat on. But know it gets a make-over and definitely more purpose in life.

1. Draw with the chalk arrows on the mini chest. The chalk gives you the opportunity to draft and delete as you go along.

2. Take the drawers out of the chest and drill holes in the ends of each line and in the joints of the arrow.


3. Then you just need to stitch the lines. I made a little knot so it doesn't pull through and wrapped the ends of the yarn around one of the lines in the back to fix it afterwards.

4. Attach the stool legs to the bottom of the mini chest with the 4 screws. Make sure that the screws don'€™t go through the wood or you won't be able to insert the drawers afterwards.

See more of the Moppe storage.

~ Sarah, Vienna, Austria

Tuesday, 27 November 2012

Pimp your MOPPE: Lightbox2


Materials: MOPPE

Description: My old MOPPE has quadratic drawers what makes it especially good to build lightboxes from it.

Step-by-step manual

1. You need a bulb-holder. (Be careful, don't take too strong bulbs, not more than 25 watt. I assume no liability.) Depending on the radius of your bulb-holder you have to modify the grip hole (with the help of a reciprocating saw, or a coping saw).

2. Saw slits into the bottom of the drawers. It helps to drill first one hole in each corner, so you can place your saw blade in the right position. Next: Polish the slits with a sandpaper.


3. Now you have to choose your favorite color for your Lightbox. You can paint, varnish or bond the MOPPE with paperboard (just like me). My favorite glue for this job is "Fixogum". It's not that cheap but it works really fine.

4. Finally put the bulb-holder through the grip hole (I saw it convex, so that the bulb-holder cannot slip out of the hole) and screw the bulb into the holder.

The light looks great as a standard lamp on a sideboard. If you like to use it as a wall light, screw it through the bulb-holder onto the wall or nail a little hook on the back and hang it up.

See more of the Moppe lightboxes.

~ Isabelle Koch, Germany

Pimp your MOPPE: Corpuslight


Materials: MOPPE

Description: My old MOPPEs corpus is especially good to build a standard lamp from it.

Step-by-step manual

1. First print a stencil for the light-holes.

2. Then drill out the holes. Take a drill with a small diameter.

3. Now you have to choose your favorite color for your Corpuslight. I overcoated the inside with white varnish (don't forget to tape the edges) and the outside with wood-colored (wenge) varnish.


4. In the next step install a bulb-holder inside the MOPPE (I pulled a nylon-twine through two holes an the bulb-holder). Be careful, don't take too strong bulbs, not more than 25 watt. I assume no liability.

5. Finally bond transparent paper over the two big slits (I fixed it with tape). You can bend the transparent paper easily. In this way you avoid wrinkles and the light gets a soft character. Its also possible to use colored transparent paper or (colored) foil.

See more of the Moppe Corpuslight.

~ Isabelle Koch, Germany

Sunday, 15 July 2012

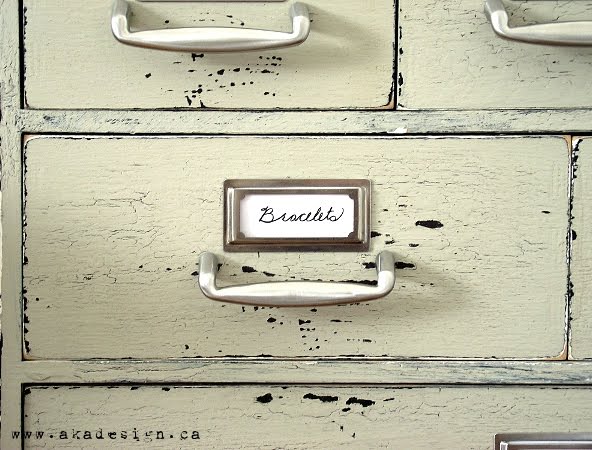
Moppe Card Catalog Jewelry Box


Materials: Moppe Drawers, Craft paint in black and burnt umber, Crackle medium, Light grey paint (we used Analytical Grey by Sherwin Williams), Paint brush, Metal ruler or scraper, Sandpaper, Adhesive metal bookplate (Martha Stewart), Handles (we used these from Lee Valley), Lint free white cloth/rag, Natural and Dark Finishing Paste Wax, Ink pen

Description: 1. Paint each drawer front and the main unit with a thin coat of black paint. Let dry. You just want enough to show through when you distress the drawers.
2. Randomly paint with the burnt umber. Let dry. This just adds some interest to the distressing.
3. Using a large brush with large sweeping motions brush the crackle medium all over. Let dry.


4. Now paint over the crackle with the grey paint. Let dry.
5. Distress. Using a metal ruler or scraper, roughly chip off paint where desired. Using sandpaper, sand edges.
6. Using a clean rag randomly rub dark wax in a few places. Then using the natural wax, wax the entire piece.
7. Drill holes and screw a handle to each drawer.
8. Remove adhesive backing and attach bookplates to each drawer. Add labels ... and voila!


See more of the Card Catalog Jewelry Box.

~ Shannon @ aka design, Ontario, Canada

Sunday, 12 February 2012

Portable drawer .... a box of second growth ...

Portable drawer

Materials: � MOPPE mini Ikea chest of drawers � 2x3 wood slats (0.6 m) � remaining piece of wallpaper � wood glue � woodstains, lacquer � screw � saw � screwdriver � brush � drill

Description: Portable drawer ... first it sounds a little bit strange, but if you think about it why not. Come in handy in the dining room to store gadgets, in the bathroom to systematize makeups or even to keep the colored pencils in the kid�s room. Multi-function handle. It can be used as intended, but when you do not need it, it keeps the drawer under the tabletop. Second growth of an Ikea MOPPE box...


Portable drawer
Portable drawer
Portable drawer
Portable drawer

Now only the drawer will be required, but the frame can also be used. I just painted, I set the rear side, standing in the rolled up in my wrapping paper.
1. Measure down the thickness of the sheet of the table where the drawer gets into. The vertical shaft of the handle's length is the thickness of the tabletop +12 cm. The horizontal shaft is about 15-20 cm, depending on what container you chose. The wooden slats cut from the blades sizes. Cut the ends 45% angle so that the handles are well-off will be developed
2. Put together at right angles to the stem and fix them together with wood glue.
3. Measure out half the side of the box. Right in the middle line, below each other bur two holes. Here it is important enough for accurate measurement....(this is unfortunately the experience of my sentence:)) Still the box and the handle are separate pieces, first polish it a little bit and then steep it. Finally you should varnish.
4. Put the "L"-shaped handle with a shorter stem on the middle line and screw on the box.

~ Wein Krisztina, Budapest

Friday, 16 September 2011

Upscale Wood Cubbies


Materials: Moppe or Fira Wooden Box Set

Description:
I base coated the cabinet and drawers with a spray paint. Then I taped all of the drawers together to treat them as one large surface, then stenciled and painted them. I finished off with some gilding to give it a more Oriental feel and upscale it a bit!

See more of the Moppe upcycle.

~ CraftTestDummies, Clevelandish

***

Happy Malaysia Day to all my Malaysian readers. And here's a special just for you.

Tuesday, 2 August 2011

Moppe goes into woods


Materials: Moppe mini chest, wallpaper, skirting

Description: My old Moppe mini chest looked to boring and I wanted it to fit in our bedroom.

I already made our bedside tables (boxes).

I first dressed it in wallpaper and was content with it but then I thought something is missing so I added the skirting.


See more of the Moppe mini chest.

~ Helene Langborg, Sweden

Wednesday, 9 June 2010

Autumnal mini-chest


Materials: minichest "Moppe", paper napkins, colours, brushes, glue, acrylic transparent coat

Description: This is an old Ikea mini-chest called Moppe. I think they still have a similar product, even if with a different name. I decorated it using the decoupage technique with paper napkins.


First I smoothed the wood using sandpaper, then I painted the mini-chest using colours which matched with the napkins. After that I cut the pictures and stuck them on the sides and on the drawers shading their margins with a brush. Finally, when the pictures were completely dry, I protected my work with several coats of transparent acrylic paint.

~ Donatella Donati, Faenza, Italy