Showing posts with label Hol. Show all posts

Sunday, 11 March 2012

Ikea Hol Arcade Machine

Ikea Hol Arcade Machine

Materials: Ikea Hol Table, Skoghall Mats, EKBY Valter brackets

Description:
I had this 15" Touch Screen LCD Kiosk machine lying around and wanted to do something with it.

Playing Plants vs. Zombies looked good but the case looked bad.
Playing around with MAME I realised there's some potential here but sinking the screen into a table and having controls was screwed when you wanted to play portrait games and then landscape, I didn't want the control on the top.

The solution was an IKEA HOL Table, just lift the top and rotate and some Skoghall coasters.


Ikea Hol Arcade Machine

As the top was quite thick I had to rout it down and raise the screen up to meet it.

The control panel was made from another IKEA find, hot plate stands, matches the basket fine and some EKBY VALTER brackets.
I added a load of arcade buttons and a joystick.
Wired up a small keyboard to all the waggly bits above.
A hidden on and off switch on the side boots it all up.

I backed the control panel and front of the box with matt black vinyl on sign board, it gives it a great effect.

Because the control panel unbolts and is plugged in I intend to make other ones for trackball and maybe dual joystick control.

Using MAME I can play all the old classics along with new touch screen games like Angry Birds.

See more of the Arcade game Hol.

~ Shorty Bob, UK

Monday, 2 May 2011

Hol Cat Litter box with Sliding Top


Materials: Hol Storage Cube (Large), floor sliders, hardware, plastic cat box, mat, trash bag.

Description: OK folks, just like a lot of cat litter solutions, this one is intended to:

1) Get that nasty box of Cat poop hidden: we live in Boston's Back Bay and have limited space in our wee little apartment.
2) Save space by making something functional, in this case a place to put a couple of houseplants.
3) Keep litter contained, instead of all over the floor. This is huge. Our cat likes to dig aggressively, scattering litter everywhere. What a mess, and required constant sweeping and vacuuming to keep up.

So, here's what I did:


1) Build the Hol box as per Ikea's instructions, except for the four little plastic plugs that go in the lid.
2) Cut out a the square entry way. (the wood is thin and this part was surprisingly easy.)
3) Line the bottom half of the crate with plastic. You could use a shower curtain or painting drop cloth; I used two large kitchen trash bags and a staple gun to keep them in place.
4) Take the box that the Hol came in and make a "litter back-board" around the end of the box opposite the entry way. (you may not think this is necessary, i did this as an extra precaution to contain litter)
5) Take a floor mat designed to get the litter off of kitty's paws and lay it into the crate. I cut the corners so it would fit perfectly in the box and wrap up on the sides. Staple into place so it won't move.
6) Put the litter box in it, hopefully you can find one that fits nice and snug, like mine. (18" x 16", it was a tight squeeze to get it in there)


FOR THE SLIDING LID:
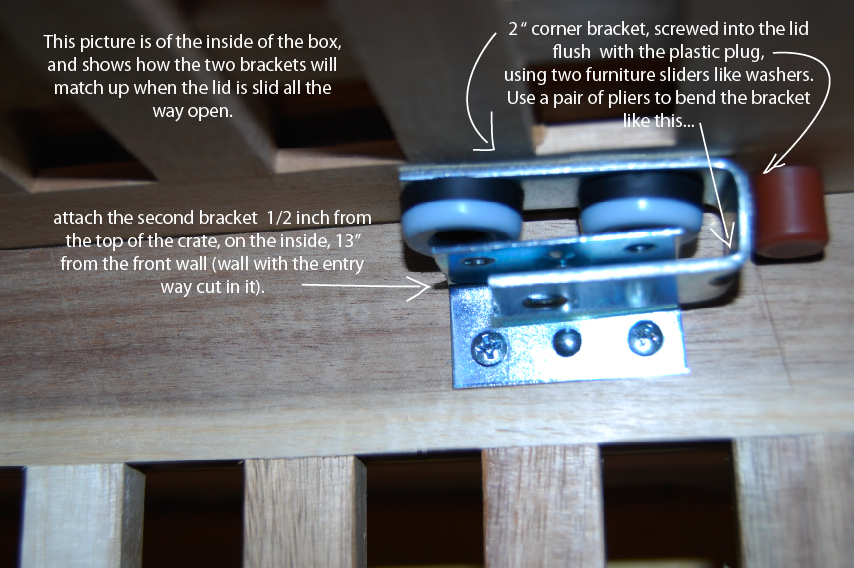
1) Put two of the plastic plugs that come with the Hol cube into one of the ends--leave the other side "un-plugged".
2) I used plastic furniture sliders to use as guides so the top will stay "on track" when you slide it open. works quite well. Place two sliders
3) I used two different metal brackets to serve as a locking mechanism, so when you slide the box all the way open the lid locks in place and will not fall off. This way you can have stuff on top of the crate and slide it open/closed without moving anything. One bracket is a 3" long corner bracket, with one of the side bent over so it will catch on the other, small bracket. This is hard to describe the positioning of these brackets, but the pictures I took should be helpful.

~ AB, Boston

Thursday, 10 February 2011

Puppy Proofing for Small Spaces


Materials: Ikea Hol Storage Bench

Description: First things first, I must give full credit to the original version of this in 2008, but who completed the answer for my dog crate situation in 2011.

My partner were awaiting our new arrival (a Cavalier King Charles Spaniel puppy), and we knew from the very beginning that we wanted to crate train him. But, as we live in a one bedroom flat, we didn't want to buy one of the huge metal crates that would look hideous in the corner of our relatively small living room. We thought about all sorts of options, and ended up googling 'innovative dog crate' into google and eventually found this fab idea on Ikea hackers.

We bought an Ikea Hol storage unit and when assembling it, we left off the lid and one end. We bought three small bolt locks from our local DIY shop and a piece of timber to reinforce the base. We screwed the locks onto what would become the front of our crate (two at the bottom and one at the top), and nailed the timber width-ways across the bottom of the unit.

Unlike the original hack, we decided not to nail the lid of the unit down so that it didn't come off, as by keeping it flexible we had not only a lockable crate, but also a puppy pen. 


To avoid the base of the unit becoming soiled/wet/wasting away/chewed, we stapled some spare carpet down, remembering to leave about 1 inch spare by the front of the crate so that the door can lock properly. We then covered this in a cut up plastic bag, which we stapled down on top of the carpet. This stopped the carpet becoming messy and acts as a waterproof layer in case the pup should tip up his water bowl/pee. We chose a strong plastic bag that was thin enough to be able to go over the edges of the base, and underneath so that any other fluid would flow out and not stand a chance of ruining the base. Finally, we lined it with newspaper for house training.

We are ecstatic with the results, and everyone who has seen the result cannot believe this is a dog crate. It fits in perfectly with the rest of our room, and as a result we bought the other smaller Ikea Hol storage unit to go with it.

This now acts as a coffee table/electricity hub which protects the pup from any cables/wires that were previously out on the floor. This was really easy to do by just cutting out a small section of the base before nailing it down when assembling it. It now houses an extension cable with a hairdryer, internet box, laptop charger and many more! We wanted a small lamp on top, and to stop the light from shining down into the box and revealing all the messy cables within, we stapled a square of canvas to the inside lid, which also stops any pens/post it notes from falling through the holes into the box.

Overall, it cost us:

�45 for the large Ikea Hol box
�18.50 for the small Ikea Hol box
�3 for the 3 hinges
�2 for the spare timber

A brilliant solution to our problem, and our pup likes it too - thank you Ikea Hackers!

~ Ruth, Cardiff, Wales

Tuesday, 5 September 2006

this hol hides a subwoofer

couldn't log into all google sites the last few days. i still can't. i think google blocked my IP address or something. and it was so frustrating not being able to blog. now i know what a blogaholic i am. :)

anyways, back to business. kalle tipped me on this clever hack that lets you hide your hi-fi subwoofer in an ikea hol storage cube. alas, the site is in french.


this is karma coming back at me for not paying attention in french class. so, monsieur christian if you're out there reading this, je suis d�sol�. and please translate the page for me. i remain votre petit �tudiant, jules. link.

tags: , ,