Showing posts with label pet furniture. Show all posts

Saturday, 1 June 2013

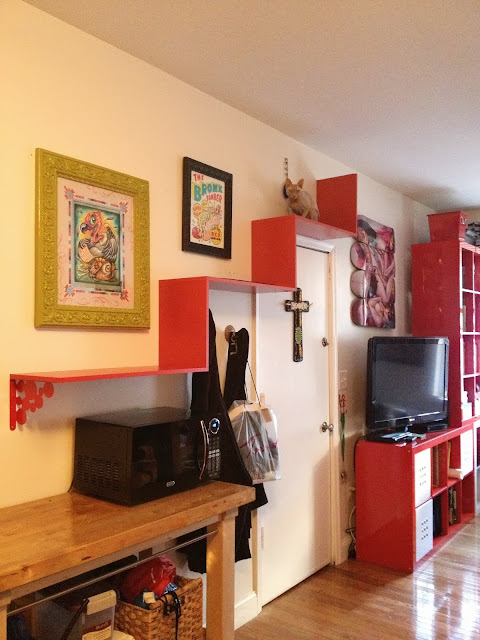
Bye Bye Lack Shelf: Alternative cat stairs


Materials: Red L brackets, red shelves from Ikea

Description: Ikea did away with the Lack shelf! So we made own! We took 5 red shelves, cut 2 in half, used the $0.50 brackets and one fancy red bracket and poof! Our own Lack! Enjoy!
Project was under $30


*we used the $2.99 bath mats and cut them in half so the shelves were soft for the cats.

~ Kristel, Fishtown- Philly

Tuesday, 21 May 2013

Cat cubby window seat with Ikea Akurum Kitchen Cabinets


Materials: Akurum Abstrakt kitchen cabinets and Ikea red pillows

Description: Akurum Abstrakt 36" wide x 24" deep x 15" high cabinets, which would normally be used above a refrigerator, were placed on the floor on a 1-1/2" high base covered with a matching Akurum base kick ripped down to size.


Holes were cut in fronts of 2 of the doors in the corner cabinet and trimmed out with the iron-on Ikea trim strips. The 2 kitty cats in the household each have their own cubby space with red Ikea pillows inside the corner cabinets.


Additional cabinets of the same size are installed around the remainder of the room perimeter and topped with custom cushions and red Ikea pillows to make window seats with storage inside the hinged door Akurum Abstrakt cabinets.

~ Lynn Bichler Architects, Mequon, Wi

Friday, 3 May 2013

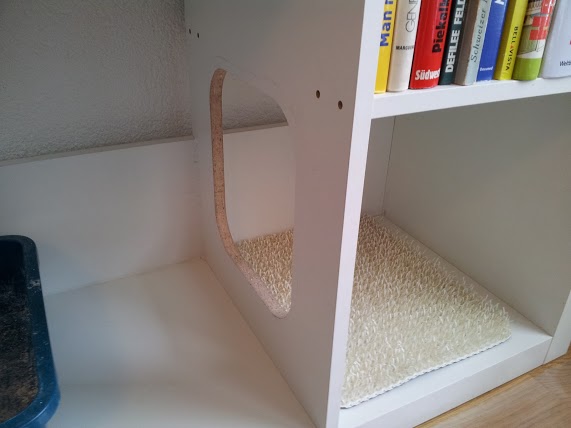
EXPEDIT Cat Litter Box


Materials: EXPEDIT / DRÄLLA

Description:
Change the 2 short boards with the long one in the middle
Drill 4 new holes in the side walls for the long board


Cut a passage on the left or right
Get a piece of wood in the color u like for the cover
For the shovel storage take a piece of the cutting board DRÄLLA and 2 long screws

...finish...

~ Trisu, Switzerland

Wednesday, 1 May 2013

Modern guinea pig cage


Materials: 4x LACK coffee table

Description: This is our new Cage made of 4 Lack coffee tables and some nice LED features :D


~ Lydia, Hamburg

Friday, 26 April 2013

Malm Dresser Turned Dog Window Seat


Materials: Malm Dresser, Paint, Plywood, Foam, Batting, Fabric, Staples, Upholstery Nails

Description: I created a window seat for our dogs so that they are able to sit and look out the window.

Instructions:

Paint dresser (optional).
Cut a piece of plywood to fit the top of the dresser.
Cut a piece of foam the same size as the plywood.
Wrap batting and fabric around to backside of plywood and staple down.
To create tufts, I used upholstery nails hammered down through the fabric, batting and foam into the plywood. (optional)


See more of the window seats for dogs.

~ Lauren, Ohio

Wednesday, 24 April 2013

A GORM villa for a hen


Materials: Gorm 78x55x174, chicken wire, a few pieces of wood, nails and screws

Description: I needed to make a movable chicken coop at a low price for a new hen, and I thought of using GORM.
I used the shelves as the end of the cage, for the compartment for the nest and its lid.

I cut out the opening for the passage to the nest, reinforcing it. Inside, with two pieces of scrap wood I made the nest, I put two panels of plywood on the sides, I made a stop at the top to access the cage with a strip and I covered it all with chicken wire hexagonal mesh.


I spray painted all over with white paint and I decorated the sides with a transferable board, covered with varnish.

A chicken coop very economical in style!
My hen Rosita thanks Ikea!

See more of the movable chicken coop.

~ Nik - Nicola Casale, Cambiano - To - Italia

Monday, 22 April 2013

LACK dog house


Materials: 5 LACK tables, elbow joints, wood screws, saw, carpet

Description: Needed a new dog house for my living room. The LACK tables ended up being the perfect size to make a dog house for a smaller dog. I attached the walls from the inside using elbow joints and wood screws. I carpeted the inside on all sides then I used a shag carpet on the floor for some extra comfort.

~ Tom, Sacramento

Wednesday, 10 April 2013

Indoor Custom Dog House


Materials: IKEA MALM 2 Drawer Chest

Description: Materials: 1 Malm 2 drawer chest 60x55 cm / assorted colors

Description: If you are like me, searching for a nice, cheap, well built indoor dog house for our small dog breeds was tough. As I searched multiple websites, I couldn't find anything under 100 dollars that looked decent that was made of wood material. I was at Ikea one day and noticed a Malm 2 drawer chest... then a lightbulb lit in my head. So here is a simple, easy project that I hope you all enjoy. My Yorkie is 9 lbs so I feel this Indoor Dog house is good for breeds 10 lbs and smaller. Project took approx. 30 mins.

Out of the box you will notice two large panels that have 2 rows of metal tracks already installed. you will need a small Phillips screwdriver to remove the 4 screws on each panel.


Next, install three of the support studs as shown in my photos. Do not install the stud that would originally separate the two drawers at the front of the chest. This will allow room for the opening of the front.

Once you have completed the outer frame of the dog house, the last step is to use the 2 panels that would originally be used for the drawer faces. These two panels will be used for the front of the dog house as shown. I started by installing the top panel first. I secured the top panel simply by hammering two nails, one on each side. I used two two inch nails. Since they were grey, I used a sharpie to color the tops so they could seem hidden.

The final step is to install the final drawer panel in an upright position. As you can see, I installed mine on the left side of the chest. Left or right is up to you. Once to position, use nails to secure it in place. I also bought a small bathroom mat from Ikea to use for the bottom. Congrats on your new dog house :)

~ Alex Gomez, San Diego, Ca

Tuesday, 9 April 2013

Satta Sitter for Aquarium Light


Materials: Satta knob pulls and 5-minute epoxy

Description: I purchased a light with a gooseneck boom that was too short to get the light centered over the tank.

I had it sitting on the tank opening acrylic lip but that looked bad and incomplete. I allowed a lot of moisture to condense on the fixture, as well.

I needed it to sit about 2 1/2" off the glass.


After considering some metal strip style pulls, I saw and realized how perfect acrylic was when I found the Satta knobs at $1.99 each for 6.

I also realized, instead of somehow using the screws I would epoxy two together at the ends to create 4 mini columns or stand-offs.

My favorite part? The two Sattas glued together are exactly 2 1/2" high. Plus the lucite/plastic nobs capture the magic of the LEDs with a nice glow. Lots of fun!

~ Clayton Smith, San Diego, CA

Tuesday, 26 March 2013

Gorm shelves into a fantabulous cat house


Materials: Gorm shelving unit (x4)

Description: Our 3 cats were in need of some extra space. They seemed to be outgrowing their small-ish enclosure and it was increasingly difficult to have to take them out and let them loose indoors since I was developing a bit of an allergy to their fur.

We had a narrow space behind the house which was roofed and enclosed by grills (e.g. bars on windows - quite common here in Malaysia), but was effectively still "open to the elements" and therefore quite airy. This was initially planned as an extra "wet-kitchen" for us, as well as a place for the washing machine which we didn't want running inside the house. However, we barely used it for anything other than washing so decided we could locate the cats there. They would be safe from access by the public/strangers but still effectively be outdoors.

My wife and I were considering various options; from having a new enclosure tailor built, to thinking about what could be modified to suit the purpose. In searching for inspiration online, we came across the chicken coop hack here on Ikeahackers (what luck!) and decided we could probably use something from IKEA as a starting point.


One trip to IKEA and we had it! The base enclosure is made of 3 large (55cm deep) Gorm shelves, tied together with bolts. We put heavy plastic netting around the entire thing, making sure to bolt the netting underneath the vertical beams of the shelf so as to hold them tightly in place. On the side, at about waist level, we fashioned a door using leftovers and offcuts of the basic materials we used in the rest of the build; this is nicely hinged and has a latch, and is used for retrieving/placing the cats from/to the enclosure, or for us to place food etc. The entire left side of the enclosure opens up for us to access litter and main water and food containers.

On the top we attached a smaller Gorm shelf (33cm depth) sitting horizontally to form a "penthouse" for the cats. This is accessed via a purpose built "staircase" through the centre unit of the base/bottom enclosure. The side of the penthouse opens up for us to access or to be left open when we want more air in/out. So far we found the cats to really like being in this top compartment. There enclosure rests against a wall, restricting visibility outside. The penthouse sits just above this wall, so I think the cats like being there to enjoy the nice view they get of trees and birds flying around.

The access door on the side has proven to be really useful, and was well worth the extra effort to build it. The solid hinges are really appreciated each time we open the door - feels very reassuring and "proper" (these are the chunky kind with nylon washers for smoothness, think they are used for normal doors). We attached a knob from some other IKEA build that didnt need it, and also added a latch to close and secure in the evenings. Each evening my wife really loves propping the door open and sitting on a stool outside the enclosure; taking the cats out in turns to cuddle them.

This was a 2 day build by me and my wife. We used mostly tools around the house and mainly had to buy netting, lots of screws, cable ties, in addition to the 4 Gorm units used. Looking at it now, we're really happy with it; it provides plenty of space for the three cats, and given the space constraint we had really is much better than anything we could have bought ready made. Is it better than having a tailor/purpose built enclosure? Time will tell I suppose!

Whats left now is to finish the wood. A bit confused as to what to do to seal/ finish/protect it, especially from termites. Appreciate any input and comments anyone has, on the build and especially on this front.

~ Cat-fanatic, Malaysia

Tuesday, 19 February 2013

EXPEDIT shelving unit + total kitty litter disguise


Materials: EXPEDIT 2x4 shelving unit, EXPEDIT insert with door, cat flap, drill, jigsaw, box cutter

Description: I share a studio apartment with a furry young gentleman named Peanut. He's a great roommate, but his litter box clashes with my aesthetic - not to mention the precious square footage that it occupies. So when I bought a new bookshelf for my entryway, I decided to make it double as a litter box hideaway as well.

This is a great hack because you're only sacrificing one row of shelves - the top three rows can still be used for storage. I left the top four cubes open and stuck KNIPSA baskets in the bottom two. You also don't have to buy much in addition to the shelving unit itself, since most of the construction will make use of repurposed unused pieces (except of course for the cat flap - I bought mine on Amazon for about $12).


Start by assembling the EXPEDIT unit, skipping the shelf divider on the bottom (so that the bottom shelf isn't divided into two separate cubes). There may be wooden pegs sticking out where the shelf divider should be; you can just saw or sand those down. Don't throw out the unused shelf divider, though - you'll need it later!

Before you assemble the EXPEDIT insert with door, lay the insert flat and use a boxcutter to slice off the right side (the side that would have lined up with the bottom shelf divider, if you hadn't skipped the bottom shelf divider). Assemble and install the insert on the left side of the bottom shelf.

Now you have a bottom shelf that's half-closed - the spare shelf divider is going to become the other half. Right now it's a bit too long to fit neatly next to the door, so cut it down to size using a jigsaw (or a handsaw and some serious elbow grease) to trim about 1" off the short edge. Next, install the cat flap in the center of this panel according to the instructions on the flap.

Slide the panel into the front of the shelving unit, wedging it tightly in place next to the door insert. You can open the door to place the litter box inside, and your kitty can use the flap to step in and out.

Et voila! No big ugly litter box taking up floor space, and way less litter scattered all over the apartment.

~ Sally, Brooklyn, NY

Sunday, 17 February 2013

IVAR jird's cage


Materials: IVAR shelf, plywood, acrylic glass, hinges, ...

Description: I used an IVAR shelf as framework for my jird's cage. At the moment, it houses 3 fat-tailed jirds and 6 bushy-tailed jirds.


The cage is in total 2,28m high (1,80m on the right), 0,50m deep and in an L-shape: from left to right: two 80cm-shelves, a corner element and a 80cm-shelf shortened to about 65cm, so that it fits exactly in the corner.

I finished the shelves with clear paint, fulfilling the German DIN EN 71-3-Norm (safety of toys, so the paint is not poisonous for the rodents and resistant against the urine).

The back is made of 4mm-plywood, at the front side I fitted acrylic glass in aluminum U-profiles, so they are easily removable for cleaning. The doors were made from 2x4cm laths and chicken wire. A few hinges and locks and voila, there is the jird's palace!

In the spare room on the left fit's an 80cm-Aquarium and there's storing room in the cabinet.
And the cats also love the IVAR!

~ Cryptomon, Germany

Friday, 15 February 2013

IVAR jird's cage


Materials: IVAR shelf, plywood, acrylic glass, hinges, ...

Description: I used an IVAR shelf as framework for my jird's cage. At the moment, it houses 3 fat-tailed jirds and 6 bushy-tailed jirds.


The cage is in total 2,28m high (1,80m on the right), 0,50m deep and in an L-shape: from left to right: two 80cm-shelves, a corner element and a 80cm-shelf shortened to about 65cm, so that it fits exactly in the corner.

I finished the shelves with clear paint, fulfilling the German DIN EN 71-3-Norm (safety of toys, so the paint is not poisonous for the rodents and resistant against the urine).

The back is made of 4mm-plywood, at the front side I fitted acrylic glass in aluminum U-profiles, so they are easily removable for cleaning. The doors were made from 2x4cm laths and chicken wire. A few hinges and locks and voila, there is the jird's palace!

In the spare room on the left fit's an 80cm-Aquarium and there's storing room in the cabinet.
And the cats also love the IVAR!

~ Cryptomon, Germany

Monday, 11 February 2013

EXPEDIT shelving unit + total kitty litter disguise


Materials: EXPEDIT 2x4 shelving unit, EXPEDIT insert with door, cat flap, drill, jigsaw, box cutter

Description: I share a studio apartment with a furry young gentleman named Peanut. He's a great roommate, but his litter box clashes with my aesthetic - not to mention the precious square footage that it occupies. So when I bought a new bookshelf for my entryway, I decided to make it double as a litter box hideaway as well.

This is a great hack because you're only sacrificing one row of shelves - the top three rows can still be used for storage. I left the top four cubes open and stuck KNIPSA baskets in the bottom two. You also don't have to buy much in addition to the shelving unit itself, since most of the construction will make use of repurposed unused pieces (except of course for the cat flap - I bought mine on Amazon for about $12).


Start by assembling the EXPEDIT unit, skipping the shelf divider on the bottom (so that the bottom shelf isn't divided into two separate cubes). There may be wooden pegs sticking out where the shelf divider should be; you can just saw or sand those down. Don't throw out the unused shelf divider, though - you'll need it later!

Before you assemble the EXPEDIT insert with door, lay the insert flat and use a boxcutter to slice off the right side (the side that would have lined up with the bottom shelf divider, if you hadn't skipped the bottom shelf divider). Assemble and install the insert on the left side of the bottom shelf.

Now you have a bottom shelf that's half-closed - the spare shelf divider is going to become the other half. Right now it's a bit too long to fit neatly next to the door, so cut it down to size using a jigsaw (or a handsaw and some serious elbow grease) to trim about 1" off the short edge. Next, install the cat flap in the center of this panel according to the instructions on the flap.

Slide the panel into the front of the shelving unit, wedging it tightly in place next to the door insert. You can open the door to place the litter box inside, and your kitty can use the flap to step in and out.

Et voila! No big ugly litter box taking up floor space, and way less litter scattered all over the apartment.

~ Sally, Brooklyn, NY