Monday 30 April 2012

The Gear Project 2


Materials: RIBBA 25x25 photo frame, 3D-printer, imagination and lots of time.

Description: I don't know if you will call this a hack. It is built around the IKEA RIBBA frames. But there are lots more to it.

Over all it is a kinetic piece of art. I got the idea after I had created the "Gear Painting". If I could print gears... Then why not universal joints? After some testing there was no way back, I just had to do it. :)

I designed the project in SketchUp and printed out all the parts that was not metal and frames. Lot's of effort was put in to measuring distances and cutting holes in the frames.


All parts that spins sits on ball bearings for a smooth and quiet operation.

The LEDs are controlled with a small remote and the movement can be turned of with a Nexa remote socket breaker.

This is a very short description of the project. But I have a more detailed version here.

You can also download all the drawings and STL:s from Thingiverse here

I will add a small movie as soon as I have made one. :)

~ Erik Pettersson, Enk�ping, Sweden

Malm dressers become built in!


Materials: 2 Malm 4 drawer dressers, 1 Malm bedside table

Description: On the first wall I used the bottom halves of 2 4 drawer Malm dressers, topped by a 3' x 8' trim panel from a Adel medium brown kitchen. I used additional trim panel wood to create the shelves at the end.


One the second wall, I used the tops of the dressers which still have. I just put them together after sawing the bottom halves off of both. Then I sawed the bottom off one of the bedside tables and mounted it on drawer slides. It slides to the side revealing a new laundry chute.


Both dressers are recessed into the walls of the room, effectively creating an extra foot of space in this relatively small bedroom. The dresser on the exterior wall has a small bookshelf area in the middle, this allowed me to leave support in place since it is a bearing wall.

~ Steve M, Pittsburgh, PA

$10 MALM facelift, huge impact


Materials: MALM four drawer unit, spray adhesive, inexpense engineer print, digital photo

Description: I wanted to customize my boring MALM dresser and after searching for inspiration I found only fabric, wallpaper and wood trims being applied to the dresser fronts. I decided, as a photographer/mom who loves her kids' faces/decorator obsessed with OVERSIZEness, that I should go with a photo.

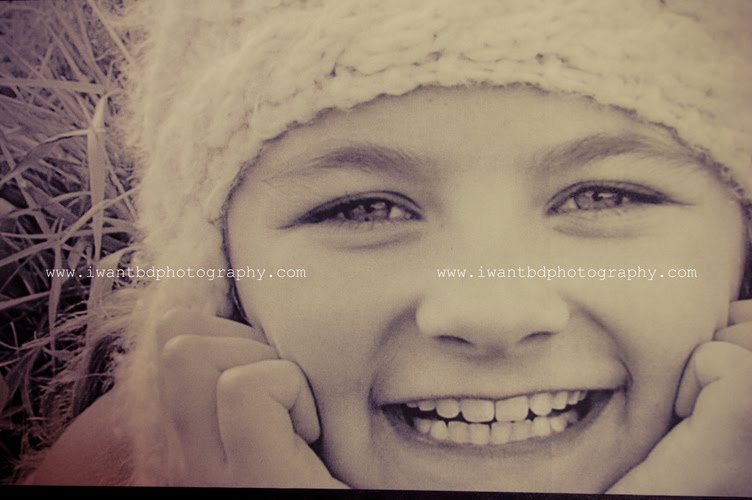
I knew that you could get super cheap larger than life black and whites at your local copy shop (staples, office depot). Take in your digital file and ask for an engineer's print, aka blueprint. I prepared by cropping my image square, 32x32 (your Malm drawer width is 32 inches and the height is 8 inches) since I have the four drawer variety.


You can customize this according to which Malm you have. Once trimmed to four pieces, all 32x8, I applied them to the drawer fronts with 3M spray adhesive. It helps to remove the drawers, and stand them up so you can lie the paper flat. Once you have a sure fit, lift one half of the paper, spray the drawer front under it, and smooth it onto the sprayed drawer. It will stick right away, securing it in place while you repeat with the other half. I did not use Mod Podge as it would probably cause the print to bubble and smear.

The blueprints are said to be "not photo quality" so don't expect perfection for $3.19, but I don't think it looks bad at all! Also, when working with your picture, consider where the cuts will go so it is not distracting (cutting thru words or faces for example). Best of luck!!

See more of the Malm makeover.

~ Bridgette Davis

***

Let's welcome our new site sponsor, PANYL. 

Just as this post is about decorating the front panels of your IKEA furniture, let's rant a little about the limited surface finishes we have at IKEA - the beech, the birch, the whites, the reds, the browns and even more meh. Well, now, say hello to new possibilities with PANYL, the brainchild of Dan and Tristam. PANYL is a ?exible self-adhesive vinyl ?lm. Some thing like tape, but without the nasty residue or markings of any kind if you remove it.  Unlike tape, it is much  ?rmer and more rigid, yet malleable enough to be wrapped around gentle contours and edges. Which means, you and I can apply PANYL without any special tools or training.

The most wonderful thing is, PANYL currently stocks 34 patterns, in solid colors, woodgrains, and a handful of specialty ?nishes like brushed aluminum. Their finishes fit the Expedit, Best� Tombo, Framst� and Ekby J�rpen but there's definitely more in the pipeline. Take a look at some of their colourful goodies.


This sky blue finish is just so easy on the eyes, don't you think? You can also get creative with their finishes. The chevrons on the Expedit is simply amazing. I really want that for mine. 


Well, maybe it's time I update the look of my Expedit. How about you? Go take a look at PANYL.

~ Jules

Make Freden Sink Cabinet Sinkless


Materials: Freden sink cabinet, wood planks of choice

Description: I found a stack of Freden sink cabinets at Ikea for incredibly cheap, and I thought it would make a nice corner cabinet to put mail, keys, family photos, etc... on, as well storing a few things inside.

First, assemble the cabinet as per instructions. The cabinet comes with adjustable feet and stainless steel feet covers that I chose to keep aside for a later project.


After assembling, cut your desired wood top to size and paint if you'd like. Screw some wood blocks (or shelf pegs) at the correct depth to set the wood top inside the cabinet sides.

Drop the wood in and enjoy your little corner cabinet!

~ Dan, Adelaide, Australia

Sunday 29 April 2012

Lack Table Face Lift


Materials: 2 Lack side tables, tools to assemble table, PL Premium Adhesive

Description: You fully make 1 of the tables as directed and then take the top from the other table and glue them to the bottom of the fully assembled table using PL Premium construction adhesive and voila new much more attractive expensive looking tables! I bunched mine together as a slim coffee table and the ottomans I already had on hand happened to fit in perfectly as a happy accident.


Just be careful with the glue and defiantly wipe up any extra, I have spots I didn't clean so well and it has yellowed over time.

See more of the Lack table face lift.

~ Erin Hall, Hamilton, ON Canada

Customise your Lack with Gesso


Materials:
Lack table

Description:
I gessoed the table completely then applied torn bits of paper from magazines, ads, show tickets, bus tickets, letters, stamps, a few scraps of handmade papers I had lying around, junk mail, you name it, using a matt acrylic medium. After it was dry I applied a coat of satin varnish acrylic medium.

See more of the gessoed Lack table.

~ Susan Avishai, Toronto

Make your LACK table a monochrome unicum


Materials: LACK table, 4 rolls of black tape

Description: I had an old square LACK table for roundabout 5�. After a few removals the clean white soul of my table was very scuffed and shabby. So I decided to hack it. Due to deficiency of cash and time, I chose 4 rolls of cheap black tape. And the rest is history.

~ Jan Petter, Leipzig, Deutschland

Smile ... you're on KNAPPA camera!


IKEA is shaking things up, again. Hot on the announcement of its new line of integrated home entertainment, Uppleva, the big blue & yellow is revealing an unexpected item - a cardboard digital camera! Well, we've had a camera hacked before but the Knappa is an entirely different thing. The camera is released as part of its new PS line, due to hit stores late 2012.


Rumour has it that the Knappa will be given away to people who buy the new PS line. IKEA hopes they will  then take photos of the PS line in their homes and share the images on Ikea's website, to stir up serious home envy. Clever marketing, I must say!


Now, back to the cam. It is extremely basic, with manual zoom and image stabilizer (as you can see from the video). It is made out of an integrated camera module, memory, USB port, two AAA batteries, all sandwiched between two sheets of cardboard. At one time, you can snap about 40 pictures. Just don't take it to the beach.

The bummer is, the Knappa will only be offered in select stores worldwide. I know it's a slick marketing gimmick but oh, what a cute one. I am smiling and ready for a Knappa.

Only LACK to hack


Materials: Lack

Description: Only LACK table.

The vertical panel comprises two parts. A lower U-shaped panel and the other is a 4 row of LACK tables. The top piece is glued and screwed with some metal plates. Both parts support its weight on the bottom and are subject to hooks on the wall to keep from falling forward.

The cabinet is composed of panels of the LACK table cut in 3/4 and LACK table legs. The pieces are just glued together. The cabinet doors are Lack shelves.


The living room coffee table consists of 6 LACK table tops. And the pieces are glued and nailed.

~ Carlos Alberto Lara Carretero, Valdemorillo, Spain

LEKSVIK floating TV stand


Materials: LEKSVIK coffee table, 1 x 12 x 10 #2 Whitewood Pine Board (lowes), Simpson Strong-Tie Angle (x3), white trim semi gloss paint, Stripper Gel, Wood strength glue, white decorative cable cover, Cordless drill and drill bits, Stud Finder, Circular Saw.

Description:
I was inspired by this hack.

To make it easier to hack, I tried to reuse the IKEA assembly mechanism (bolts and screws) that the table had, to make this easy with just a few cuts.

First, disassemble the table keeping in mind what part of the table you're gonna use. (see picture with doodle). I wanted to have enough space in the shelves to fit DVD's, games and my kids Wii console. Cut the shelves to your desired length.


My table was painted over, so I stripped the paint off with Stripper Gel and later painted it white with leftover semi-gloss trim paint to match the wall panel, that way it blends as part of the wall. After it dries, put it back together as you would right out of the box.

Placing it on the wall is the tricky part, it's heavy piece, so that's why I used very strong and large tie-angles to hold it in place, and also *very important* to use a stud finder and screw the angles directly to the 2x4 inside your wall, so it holds in place without the risk of coming apart or falling.

Finally, glue the painted pine board to the top and guide all the TV cables through the white cable cover and VOILA!

~ Daniel R, Atlanta, GA

Saturday 28 April 2012

GRONO & LERBERG LED Lights


Materials: Grono Lamp and Lerberg DVD rack

Description: Remote controlled multi-colour self adhesive LED lighting strip was used for these hacks. For the Grono the LED strip was mounted on a section of square plastic drainpipe (you can see the remote control sensor in the picture).


For the Lerberg a rectangle of frosted perspex was mounted behind the metal frame using clear silicon. Holes were then drilled in the perspex so the original mounting brackets could be refitted.


The LEDs were fitted to a length of rectangular plastic fan ducting.

~ Nick, UK

Tying in Lersta


Materials: Ikea-Lersta Reading/floor lamp, lamp shade, spray paint, Rayon Crepe Cord

Description: We moved a year ago into our new house. This was the perfect opportunity to create a new style for our living room.

Coming form Germany and moving to the UK, I wanted to have a Mixture of British and German elements.

I opted for red wall paint,red velvet curtains, red footstools.....you get the picture.

After all the redecorating, my old floor-lamp in my reading-corner did not fit in any more.


Lamp, before

Being a stingy German, I did not wanted to throw the lamp away and buy a new one.

So I decided to make it fit:
I bought a red lamp shade, a 200ml can of black spray paint and 4 metres of 4mm thick golden Rayon Crepe Cord.

First I removed the Aluminium Shade.

Then I bent the flexible part of the lamp into the desired form and fixed it with some yarn.

I masked off the thread and the cord and sprayed the whole base black.

As soon as the paint completely dried, I removed the masking tape.
Then I covered the yarn with the golden Rayon Crepe Cord. I left the ends of the cord long and added a second part of cord, so I had four long cord ends hanging down.

I cut each end a different length and made a knot in each aprox 7 cm from the end. Than I frayed the ends to gain some kind of tassels.

Finally I fixed the new lamp-shade onto the base, and.....TADA: the clinical looking old Lersta is now perfectly tied (pun intended) into our new living room decor.

~ Gregor Dobschutz, London, UK

Curtain panel bluff and room divider

After with Panel Curtain Room Divider!
Before

Materials: IRJA Curtain rod set, Riktig curtain loops/hooks, Betydlig ceiling brackets, KAJSA curtain panels,Drill, screwdriver, hammer, hacksaw, mounting screws

Description: I wanted the look of the curtain panels but didn't want to double the cost by using the recommended rails and sliders.


Before
After

This is two related projects as they all include the same/similar hardware

1. Room divider
2. Closet "Bluff"


I inherited one, clearly IKEA. The only project that required cutting the rod with the hacksaw was the Bluff. The other rod slides open.

I used two Betydlig ceiling brackets per project @$1.49 each. Easy to mount with the option to easily raise/lower or slide the bracket back/front.


Instead of cutting the curtain panels, I rolled up the excess on the tube it came on and, for pinned them up. The weight gives it the right look with out the recommended hardware. You can also slip in a short piece of the remaining rod in if you want more weight.


The loops work well, too! Five per panel is perfect.

~ Clayton Smith, San Diego, CA