Showing posts with label bedroom. Show all posts

Saturday, 16 August 2014

Improved and lowered Malm Nightstand


Materials: 2x MALM Chest with 2 drawers, black-brown

Description: We bought two small Malm Chests as nightstands but I the height of them annoyed me real quick.

So we cut off the lower half of each Malm and attached the remaining pieces to the back so you'd receive a nightstand looking like the old Malm nightstand.


We added a power socket to the top and mounted our selfmade lamps to the back plate.

Only thing I had to buy were the sockets, matching covers and two tiny hooks for the lampshades.

~ fabsn182, Würzburg, Germany

Saturday, 8 February 2014

Improved and lowered Malm Nightstand


Materials: 2x MALM Chest with 2 drawers, black-brown

Description: We bought two small Malm Chests as nightstands but I the height of them annoyed me real quick.

So we cut off the lower half of each Malm and attached the remaining pieces to the back so you'd receive a nightstand looking like the old Malm nightstand.


We added a power socket to the top and mounted our selfmade lamps to the back plate.

Only thing I had to buy were the sockets, matching covers and two tiny hooks for the lampshades.

~ fabsn182, Würzburg, Germany

Wednesday, 8 May 2013

Very hacky in Berlin - 10m² full of storage


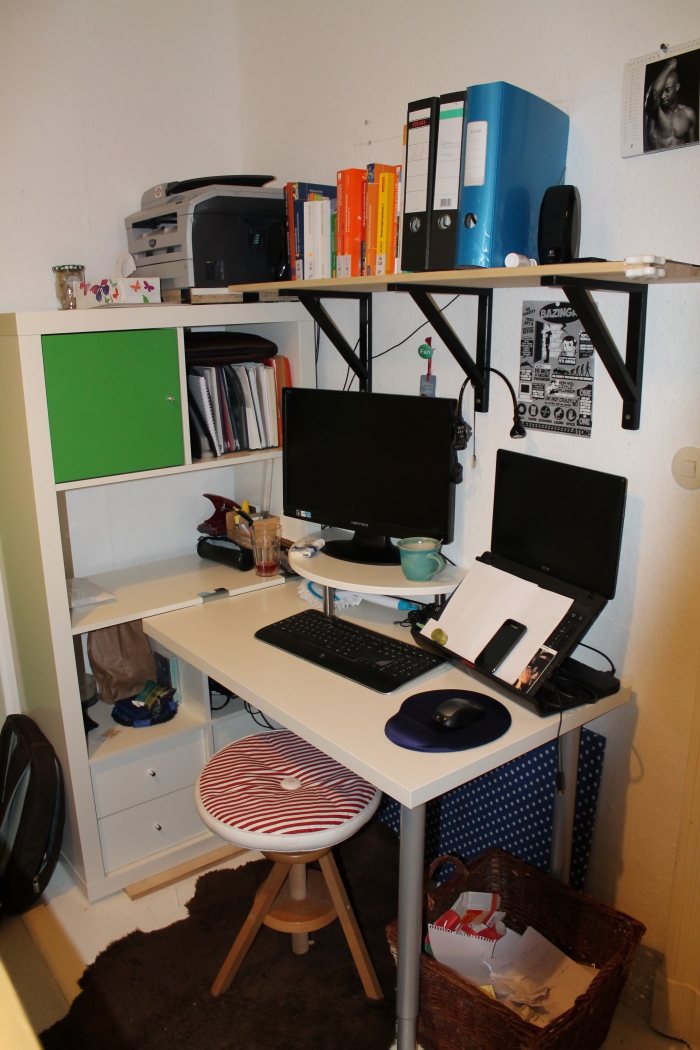
Materials: Mandal bed, Capita legs 11 & 21 cm, Galant extention & shelf, two 2x4-Expedit, two 1x5-Expedit, two Vika Kaj, 100cm Linnmon Tabletop, Expedit desk mounting

Description: Last year I moved to Berlin to start my masters degree. I found a wonderful flat mate that I totally wanted to live with. Only weak point: the room for rent was only ~10m². After 3 month of planning, searching hacks and forums, I came up with a plan to get most of my stuff from my previous 20m² to the new tiny room.


1) Mandal bed mounted on 1x5-Expedit

I love the Mandal bed frame since I first saw the black edition at my local Ikea years ago. On IKEAHackers I found tons of DIY-bedframes made from Expedit shelves, which gives you lots of space for storage - in the shelves and underneath the bed.

So the idea was to mount my favorite bedframe on two narrow Expedit. It is pretty simple. You put together the bedframe as described by the manual BUT you do not attach the white bars, that come with it as a base. The 1x5-Expedits are assembled like the manual says. Put them down on their long sides and place the bedframe on top. You can fix the bed by putting long screws (~8cm?) trough the holes where the base is normally screwed on. Voila, bed with lots of storage :)

2) 2x4-Expedit meets Linnmon (Amon in Germany)


Next I needed a desk with storage for books, folders etc. My first choice would have been the Expedit desk combination but there is not enough space for a 80cm deep table. So I got a 2x4-Expedit and the mounting for the desk (from the IKEA service counter) but not the desk itself.

Instead I bought the smallest Linnmon tabletop and the adjustable Vika Kaj legs. I put together the Expedit but left the vertical part in the second row from top out. This is where I connected the Linnmon Tabletop. To mount my monitor I attached 11cm Capita legs to the small half round Galant extention, like I had seen in my local Ikea.

3) Mounted TV


Yeah, not exactly new...but it belongs to my room. Since my bed is 90cm high I needed to mount my TV to see more than just the upper part of the picture, while sitting on the bed. So I bought the Galant shelv and screwed Capita 21cm to it. It has the perfect width for my TV and there is space under it for DVD-player and photos.

So, that's my room, basically. There are also two Grundtal drying racks, mounted high on the wall but that is not exactly a hack. Just using the ~3m of wall :)

And just if you wonder about the red and grey blankets - thats sleeping places the cats choose. If we miss one of the kittys, just look under my bed ;)

~ Bianca, Berlin, Germany

Monday, 8 April 2013

Up the bed


Materials: Kura + Grankulla

Description: Basically I open the structure of the sofa Grankulla and put to Kura bed on it. I cut the excess wood and held these two with angle supports. Then I finished with wood footer around the structure, and that's all!!


~ Rui Ricardo, Lisbon, Portugal

Friday, 29 March 2013

Kura bed to loft bed hack


Materials: Kura Bed, 3x2 Wood

Description: Please note, make sure you use strong enough fixings to secure the bed to the wall, if you are fixing to a plasterboard/drywall wall you will need to secure it to the studs, DO NOT SECURE IT TO THE PLASTERBOARD!!!!!!

I did this hack with the bed fully built and on my own, but you could modify it in pieces if you find it easier, and a second person would help make it easier, this took me about 3 hours but would be quicker if I had a second pair of hands. This need to be done in a corner of the room as you need 2 sides supported.

You will need.
1 x Kura Bed
1 x 3m length of wood (about 3" x 2"€)
Some suitable wall fixings and screws, and some basic tools.


1. Saw through the 5 upright supports just below the main bed section to leave the top part of the bed with the slats in place, if you're careful and use a hand saw you can saw all the legs and the bed just rests on top of the frame, the cuts should be flush with the bottom of the main bed section.

2. Lift off the top part of the bed and put to one side.

3. Take apart the remainder of the lower frame and ladder and put all the pieces to one side, making sure you know which parts are the original ladder treads.

4. Decide how tall you want the bed to be, I made the bottom of the bed 1.7m from the ground, (we have high ceilings) this is about as tall as you want to go, but you can go lower if you want, using a long level mark a straight level line along the wall at the height you decide the base of the bed to be (mark the longest side)

5. Cut a piece of your 3x2 wood to the same length as the bed (about 2.1m) I cut a slight angle on the exposed end so it looked nicer and less chance of hitting the corner with you head.

6. Pre drill about 6 pilot holes in the wood at regular intervals.

7. Hold the wood up to your line on the wall (this is where a second person would be helpful) and then using the pilot drill, drill through each hole so it marks the wall behind.

8. Now depending on the wall type either drill and fix wall plugs or if it'€™s a stud wall just pre drill a pilot hole. (An SDS Plus drill will give a nice accurate hole in solid walls, a hammer drill is rubbish and normally makes an oval hole, and takes 5 times a long to drill it)

9. Screw 6 screws part way into the wood so they just stick out the other side this will help line up the wood on the wall, offer it up to the wall and screw it on, check it'€™s nice and strong by hanging from it, if it moves you need to brush up on your DIY skills, ask your wife for some tips.

10. Repeat above steps for the shorter piece of wood to go along the other side, the left over piece of 3x2 should be the correct length already and has the correct angle on it as well.

11. Next you need to lift the bed up to the new wood supports and prop up the other side near where the ladder will be, I used an adjustable plasterboard prop to hold it up but a piece of wood will do, using a level get the bed nice and level and then prop it up.

12. Next take the two long pieces of wood from the base of the bed you disassembled earlier, this will form the new sides of the ladder, these will have a dowel in each end, find a small piece of the base which you can use to make the first run of the ladder, this goes flat on the floor so will be wider than the rest of the steps, you need to fit this piece temporarily to get the correct height (see photos of the ladder to see what I mean) once you have this in place offer it up to the bed and using a level check it is vertical and then measure and mark the height and cut it, repeat for the other side. (The ladder goes from the floor to the very top edge of the bed, its screwed to the front edge in order the make the bed more secure, and not fitted flush like it was originally, if you don't do this the side of the bed that stops you falling out will be too flimsy)

13. Once you have both sides cut you need to make the steps, you will have two steps from the old ladder to use as a guide to get the correct length, but you will need 2 or 3 more depending on the height you made the bed. Try to keep even spacing between the steps and keep the gap the same as the original ones to make climbing the ladder safe, this gap size was set by IKEA for a reason, best not to alter it.

14. Next is probably the hardest part, I cut the steps to length using the two originals as a guide, and then drilled holes in each for the dowels, if your careful you can re use some of the original holes and therefore use the original bolts and fixings for most of the steps, if you can’t use the original fixings just secure each step with 2 screws each side to stop it twisting, pre drill holes to avoid splitting the wood. I only had a few that I needed to screw.

15. To mark the step gaps out on the 2 uprights lay them side by side and then using a tape measure and square mark both pieces at the same time, then they will all line up.

16. Secure the steps to the ladder.

17. Once the ladder is built offer it up to the bed, check its still level then clamp the ladder to the bed and secure with 6 screws (3 on each side) you can also add some L brackets to the back of the ladder where it joins the bed if you want, I didn't but may do so in the future for peace of mind.

18. Now make sure the bed if fully pressed into the walls on both sides and secure it to the wooden wall supports by drilling some angled pilot holes from below, then you screw through the 3x2 at an angle so it also screws in the bed frame, do this about every 30cms on both edges.

19. All done, make sure it's sturdy, mine doesn'€™t move at all, even with me climbing the ladder, it's much stronger that it was originally, now settle to down to a nice dinner of meatballs and gravy, with added horse for flavour.

The desk below is all Ikea as well, Vika Amon tops secured to Besta shelf units on legs and a few Lack shelves.
Top tips for wood working and fixing screws is buy a cordless Impact driver, one you have used one of these you will never want to use a cordless drill again for putting in screws.

~ Mark, Essex, UK

Thursday, 14 February 2013

Backboard for Grankulla Massum bed


Materials: Grankulla sofa/bed, wood planks, screws

Description: I made this hack, because I use this sofa/bed only as a bed and I needed the back rest.

First I made a drawing in computer (also added with pictures), so the new part would be the same as original one, and then made these planks and put it together.


When it was made, I added upholstered and embroidered foam mattress to the backboard.

~ Piret, Estonia

Tuesday, 5 February 2013

Square Headboard with space to hide electricals


Materials: Brimnes bed, Lack wall shelf, Vika Amon, Ribba ledge, Fas spotlight, Ledberg ledlights, Hampen rug

Description: Inspired by an Ikea hack by Celine "A simple and tidy headboard"

I didn't have a lot of space around the Brimnes bed, so I used the Celine's hack to create a headboard, but I used wide Ribba ledge to get space between the ledge and the edge of the Vika Amon for electrics cables.


I used Ledberg ledlights for ambiance, and bent the arms of FAS spotlight to use it for reading books.

I also used half cut Hampen rug beside the bed, and Lack wall shelf for beside table.

Finally I saved a lot of space for the door opening area, and got little storage in the headboard, with elegant aerial bedside tables.

Thanks Ikea Hack for Ideas !

Hope it could inspire you.

~ Gastan, France

Friday, 25 January 2013

Malm bed ledge hack


Materials: Malm Queen size Bed x 2, L brackets

Description: I wanted a bed ledge, but I didn't need Malm's existing slide out storage (or want to spend that much, and I like to reuse/re-purpose). I wanted a ledge the same length as my Malm Black/brown queen bed, and none of Ikea's ledges or occasional tables had the right dimensions or colour match.


1. Procure a second Malm bed (second hand wouldn't hurt the pocket as much)
2. Discard the side rails, the metals supports and the slats
3. Drill holes in your 'second' Malm bed head(keeping the first and most loved Malm scar free should you prefer) to match those on your chosen L brackets. I think I placed them 300 mm from the edge...
4. Take the second Malm's foot and align the second head to the foot to form an upside down L - the foot will become the ledge, and the head will become the second set of 'legs' to your ledge. The mark and drill the guide holes for the other side of the L brackets.


5. Place L bracket on the other side of the 'foot' and screw in.
6. (OPTIONAL) Matched L brackets to first Malm bed head. I did not do this, and with the other side screwed in, and the L brackets, it limits lateral movement of the ledge, without scarring my first Malm.

The only limitation is that the Malm foot needs to face the wall to hide it's ugly un-finishedness. But that's easy enough!


See more of the Malm bed ledge.

~ Sarah, Sydney, Australia

Wednesday, 23 January 2013

Simple But Effective Occasional Table


Materials: Lack Shelf, Vika Adils Legs

Description: A very simple hack. I didn't like the Malm occasional table (or the $130 price tag) so I built one for $34. I combined the 74" Lack Shelf with 4 Vika Adils legs. I have the low headboard Malm, for the high headboard the Vika Kaj legs would be better.

Freestanding it's not the most stable but behind the headboard its solid as a rock, it is about 1/2" lower than the headboard which provides a nice lip to keep items from falling on your head.


~ Matt Hannan, Wheat Ridge, CO

Friday, 18 January 2013

Expedit wall shelf into nightstand


Materials: Expedit wall shelf + Expedit insert with 2 drawers + 4 hairpin legs + screws + rust proof spray + drill

Description: I was searching for a nightstand for my new bedroom and I couldn't find anything that would match my vision or my price range.

After scouring the Ikea website, I decided that the Expedit wall shelf would work great as a nightstand with the addition of the Expedit insert with 2 drawers and legs. Alone the wall shelf + inserts would have sufficed as a nightstand, but I wanted some height for better flow with the height of my bed...and also, I just love hairpin legs.


I ordered my 8" legs from hairpinlegs.com in raw steel, and rust proofed them before drilling the holes and attaching them on the bottom of my assembled wall shelf. They make the legs to order and come in various sizes.

See more of the the Expedit nightstand with hairpin legs.

~ clearlytangled, San Diego, CA

Wednesday, 16 January 2013

SNIGLAR into red truck bed


Materials: Sniglar bed frame with slatted base

Description: MDF sides, front and roof were screwed into the bed frame.

The front grill is a bathroom vent and the lights are battery powered push lights, from our local DIY store.

The cupboards with green fronts were also IKEA, and conveniently matched the paint used on the walls.

A simple enough design, but our kids love it.

~ Edward's dad

Monday, 14 January 2013

Everything should float 2


Materials: EXPEDIT Wall shelf, black-brown 3/4" x 2 1/2" oak planks 1/2" oak plywod Wood glue Onyx stain Mahogony varnish Table saw Miter saw Drill press 1" forstner bit Finish nailer

Description: I was just wandering through Ikea and saw the EXPEDIT wall shelf, and liked it for a nightstand. I didn't like the idea of cords hanging down the sides, or that it was less than 16" deep. I wanted just a little more, and I wanted a way to hide the cords for my lamps, clock, etc. I also didn't like that the spacing for the wall mounts wouldn't let me mount it into a wall stud, so I'd be very limited in the weight it would support. But with just a small change....

I created a back for it, using 18"x24" pieces of 1/2" thick oak veneer plywood. I framed this plywood with 3/4" oak strips, to create a box. I lined up the unit and drilled holes for the EXPEDIT mount and (once again using the blue tape) marked where the top of the wall shelf would be. I used the forstner bit to drill two holes to pass power cords through. To mount it to the wall I used the best, simplest (and least expensive) wall mount I know of - the french cleat.


I used another 3/4" x 3" piece of my leftover plywood and ran it through the table saw, cutting it down the middle at a 45 degree angle. One piece was glued and nailed in the frame for my nightstand, the other was screwed into studs in the wall. To hang it up, I simply raise the table and lower it onto the cleat. The angle forces it down and more firmly onto the cleat. Voila! Two floating nightstands, for less than $100 total. Look at the photo of the french cleat and you'll see why I value blue tape for marking things.


~ Scott C, Southern California

Friday, 11 January 2013

An EXPEDIT Bed for kids!


Materials: 2 2x2 EXPEDIT, MALM, SULTAN LUR�Y, SULTAN HUGLO

Description: After deciding to renovate my children's bedroom, and searching this site and coming across some fantastic posts, I thought I'd give it a go.

You may recognise a lot of the hacks like this, this, this and this!

It comprises of a MALM chest of drawers, 2 x EXPEDIT, SULTAN LUR�Y bed base, a SULTAN HUGLO mattress and some 125 x 25 timber and some 25 X 25 timber spurring.

So first things first.
I needed to do a test fit of the items together with the mattress. I knew that I really needed to give the bed some stability by fixing the top to at least two walls, but with the 2 2x2 Expedit's and the MALM set of drawers the overall bed length would be too long. I will come to that later.


Bed Construction.

So as I said earlier, I needed to make sure the bed was firmly secured against the wall on two sides. I constructed the main frame from some 125 x 25mm timber (5x1 in olde English!!) and fixed it to the wall using frame fixings (The same used to fix door frames and windows etc to walls). I did this on two sides and then screwed and glued the other two sides together


As you can see from the picture, I then glued and screwed some 25x25mm battens to the base of the frames. These would act as the support for the bed slats. Also in the picture above, I have already attached one of the Expedit units to the wall. This was done again using screw fixings through the edge of the units as this is where the internal timber supports are.

You may have already noticed that the height of the MALM is lower than the overall height of the EXPEDIT, but this was rectified using a thin piece of MDF and a cut down shelf from a LACK table!!


The LUR�Y Slats resting on the 25x25

The next task was to fit the slats. As IKEA sell these separately it was just a simple case of laying them out on the battens that were in place

The battens over the MALM drawers were screwed down with 2 50mm screws. This ensured that the screws penetrated the battens, the filler pieces on top of the drawers and the drawers themselves.


The next task was a bit of a tidy up job. The gap down the side of the MALM drawers was filled in using a piece of white faced chipboard

Of course, then came two sticking points. The first was how does my son get on the bed?

That turned out to be easier than I thought. I just cut down the ladders that he originally had on his large cabin bed so they fit and after a few well chiselled groves in the bed frame, they slid into place.

The second was that my wife panicked that he would fall out of bed. After informing her that he would probably only do it once and after recovering from a black eye for such a "stupid thing to say" I went with a fence style bed guard. This were constructed from some timber that I had in my garage and two left over slats from shortening my daughters FJELLSE bed.

What about the gap at the end of the mattress you may ask. Well after some consideration I decided to turn this into a shelf. I had some left over white faced chipboard which I cut to size, screwed down and sealed around the edges. I then made a 'Headboard' of sorts in order to stop his pillows falling off the mattress.

I also constructed a desk for him and added some VIKA ALEX drawers underneath.

See more of the Expedit children's bed.

~ Simon Millward, Basingstoke, UK

Friday, 4 January 2013

Forhoja For Bed


Materials: Forhoja + Sultan Florvag + lumber + castors

Description: We were inspired by the recent hack of the Kura bunk bed as our son recently outgrew his crib. Alas, Ikea Brooklyn had no Kuras in stock, so we left with only the mattress and sheet set.

Lying around at home, gathering dust, we had the shelves from a Forhoja kitchen table/cart/sideboard thing (though ours is an older version 3-drawers wide, and no wheels). We decided these would form the headboard and footboard of the bed, we'd get some 2x3s to use for the sides and we'd use pieces from the half-broken crib to support the mattress.


We cut the ends off the Forhoja shelves to make them flush, cut the 2x3s to length, and basically just drilled and countersunk the wood before screwing everything together to form a cuboid. We screwed the slats leftover from the crib in the sides of the upper 2x3s, and then added some more lengthwise for further mattress support. We'll make this a bit neater/more functional down the line (perhaps by using a sheet of 1/4" plywood instead?) but it was bedtime on Christmas eve and we needed to get 'er done!).

We decided we might as well re-use the castors from the old crib too, so we pulled those off, drilled and banged them into place on the new bed.

As for the big gap down the side of the bed: for now, we have a couple of big, shallow trays used for storage under the bed. At a later date, we may find a drawer or two from the chipped and broken aisle that fit, and engineer those in place. Or, we may simply add a filler piece for aesthetics.

~ Peter Campbell, NYC

Monday, 31 December 2012

Space Saving Pull Out Fjellse Daybed


Materials: Fjellse Full-size Bed Frame, Sutlan Florvag, wood screws, 4
lag bolts, wood glue

Description: The whole idea for this project stemmed from our need to turn our guest room into more than just a place that gets used by friends and family 2 weeks a year. Most of our visitors are couples, so we needed more than just a standard twin daybed, the width of the space was also just a bit too small to fit a queen size bed. Enter the idea of the pull out daybed.

We started with a Fjellse bed frame and took meticulous measurements and sketched out plans to have the bed pull apart to expand to a full size bed. Using almost every single piece of wood that came with the bed and a 2X6 piece of wood, we constructed the frame. The lag bolds and a few extra wood screws were the only additions.


The middle support was cannibalized to make laminated legs (attractive and sturdy) for the frame that was made out of the headboard, baseboard, and the rails that were cut in half. We narrowed the spacing of the rails that attached to the headboard,before eventually constructed a sliding bed base out of hardwood slats (DO NOT USE PINE OR THE BED BASES SOLD AT IKEA).

Once the bed was slats were attached to the appropriate sliding side, I took some old fence boards that we cut to size to make a flat headboard, and then upholstered it using batting, DIY fabric buttons, a linen-like material, and our handy dandy staple gun.

After that, we took a serrated bread knife to an ikea foam double mattress, cut it in half before putting its back in its outer covering, and fold it in half as need for a full bed, or a day bed!

The bed fits the space perfectly and is rather comfy too!

~ Lynn, Seattle, WA