Showing posts with label craft. Show all posts

Wednesday, 15 May 2013

Easy IKEA Cabinet Makeover with shelf paper


Materials: IKEA Cabinet (no longer sold), Chevron Shelf Paper, Tape Measure or Ribbon, Scissors

Description: One of my favorite IKEA pieces in my home is this white cabinet (no longer available at IKEA) in my bedroom. Since the walls in my room are an off-white, the cabinet tends to blend in so I wanted to add something to make it POP! I decided that I would add chevron shelf paper to the back of the cabinet.

I started this project by measuring the back of the cabinet. I couldn't find my tape measure so I ended up using a piece of ribbon (also from IKEA) to measure the distance and measured the paper using the grid on the back. Before applying the paper to the back of the cabinet, I removed all of the wooden shelves.


When I started peeling the backing off of the shelf paper, I pulled too much off at once and it was a big sticky mess! After finishing the first section, I started only peeling off a small amount of the backing away from the top while smoothing the paper onto the cabinet.

I continued this process of measuring and applying the shelf paper until the entire back of the cabinet was covered.

The best part about this project? It was cheap and simple! I spent $4 on a 2-pack of shelf paper (I still have a whole roll left) and the project was complete in less than an hour.

What I love about using shelf paper on my IKEA furniture is that it's easily removable so when I get tired of chevron, I can take it off and start all over again!

See more of the IKEA cabinet with shelf paper backing.

~ Erica, Kentucky

Friday, 3 May 2013

How to turn an Ikea computer desk into a loom stand with treadles


Materials: Ikea metal computer desk, table loom, scraps of lumber, 6 inches of 1/4 inch threaded rod, nuts, bolts, 2 zip or cable ties, scissors, paracord to tie the lamms to the treadles and the levers to the lamms, pliers, wrench, pipe cutter, 4 angle braces, drill

Description: A couple of months ago, I bought the neatest loom on Kijiji.

It's a 2 harness Leclerc table loom, with a weaving width of 20 inches.

It's a joy to weave on, but my tendons were grousing about the side levers and my back was honking at me.

I figured that there had to be a cheap and cheerful way to build a stand with treadles for it.

and VOILA!!!!! (happy dance)

I have just figured out how to do it! Wheeeeeeeee!


Here'€™s the video that I made about how to convert an Ikea computer desk into a loom stand with treadles.


Or check out my blog to see more of the loom stand with treadles .

~ Noreen Crone-Findlay

Friday, 15 March 2013

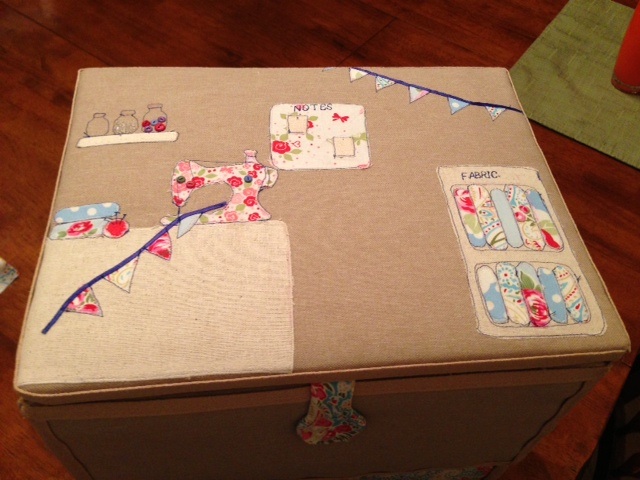
Set of drawers hacked into a sewing box


Materials: Fabric, Ikea drawers, staple gun, saw, screws, glue gun

Description: First I disassembled the drawers. Then I used hardboard to fill in the box to the correct config.
Covered with batting and fabric to upholster. Appliquéd a design for the lid. Finished with tape and voila!


~ Lady Jojo Monsoon, Santa Clarita

Monday, 4 February 2013

Valentine's Day wreath from Christmas ornaments


Materials: Ikea Christmas wreath, Ikea heart ornaments, wire hangers

Description: The Valentine's Day wreath is made from Christmas wreath (white/red polka dot garland and white fuzzy heart ornaments).


STEP 1
Take a wire hanger and shape it into a heart by pushing inward the hanger part of the hanger.


STEP 2
take the Ikea Christmas garland and tie with red wool to the wire in between the beads. Cut the garland to the exact length of the heart.

STEP 3
take fabric scraps about quarter inches wide and tear to strips. Wrap the top part of the hanger and secure with glue gun.

STEP 4
hang any heart ornaments (or those from Ikea) and glue on a bow.

Hang wherever it looks great! :)

See more of the Valentine's wreath.

~ Elvi, Brooklyn, NY

Friday, 7 December 2012

Expedit sewing/crafting/cutting table


Materials: Expedit 4x2 units, Vika Amon tabletop, Ribba picture ledge

Description: This is a cutting table for craft and sewing projects. The base is two Ikea Expedit units (4x2) that I put on their sides and connected together. To connect them together I used the brackets that come with the Expedits that are meant to connect them to the wall.

Then I attached Besta 4 inch legs (10 of them total - 5 on each Expedit) to the bottom to give the table more height (so it would be closer to counter height). This allows for the right height to cut without hunching over.

The tabletop is the Vika Amon tabletop (the one that is 59 x 29.5). I covered it in a layer of quilt batting and then fabric (the padding makes it better for ironing directly on the table). The tabletop is connected to the Expedits with L brackets from the hardware store.


On the long edge of one side of the table are two Ribba picture ledges that I cut to the right size and connected (they are screwed into the Expedit). I'm using the picture ledges to keep rulers, pencils and other tools organized. The other nice thing about attaching the Ribba is that the two Expedit units connected are wider than the tabletop. The Ribba gives it extra width to that the tabletop overhangs slightly on the other side, which looks more attractive. In addition, the overhang allowed the use of L brackets to attach the tabletop to the Expedit units.

When attaching the Ribba, I aligned them flush with the Expedit in the event I rearrange my sewing room and I want to put the table against a wall (of course, in that case, I lose access to the eight cubes on that side, but it's an option this way).

~ Summer Frace, Austin, TX

Having a crafty Christmas?

Ahh ... tinsels and carols. The season is definitely coming. And I am busy making new ornaments from IKEA JULKUL cupcake liners.

It's a first for me - making ornaments, that is. Decided not to go the store-bought route this year and so far, I am having fun.

You can check out my tutorial over at JULES.

What are you doing differently this Christmas? Or what are you crafting for the season? Let me know (or share your link with us) in the comments below. I'd love to see what you've done.


Friday, 9 November 2012

Quilt Extension Table


Materials: Akurum 18"x22" kitchen cabinet shelf

Description: I needed a quilt extension table for my sewing machine. Being that these can be very expensive and I can be very frugal. I figured I better just Ikea hack my way through this project.


I found in the Ikea As Is department a Akurum shelf that would serve as the top, next I needed some adjustable legs (Home Depot) and a few scrap blocks of wood found in my garage.

I measured the throat of my sewing machine to cut out with my jigsaw, mounted the 3x3" blocks of wood on the underside, drill pressed the hardware mount for the legs, screwed the legs into position, and voila! Only about an hours worth of work and saved myself nearly $200. Thanks Ikea! This project was completed for $11 (shelf-$7, legs-$4)

~ Sarah

Wednesday, 7 November 2012

DIY IKEA INGO Sewing Table


Materials: Ikea INGO or other dining/kitchen table with a rail under the tabletop (this tutorial is not for Ikea tables where you pick a top piece and legs separately � you need that rail underneath in order to attach the support beams that will hold your machine)

Description: Marta has a fantastic tutorial on a sewing table where your machine lies flush against the table top. It makes sewing so much easier, not to mention less aches and paints for the shoulders. ~ Jules


See the fantastic step by step tutorial on Marta's blog.

~ Marta Strzeszewski, Colorado

Monday, 9 July 2012

Versatile Expedit Crafting Table


Materials: Expedit (3 of the 2x2 bookcases), pine boards, pine edging, MDF board, varnish

Description:
1. Build the three Expedit units as per IKEA instructions.
2. Cut a sheet of MDF to size for the table top: (2*Expedit Width)*(1*Expedit Width)+1" all around. These proportions are important because they allow you ultimate versatility with the layout of the Expedit units once the table is complete. The extra inch is to allow a little wiggle room so that you don't damage the units when you lift the table top on and off.

3. Nail pine boards to cover the MDF.
4. Add the pine edging along the four edges.
5. Sand the table thoroughly, softening the corners on all of the edges.
6. Arrange the Expedit units as you wish (H or C shape for example.)
7. Lay the table top on.
8. Stain and varnish as desired. We chose a walnut stain and high gloss varnish.

The table top isn�t secured to the Expedit units. It has a lip underneath it that fits snugly over the units to prevent it from slipping from side-to-side, while still allowing us to rearrange the units to suit. The beauty of this design is that you can flip the table top (we plan to cover the underneath with felt so that we can use it as a gaming table when flipped), and you can rearrange the Expedit units as you please. It works perfectly well with 2, 3, or 4 units, so as your needs change, so does your table.


See more of the Expedit crafting table.

~ Lisa Healy, Ireland

Friday, 29 June 2012

Quilters Table with storage


Materials:
2 IKEA Expedit (2 x 4) bookcases
2 sheets of plywood (3/4"�)
5 heavy duty casters
5 washers
5 lockwashers
leftover flooring
trim
18 - 20 L-brackets

Description:
1. Assemble the two bookcases

2. Cut the two sheets of plywood down to 6 ft (cut 2 ft off the long side). The sheets will now measure 4ft x 6 ft). Paint one side of each sheet to match/coordinate the finish of your EXPEDIT pieces. In my case, I just painted them white.

3. Mount 4 of the casters in the four corners (within 6" of the edge of the long side so that they will not interfere with the bookcases), and one in the center. The casters should be mounted on the side of the plywood that is NOT painted.


4. Position the bookcases parallel to each other but with 13 1/4"� of space in between them. Position the plywood (with the casters) on top of the two bookcases. You should now have a 6" overhang on the long ends, and a 2" overhang on the short ends. Secure the the plywood and the bookcases together with L-brackets (2 on each of the short ends and 1 in the middle of the long side).


5. FOR THIS STEP ASSISTANCE IS REQUIRED !! Turn the table upright (see photo above)

6. Attach the 2nd piece of plywood (painted side down) to the top of the two bookcases, using the same measurements you used on the bottom.


7. Finish the top with the covering of your choice. I used leftover flooring for mine. In the main picture, I have attached the trim to the top but not yet to the bottom.

~ Irene Grimes

Sunday, 17 June 2012

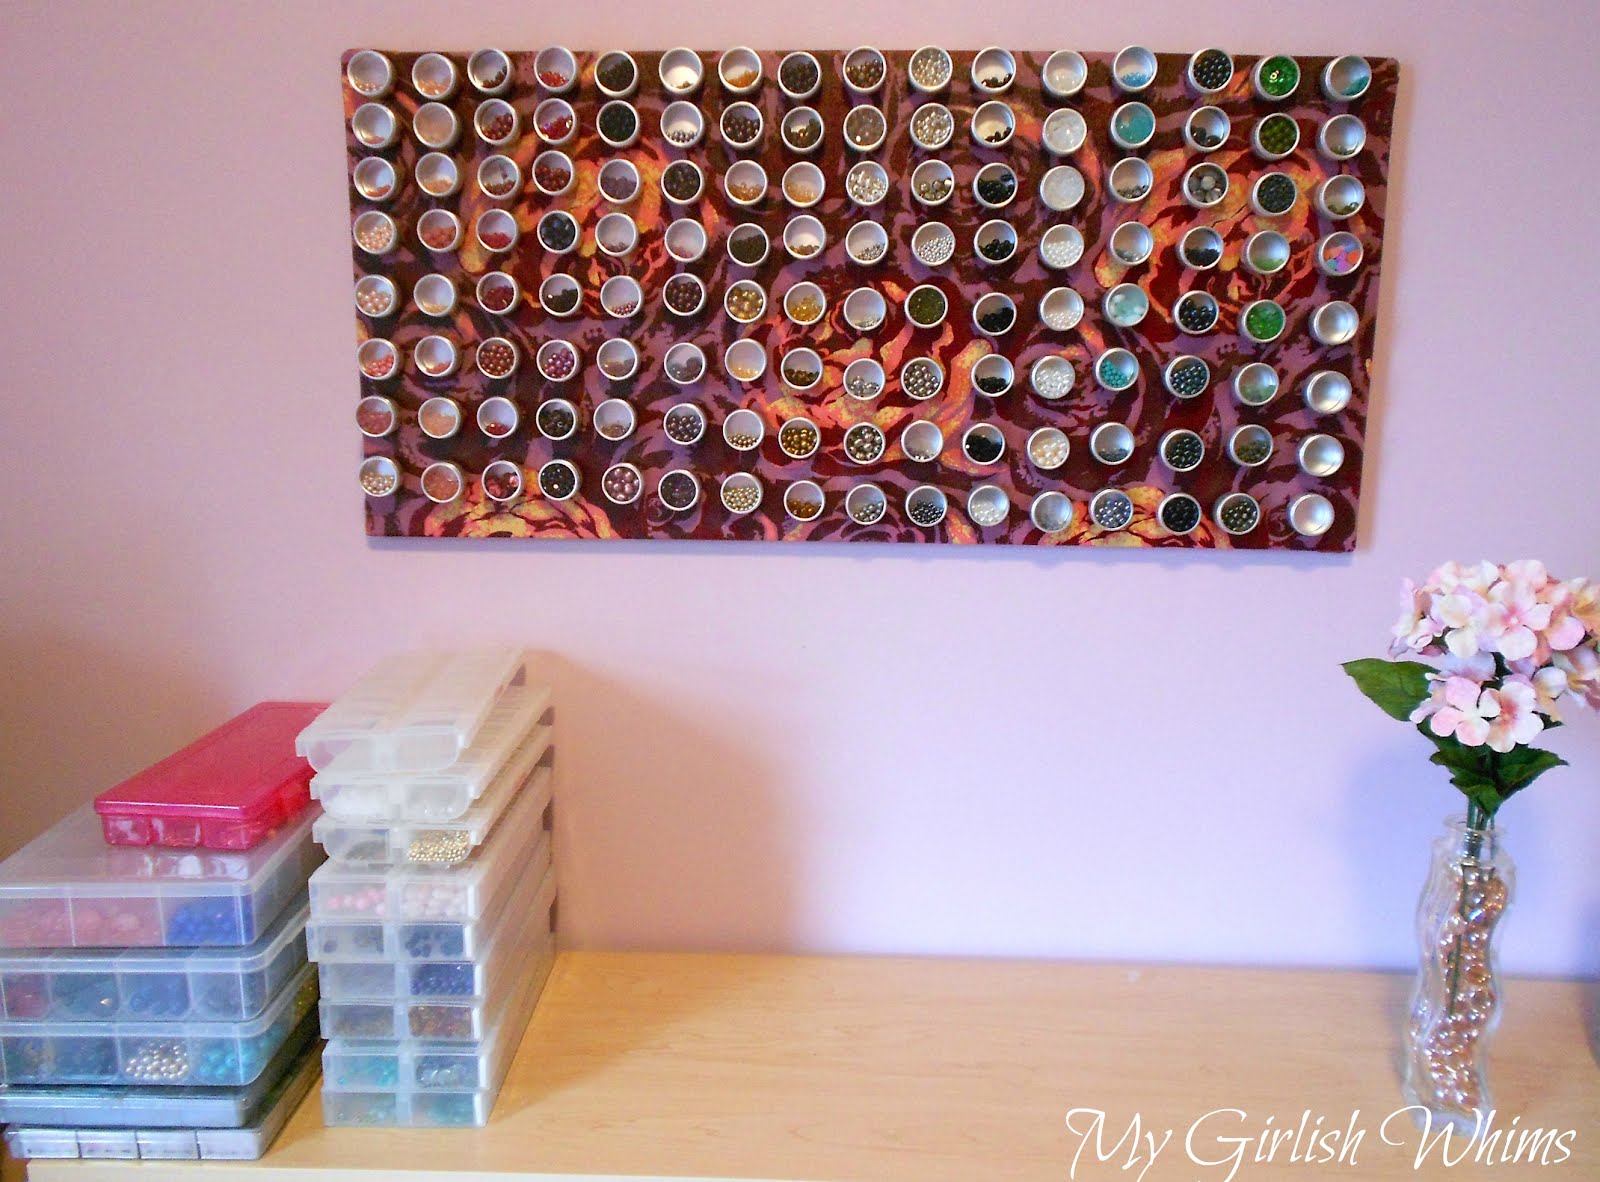
Fabric Covered Magnet Board for Bead Organization


Materials: Spontan Magnet Board, Fabric, Mod Podge, Metal Containers, Magnets

Description: I grabbed a magnet board from IKEA to use as a way to store my beads in my craft room. I wanted it to look girly, so I covered it with pretty fabric!

I cut the fabric to slightly larger than my magnet board and then just applied Mod Podge over the fabric to adhere it to the board. I did two total coats, and let it dry for a day before putting on the second coat.


After the top was dry, I trimmed away some of the fabric from the sides and then just wrapped it around and hot glued it to the back of the board.

I hung the board on my craft room wall, and put mini-metal containers with magnets hot glued onto the back full of beads!

See more of the bead board.

~ Rebecca @ My Girlish Whims, United States

Monday, 7 May 2012

Yarnbombing Station


Materials: Rationell Variera, old cupboard door

Description: I live in a room in a shared house and like to do yarnbombing. My old setup was basically a perpetual mess - I use that table to put lots of other stuff on and the cones or yarn would collapse and tangle.

Inspired by this hack, I trekked to Ikea and bought a bunch of Rationell Variera bag holders, two Bygel cup things, and a Ribba painting rail that I wanted to use for the machine tools but didn't end up using. (not enough vertical space)

I found an old cupboard door in my shed and now I have an awesome yarnbombing station.


before

I'm especially pleased that it was a no-tools-required hack: I don't have much in the way of tools or workspace in a student house, and I often have to wait with doing stuff until I can use the workshop at my parents' house.

~ Arwen Bijker, The Netherlands

Sunday, 15 April 2012

A Malm Headboard Gets New Life as a Project Table


Materials: Malm bed (headboard piece), Expedit Shelves and Expedit Casters (wheels)

Description: I have been wanting to make a Project Table for awhile now, but wasn't sure what to use for the materials. My Malm bed had survived two moves, but a third move wasn't in the cards for it.

Always inspired by the IKEA hacks, we saved the headboard piece from the Malm bed and then picked up two Expedit Shelves on an IKEA trip. The casters were the perfect addition to not only make the table mobile but also give it a little more height (the workspace sits 37" off the ground).


We spray painted the tabletop white to match the Expedit Shelves and screwed the top on.

See more of the project table with Malm headboard.

~ Lydia, Chicago, Illinois

Wednesday, 4 April 2012

Dra ut hyllan


Materials: Billy shelf (white), 1/2" white particleboard

Description: A few years ago, I bought my first condo, which had a loft floorplan. Most of the room was one big ground floor, with a small lofted bedroom and even smaller study area/second bedroom. As such, I promised myself that every piece of furniture in the living room would either (1) serve at least two purposes to reduce furniture clutter, or (2) act as storage.

Thus I decided to transform my little Billy shelf into a new IKEA family member, which one of my coworkers dubbed "Dra ut hyllan" (apparently it means "pull out shelf). I call it a craft armoire, because it holds my sewing machine and my crafts.

Details and instructions for the Billy hidden craft armoire are here.

~ Wei-Ling Lorelai Wu, California

Saturday, 17 March 2012

International Women's Day-cup in Norwegian style


Materials: Ikea coffee cup, transfer for ceramics

Description:
I love the I?New York-campaign from the seventies. The 8th of march is the International Women's Day, and I wanted to make some cups for the day. Some cups I've made by the use of plastic foyl one can get at a hobby shop (goes into the oven in 180 degrees centigrade for 30 minutes). For the cup in the picture I made the logo in a word-document and sent it by email to a online ceramic store. They made the logo into a transfer, and put in on the cups and burnt them in my ceramic-oven (800 degrees centigrade).

I?Likestilling (I?Gender Equality, in Norwegian).

~ Birgitte Kleivset, Kristiansand, Norway

Trofast Craft Table


Materials: Trofast Frame, Trofast Wall Unit

Description: Put together Trofast Frame & Wall Unit as instructed. Use Wood Joiners (cheap, Home Depot) to join Frame to Wall Unit and Trofast bases to 39X60 cut Cabinet Grade Plywood (Home Depot $23- 2 free cuts). Cover with 38X59 self healing cutting mat (JoAnn Fabric). Use bins for craft supply storage/organization.

See more of the Trofast craft table.

~ Kerensa, Dallas

Friday, 9 March 2012

The Ultimate Quilting Table

The Ultimate Quilting Table

Materials: 2 Ikea Expedit bookcases, 1 Ikea Numerar countertop, 4 heavy duty casters and 2 2x4s

Description: As any quilter will tell you, a large table to support the quilt is a must have item. We were looking at all kinds of hacks for months before walking into IKEA and seeing the Expedit bookcase on it's side and on casters! The wheels starting turning... To make it larger, we placed two Expedits side by side, joining them at each end.


The Ultimate Quilting Table

We then put it up on casters (not those for sale at IKEA, in my opinion it was a broken toe waiting to happen!) To make the top smooth we added the large Numerar counter top with "L" brackets, making the counter hang over on one side and one end.

This enables two quilters (possibly 3!) to sit and sew together with plenty of leg room underneath. Foot controls can sit on a shelf for easy reach. A coat of poly to make the counter smooth is a wonderful finish and your choice of baskets gives you a ton of storage for WIPs (work in progress) and fat quarters.

~ Ms. Bland MacPherson-Reddy, Burlington

Sunday, 19 February 2012

Sewing/Crafting table with Basket storage

Sewing/Crafting table with Basket storage


Materials:
two Antonius Frame and Wire Baskets, Vika Amon Table Top

Description: This is a simple sewing/craft desk made with two Antonius Frame and Wire Baskets and the Vika Amon Table Top. I used four cable clamps and small wood screws per each Antonius frame to attach them to the table top after they were assembled. You could use brackets, but I found that the cable clamps were pliable and stretched over the frames to hold them on securely. Turn it over and it's done!


Sewing/Crafting table with Basket storage

See more of the Vika Amon Antonius crafting table.

~ Andrea R., Cincinnati, Ohio