Tuesday 31 August 2010

No space for PC, lets hang it up on the wall


Materials: Plinga range powder-coated steel hat rack 001.525.93

Description: After sort of redecorating a room, there was no place on the floor left for my PC, so I used a very cheap (2.5 Euros on sale) IKEA hat rack, item # 001.525.93, fixed that up on the wall upside down, then put my PC inside that.

This metal hat rack is strong enough for the weight of my very heavy PC (a 11 year old P-III btw), also is a bit longer so cables etc can stay inside.


On second thought, this thing might also be used to place a human baby inside, has the right size, if placed somewhat lower on the wall, like over a bed or something like that. Maybe I sould have bought another one...

Really cheap stuff, cause I am a very cheap person. Lots of other non - IKEA stuff in the pics get misused as well.

~ Antonios T. Andronoglou, Athens, Greece

Lack Lego table


Materials: Lack side table, 4 Lego 10x10 bases and adhesive putty.

Description: My son plays with his Lego almost daily but I got tired of them all over my coffee table. Some of his creations he didn't want take apart and put away and he likes to sit at the table. I wanted something that wasn't too terribly big and that wasn't made out of plastic as most premade Lego tables are.

Easy solution, I bought a side Lack table (beauty that it comes in so many colors to match your decor) and four 10x10 Lego base boards. I then placed the boards where I wanted. My original thought was to epoxy glue them down but why ruin the table? I used adhesive putty to secure the boards to the table. That way the boards stay put and when he grows out of Legos I can still use the table for something else. It's a perfect height for sitting on a footstool to play and I slide my tote (to keep his Legos) under the table.

Too simple.

~ Christie Phillips, Holland, MI

***

To all in Malaysia, Happy Merdeka! Enjoy your day off. Go to Ikea. ~ Jules

Monday 30 August 2010

Customized kitchen pantry


Materials: Akurum high cabinet, Pax Komplement drawers

Description: When we renovated the kitchen, we chose this high cabinet from Ikea because it's wide enough for the microwave but for storage it is terrible. It is too deep and has two big drawers which are again too deep. If you put a can in a drawer you can only see the top of the can! I like organizing but I wasn't about to label all the top of my cans!!!


The solution? Ikea's drawers for the Pax wardrobe system. We bought two big ones and my boyfriend cut them to fit the pantry. Voila! Nice sliding, solid wood drawers and not too high.

See more of the Akurum high cabinet with Pax storage.

~ Louise, Montreal

Contemporary concealed entertainment center


Materials: Ikea Besta frames, Ikea Framsta doors

Description: We wanted to replace our dated TV stand and open faced media towers with a new contemporary, sleek entertainment cabinet. Had to be modern yet functional. Key attributes were to be low to the ground, minimalist, big enough to hold the 56" HDTV, conceal all the components and speakers. We had to have doors that would allow sound and remote control signals to pass thru.

To center the AV Receiver and center channel speaker under the TV we needed an odd number of shelf alcoves. This led us to purchase two double unit Besta shelf frames and a single unit Besta shelf frame. The left and right speakers as well as other components fit nicely in the Besta shelves.


Key to this hack were the doors. We purchased 5 Framsta door kits in total. The center three doors were hacked to allow sound and IR remote control signals to pass. I cut out the centers of the doors using a jig saw and then wrapped the door frames in speaker cloth purchased at the local craft store. Using spray adhesive and a staple gun, the speaker cloth was stretched over the door frames and secured in place. I used the Framsta hinges included and mounted to the Besta shelf units.


We're really happy with the system. The simplistic, low sleek entertainment cabinet fits our style and budget - less than $350!!

~ Tim, Orlando, FL

TV Theater Wall


Materials: Vika Amon table top (black-brown)

Description: It is easy and cheap to have your TV Theater wall. Just make a hole in the table top in order to fix the TV back inside it and place the Vika Amon table top (black-brown, in this case) between the wall and the TV. The TV holders will sustain it. That's all.

~ Jav, Toledo (Spain)

Friday 27 August 2010

Laptop/Book Stand


Materials: LANSA Handles and EKBY VALTER brackets

Description: A few weeks ago I started a new job, and discovered that the desktop computer has become a thing of the past. In its place was a ThinkPad T400 with a screen size of 14" connected to an external Dell 2009W 20" monitor. My challenge: how to raise the laptop screen to be at eye level with the Dell monitor to make this work for me. I thought of a laptop stand, and went out to buy one from the local office supply store. Its usefulness was limited - the laptop slid off the angled platform, so I took it back.

I heard about blog forums and researched how others had designed and assembled such stands from IKEA parts. From these ideas, I adapted the combination of parts listed below. The result: The completed stand works well as a stand for Thinkpad and my Acer 10.1" net book. It is also multi-functional since my wife also sometimes uses it as a cookbook holder.


What you may need:

Two-pack LANSA Handles (Article number: 60138759)
Product dimensions
Length: 9 5/8 " (245mm)
Depth: 1 5/8 " (41mm)
Hole spacing: 6 5/16 " (160mm)

2 EKBY VALTER Brackets (Article number:76696009)
Product dimensions
Width: 1 1/8 " (3cm)
Depth: 7 1/8 " (18cm)
Height: 9 " (23cm)

~ Oscar J, Ottawa, Ontario, Canada

Thursday 26 August 2010

Built-in bookcase and Home Theater Unit


Materials: 3 x 15" Billy Bookcases, 2x Billy height extenders, 2 x Billy doors, 2 x Benno DVD Rack, 1 x Hemnes Storage Bench, 1"x2" moulding, crown moulding and baseboard to fit your perimeter, Brad Nailer and nails, Liquid Nails adhesive, level, saw, 1' particleboard screws, caulk and paint

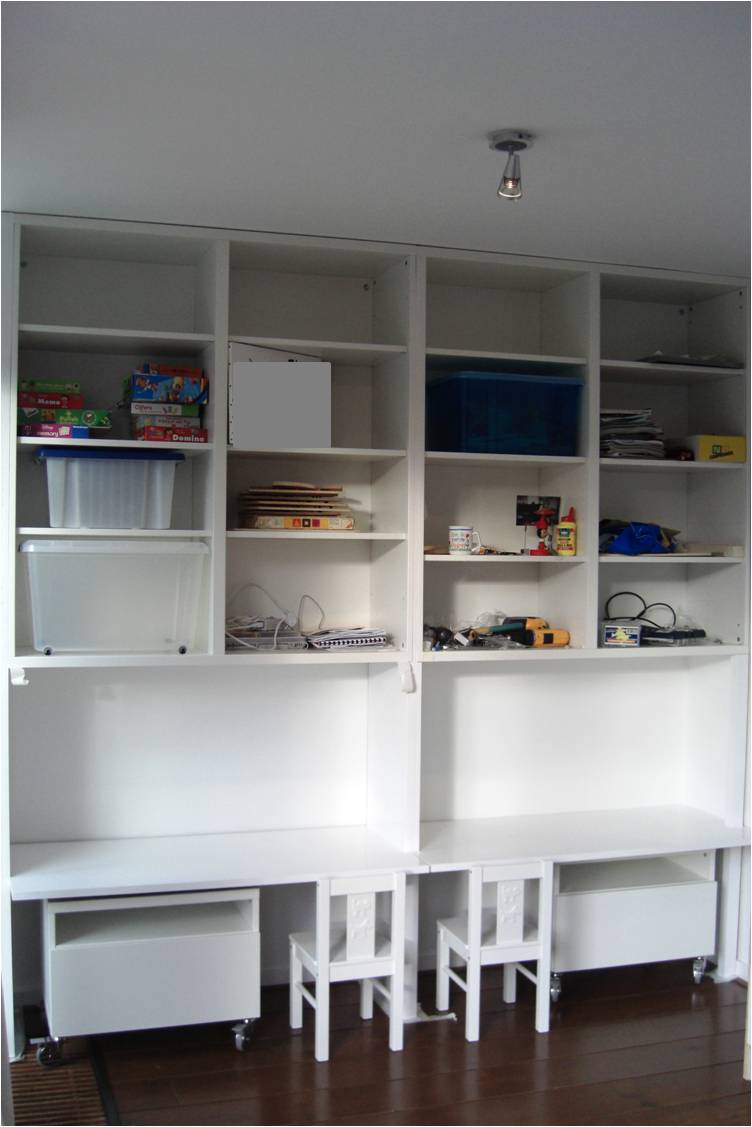
Description: We have an extremely small, 100-year old downtown house that has a teeny tiny living/great room -10' x 10'. Every inch of space counts! We decided that the look of built in bookshelves would be a suitable way to give ourselves extra storage and multi-task while still looking great.

1. Assemble 2 Billy bookcases, including adding the height extenders and put them on opposite ends of your project

2. Assemble the Benno DVD racks and place them against wall beside the Billys (both on the side facing the middle)

3. Trim your 1x2 moulding so that you can build a support ledge starting from the side of the left Billy across the front and side of the left Benno, across the back wall, and up the side and front of the right Benno ending at the side of the right Billy

4. This is the part where you can decide how wide you want your unit to be (we used the whole Billy). If you want it shorter, then you'll have to saw off some length). Assemble the third Billy, nailing the shelves in place on the sides, as this unit will be mounted horizontally

5. Secure the Billys against the wall - make sure they are levelled - and Liquid Nails the Bennos to them. The Bennos go flush against the wall

6. Attach the moulding ledge as described in Step 3, with the mouldings immediately below the height point where the Billy extenders meet the parent Billys

7. With another person, hoist the third Billy horizontally between the height extenders, resting on the Benno tops and ledge that you just installed. Have that other person keep holding it against the wall while you take a few particleboard screws and, using the shelf-mount holes in the Billy extenders, fasten the extenders to each end of the third Billy

8. Install the crown moulding and baseboard to the unit

9. Caulk every single gap on the unit, caulk it to the wall, and remember to caulk the crown moulding to the ceiling

10. When the caulking is dry, paint unit and the back of the wall where the TV will go so that everything looks built-in

11. Assemble the Hemnes bench, leaving out the front panel on top of the drawers. (You will be able to hide all of your home theater/cables/satellite boxes there). Place the Hemnes bench between the two Bennos

~ LittleMy17, Ottawa

Piecemeal kitchen island


Materials: Bekvam kitchen cart (or similar item), Lagan countertop, Vika Byske Table Leg, drawer slider, wooden slats, cutlery tray

Description: I've had an IKEA kitchen island since sophomore year of college when I moved into a dorm room with a kitchen. It's been the perfect fix for the common lack of counter space in every apartment I've lived in since then. In June, I moved into a tiny studio apartment (200 square feet total) in Brooklyn. The 'kitchen' was just a refrigerator, a stove, a sink, and two cabinets in a nook to one side of the apartment. I knew I need more counter space, as well as a space to eat and work, so I built this multi-purpose kitchen island/bar table/workspace using my old IKEA island and some other IKEA products. Unfortunately, some of the IKEA products I used have disappeared from the site, but I'm sure there are other similar items you could use.

First, we mounted the Lagan countertop at 39", slightly lower than standard bar height but still high enough for 29" stools to fit comfortably under. We secured one end of the counter to the wall using L-brackets, then attached the Vika Byske leg to the other end.


Because the kitchen didn't have a single drawer (something I noticed after I had already moved in, of course), I fashioned a utensil drawer out of a cutlery tray that was almost exactly the same size as the surface of the bottom island. Using a 3/4 extension 18" bottom mount drawer slide from McMaster-Carr, we attached the utensil tray to the top of the smaller kitchen island. Because the bottom mount drawer slide was mounted in the center of drawer, it was slightly wobbly, so we used some wooden slats and screwed them in on one side of the bottom island to steady the drawer. It works great!


~ Molly, Brooklyn, NY

Wednesday 25 August 2010

Custom wall of shelving...cheap!


Materials: Hyllis shelves, plywood, four band-aids

Description: Hyllis shelves are about $15 bucks a pop at Ikea but are rather flimsy and pretty short.

For my bedroom, I knew that I needed to house about 1200 books on a 20 foot long wall and I also wanted to house two flat screen TVs (long story why I needed two) that were at the correct height to view from the bed.

The Hyllis shelves will go together rather easily if you want to stack them. For my hack, I used the shelves and 'overlapped' the shelving units a bit in height. It is easy to overlap the legs (vertical supports) of Hyllis and and one to four shelves in height to it. You just have to put a screw through both vertical sections and into the shelf...the screw will connect everything together. I purchased slightly longer screws than the shelves come with to make the shelf connections at the front and the back sides, and used 1" long drywall screws to hold the shelves together side by side. I also sunk one screw per shelf unit into the rear wall of my bedroom to add some stability.


To house the TV brackets, I had two pieces of plywood cut down to size at the hardware store. I made them the same size as one shelf 'opening' and inserted them where the shelf should have been, using the same holes drilled in the vertical supports that the shelves use. The plywood goes from the bottom of one shelf to the top of where the shelf below it should be. Easy as can be; this gave me a solid base to install the mounts for the screens.

The vertical supports have one end drilled with two holes in it (Ikea anticipates you to attach the shelves to the wall using these holes, I think). I added an extra row of shelves purely for decoration along the top of the unit using the extra holes. I Turned these upside down so you see the smooth surface of a shelf 'top' in lieu of the crimped shelf bottom.


I was left with one section of shelves that was a little bit too big to fit into the wall. Hyllis shelves are thin enough you can actually cut them easily with tin snips if you need to modify the width. When you cut them across you loose a little bit of stability because the shelves are folded on all four edges and the fold makes them rigid and gives the shelf its thickness. I had to insert small pieces of 1" tall scrap wood cut the same depth as the shelf to stiffen the shelf front to back. I installed the wood using the existing holes on the vertical supports. Note: the cut shelves are sharp...hence bandages should be on hand! The cut shelves are shown in the picture with the urinal on the floor; you can barely see that they are modified.

~ Dave Hopkins, Chicago

BEST� turns into play-centre


Materials: 2 BEST� units with 6 shelfs, 2 BEST� units with 1shelf, 2 drawers with front, 4 sets of large BEST� castors, 8 square doors, all white. Two MDF wooden plates, white paint, screwdrivers, screws, saw and lots of glue. Two white KRITTER chairs.

Description: In our L-shaped living room, we wanted our small kids (1 and 4) to play in the corner. The enormous amount of bright colored toys, which had been spread across the floor in the past few years should be stacked into sleek design cabinets which should be out of their reach, it should have little desks to draw their pictures on and little cabinets on wheels for their daily stuff to put into.

When we shopped around all cabinets for kids turned out to be bright colored, funny or otherwise not-sleek and therefore not suitable for our livingroom. I decided to hack the BEST� cabinet!

First we mounted one BEST� unit to the wall, against the ceiling. Note that the unit is temporarily supported by an old IKEA dresser with additional piles of magazines! It did a very good job.


Than we mounted a room-high MDF plate, mounted a second shelfunit (again with the help of the old dresser) and a second room-high MDF plate. Plates were mounted with lots of glue and a single screw.

Just for the look of it we thickened the plates by glueing extra plates on both sides of the room-high MDF plates. And to be sure the cabinets would not fall on our children's heads we put an extra rod underneath the first cabinet.


I sawed two little desks, mounted small bars underneath and screwed the bars against the plates. We sanded the plates and painted them white.

Eight doors were attached that opened by clicking (BEST� press-and-open! Superb!).


The two small BEST� cabinets got a drawer and 4 castors each and were shoved under the desks. Two KRITTER chairs completed the new play-centre.

We are very happy with the result, although I must say that a tidy play-centre still seems to be a matter of discipline.... !

~ Janine

Tuesday 24 August 2010

The "A rose by any other name is a Malma" mirror


Materials:
Malma Mirror, clay, paint, varnish, glue

Description:
Using a self-hardening clay (no kiln needed), form your roses, then once dried, paint and varnish them. Glue them to the Malma mirror with bathroom-tile glue, to which you can add paint, so that it will blend in with your color of roses.

~ Eileen, Lisbon, Portugal

10-Minute Cheese Grater Lamp


Materials: HEMMA light cord/light bulb set, IDEALISK cheese grater, electrical tape

Description: I was inspired to make myself a new desk lamp by the lighting design of a trendy Mexican food restaurant in Berlin. I had always been annoyed by the shortness (and boring design) of the cheap desk lamp I have had since my dorm days, so I decided to bring a little fun into my workspace with this cheese grater lamp.


I bought the HEMMA light cord and CFL light bulb combo pack (in black) and the IDEALISK cheese grater for this project (the cheese grater in the version pictured is my old cheese grater, but the design works just as well with Ikea's IDEALISK cheese grater, which is exactly the same size, shape, and weight). I originally intended to drill a slot and a hole in the handle for the cord but was lacking a drill that was powerful enough. Instead, I fed the cord through the cheese grater and looped it around the handle, then secured the loop with black electrical tape. Right now the cord loop balances stably on the handle, but if you find that too flimsy you can use more electrical tape to bind the bottom of the loop to the grater. Install on the ceiling so that the lamp hangs at a comfortable height above your workspace, and you have a great and funky new light source that cost 11 bucks and took 10 minutes to build!

This lamp is probably better suited thematically for a kitchen, but since I don't have my own kitchen, that was not an option. I love cooking and LOVED this design, so I deemed this appropriate for my desk. Plus it provides just the right amount and angle of light for working (and is a great conversation piece).

~ K McF, California

Monday 23 August 2010

Pax Wendy house


Materials: Pax wardrobe packaging, duct tape, imagination.

Description:
Unpack wardrobe. Store wardrobe in bedroom for later construction. Gather together the wardrobe packaging, scissors, duct tape etcetera. Discuss with 2 year-old granddaughter on which style her Wendy House should be. Construct house.

~ Delia Campbell, Stevenage, Hertfordshire, UK

Lack Scrabble table


Materials: Lack coffee table

Description: I had read guides on how to do this on a few websites, but the laminate surface of the Lack table made a mess of their recommendations. Fortunately my brother is a tile and granite mason.

Here's what you'll need:
1. Lack coffee table
2. 1000 Scrabble tiles
3. Tile adhesive (bucket)
4. Notched trowel
5. Urethane
6. Paint brush (minimum 4")
7. Paint thinner
8. Sandpaper (rough grit)
9. Glass table top
10. Little plastic glass grips
11. Wet cloth
12. Patience

Whatever you do, do not trick yourself into thinking that wood glue will work - this is a Lack table. Swedish scientists worked for years to ensure that hardly anything will stick to the laminate surface. You just don't mess with Swedish scientists.


Here's how it works:
1. Order 1000 Scrabble tiles off eBay
2. Wait for them to arrive
3. Sand the laminate in the areas you wish to apply Scrabble tiles
4. Use the notch trowel to apply tile adhesive to a small area of table
5. Apply tiles
6. Continue until complete, allow to dry
7. Use the paint brush to apply 2 coats of urethane over the tiles and un-tiled surface, working to fill all the cracks, and do your best to keep the brush strokes long and all in the same direction
8. Use the wet cloth to clean up all the urethane that runs down the sides
9. Use the paint thinner to get the urethane out of the brush, especially if you ever want to use the brush again
10. Put the little plastic glass grips on the corners of the table
11. Put on the glass top
12. Clean up yer goldarn mess
13. Enjoy your new coffee table, which now weighs a metric tonne
14. Get your feet off the table

~ Dan, Toronto

Friday 20 August 2010

Cabinet for Walter Gropius


Materials: Besta, Varna, Stolmen components

Description: This is the first in a series of sculpture/furniture pieces that are based on the architecture of Walter Gropius, the founder of the Bauhaus. Specifically, I am making IKEA models of all eight mid-century Modern Gropius buildings that are currently being demolished by the City of Chicago.

This piece is based on the 1953 Power Plant (pix, right).

First, I assembled the base using three Besta cabinet bases. Since they have paper cores, I inserted strips of pine inside the two plys of laminate to fasten them together.

Sides and doors are made of recut Varna doors. Original hinges are used, but new pocket holes needed to be made with a Forstner drill bit.

The top is made of two Varna doors. It is fastened to the cabinet using IKEA cam lock hardware, which again, needed to be redrilled with a 15mm Forstner bit.


A router and circle jig was used to cut smooth holes for the Stolmen poles to go through. The entire cabinet is supported by Stolmen brackets on the underside.

~ Jeff Carter, Chicago

Permanent to non-permanent lighting fixture conversion


Materials: Cord set e26 and KRYP Fish light fixture

Description: Basically taking a light fixture that was meant to be an installed structure and converted it into a movable wall plugged in solution with a switch.


See more of the wall mounted fixture.

~ superfro