Saturday 31 December 2011
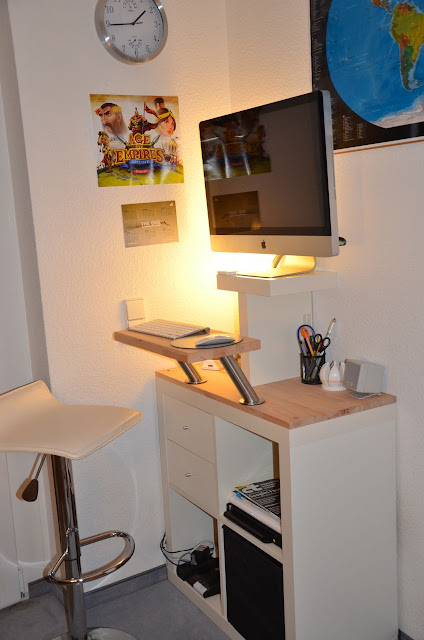
Mr. T: another iMac standing desk
Materials: EXPEDIT Shelving unit 4x4 (white), 2x LACK Wall shelf 30x26cm (white), 79x39x1.8cm beech work plate, 50x24x25.cm beech work plate, 2 CAPITA console stainless steel, some EXPEDIT gear
Description: Recently I began to feel unhappy with my current home office environment. At work I am sitting all day in front of my iMac and when I get home I really didn't feel like sitting anymore. So I started looking for alternative ways of working and thought about my last job where we had tables to move up and down in case we felt more like standing at work. I loved this option but since there isn't enough space anyway in out home office (we're sharing about 12. 5m^2) a real desk wasn't an option anymore. After a long and frustrating search I discovered ikeahackers and started to look through the workspaces shown here. The desk which at last I liked the most because of its simplicity and small space consumption was [When iMac goes to work] by Piritea from Italy.
Having this in mind, my girl and I drove to IKEA and walked through the LACK department and talked about that the LACK shelf was guaranteed to hold 3kg and how my iMac weights about 18. something. Talking to some of the IKEA staff members and putting together some pieces of work plate we had as a leftover of earlier self-made-furniture we designed Mr. T using two LACK wall shelves as a stand for the iMac, an EXPEDIT 4x4 shelving unit and the gorgeous CAPITA consoles.
First, we assembled the EXPEDIT shelving unit and mounted a beech work plate (genuine wood, not pressboard - this part is important) on top of it. We used four screws to attach them together but you need to be careful while drilling them into the EXPEDIT because it's mostly hollow.
In the second step we attached one of the LACK shelves vertically in the middle of the work plate and the second LACK shelf horizontally on top of the first so that they form kind of a "T". For security reasons, the upper LACK shelf was additionally attached to the wall. The LACK shelves are mostly hollow as well so keep in mind that beyond tight it will be loose and then it will be broken (we say "nach fest kommt ab" in german which seems to be hard to translate).
With the stand for the iMac the last missing part was the keyboard, mouse and palm rest for which we used the CAPITA consoles and another beech work plate of 50x24cm. In Piritea's hack, he mounted the CAPITA consoles upside down and I know why he needed to do this. There's no way you can attach these in the right direction to a LACK shelf (hollow, you already got it perhaps), because they need to be drilled through the plate and tightend with a screw-nut from the other side. This would have smashed the LACK shelf completely.
But in our design, we had the advantage of a work plate made of genuine wood for which the procedure is not a problem. Due to the fact that we were out of 10mm drills (CAPITA's bottom screws are 10mm thick) and the upper plate of the 4x4 EXPEDIT shelving unit was attached to the work plate so that we would not be able to attach the screw-nuts as well, we simply took an 8mm drill and forced the CAPITA console into these slightly-too-thin-holes. You should end up with an "undestroyable" construction.
The last step was easy: Attach the two CAPITA consoles to the upper work plate with 4 screws each and be done. Afterwards we made another trip to IKEA and got me an EXPEDIT insert with two drawers and a FL�RT box.
Finally I am happy with my new standing desk and would like to thank you all for being such a great inspiration by sharing our ikeahack. Thank you.
~ Flo, Germany
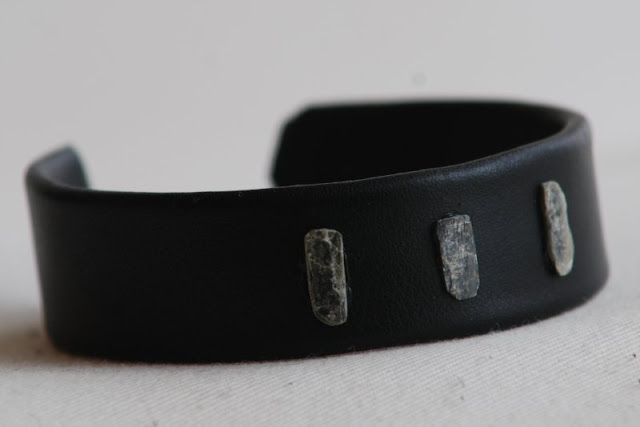
Bracelet from IKEA Lillholmen Cotton pad holder
Materials: Lillholmen Cotton pad holder
Description: A cotton pad holder can be made into bracelets. Draw a line across the cotton pad holder where you want to cut it. The best tool for this is a waterproof marker and a paper line with the width of the required bracelet, wrapped around the metal.
The metal pieces are them wrapped with leather. Add ornaments from mica, slate, wood and crust to further embellish the bracelet. Mica and slate are special rocks: you can make very thin slices out of it and also it is quite easy to form with a metal rasp and with the help of some pliers.
See detailed instructions of the Ikea Lillholmen bracelet.
~ Peter Molnar, Budapest, Hungary
Open Your Home with Spare Doors
Materials: As Is Ikea Glass Front Doors
Description: By gathering identical glass-front doors from Ikea's As-Is department, I've assembled two walls of framed posters. The first one uses identical rustic glass-front doors. I taped Broadway posters to the back and drilled a small hole to hang them on screws in the wall. I then hung seven of them on an angle across the entire wall.
On the Miles Davis poster, I laid out identical square doors leaving equidistant spaces between each door. I marked with pencil and cut the poster to fit behind each door, while keeping the proportions intact. This allowed me to hide the wrinkles in the poster from it being rolled up and poorly stored for years. I used the pre-drilled handle hole on the door and put a large screw through it to hang each door as a frame.
Lastly, I used a large Ikea glass door to create this pot rack. By drilling screw eye hooks through the door and bolting them underneath, I hung them evenly on small chain links to plant hooks in the ceiling. I made sure to use plant hooks with toggle bolts to hold the weight of a full rack. The screw eye hooks on the bottom then only required S-hooks to hold the pots and pans. The glass allows the ceiling light to shine right through.
~ Michael A
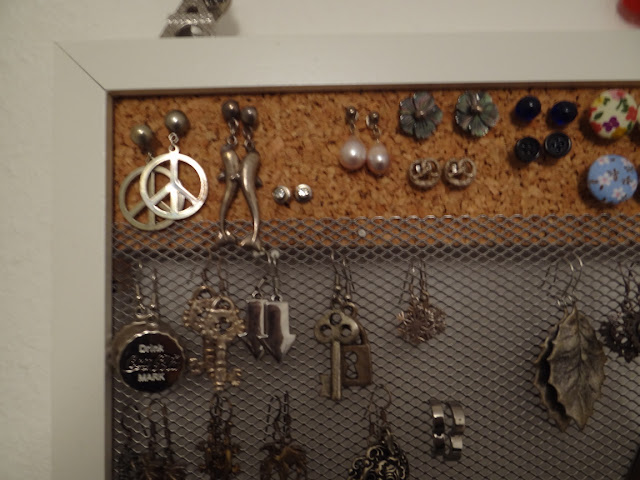
Ribba jewelry display frame
Materials: Ribba frame, chicken wire, cork, carbon tube and hangers
Description: As I have quite a lot of jewelry, I decided to display them in a picture frame.
I bought 2 Ribba frames from the as-is-section (4�) and used only the frame itself. For the earrings I cut a piece of chicken wire to fit the frame and "clipped" it with these little metallic, bendable things that would normally hold the photo mount and the glass in place. The same with the piece of cork which is the best solution for studs.
The necklace frame is a bit more complicated: I drilled to holes where I wanted the carbon tube to go (depending on the lenth of the necklaces). I bought the tube (2�) at a railway modelling shop. It is cheap and slightly bendable. After having slided on the hangers, which are a left-over from an IKEA curtain-hangers-pack, I inserted the tube in the drilled holes and hung the necklaces.
~ Julia, Germany
LUPIN X-mas tree
Materials: LUPIN Venetian blind, carriage bolt with nut
Description: I took the thick slat from the bottom of the LUPIN blind and 16 thin slats, put a hole at the top of the slats (all at the same place) and bound them together with a carriage bolt and nut. Then I hung it up, spread the slats out like a fan, and pinned christmas decoration on it. - Done
~ Sabine, Basel, Switzerland
Friday 30 December 2011
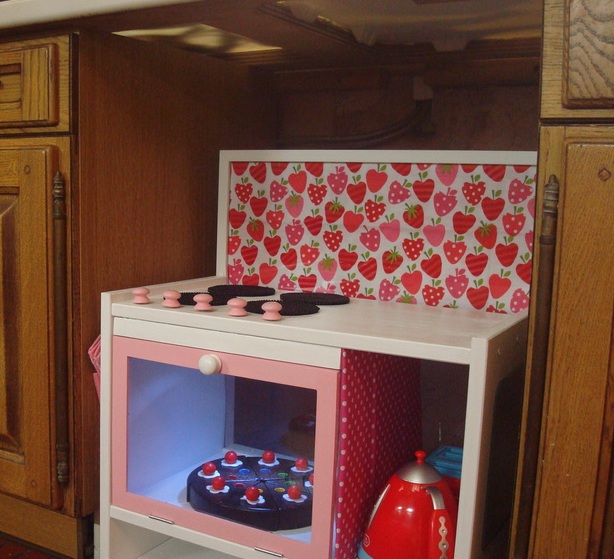
Strawberry RAST Play Kitchen
Materials: Rast Bedside table, RAM frames, RIBBA frame, SORLI mirrors, even IKEA packaging
Description: Mandate: Create a play kitchen for my daughter for Christmas. Needs to fit space where a kitchen base cabinet is missing.
Labour: Building took 10 hours over 3 days. Countless hours on design/getting stuff.
Cost: Probably more than a shop bought kitchen - but that's mainly because I had to buy all tools, paints etc.
I'm thrilled at how well it has turned out, considering that I am a complete novice at DIY, the tight time deadline (before Christmas) and the fact I was nursing a painful tooth!
My heartfelt thanks to IKEA Hackers and play-kitchen-creating mums for all the ideas.
The frame is a RAST bedside table (what else?) I primed, sanded, painted with satin gloss white paint and finally varnished the parts before assembly.
I used a RAM photo frame for the oven door. I painted it a pale pink. I used two flush hinges to attach it to the lower shelf of the RAST table. I tried to screw it in, but after a loooong struggle with the cordless drill, gave up and tried hammering it in. That didn't work either - hammered all but one of my fingers. Finally glued it using Gorilla All Purpose Superglue.
For the base, I bought a piece of 1/4 inch plywood (should have gone thicker!) - primed and painted along with the RAST sections. I screw-fitted SLUGGA castors to attach the plywood to the RAST "legs"
For the back, I lucked out. I got a RIBBA(?) frame, white finish at the Bargain Corner in IKEA for �2. Screwed it onto the back of the table, inserted some fabric for the "backsplash". Done.
For the door inset, I used the perspex packaging from last year's Christmas baubles. (also from IKEA!)
Knobs: Unfinished, screw-fitted knobs bought via eBay, painted white and pink for the hob knobs and oven door knob. Drilled holes and screwed in the knobs.
Hob Burners: Super-glued beaded coasters bought from the supermarket.
Oven Light: Stuck a push LED light on to the roof of the "oven".
Other accessories:
Stuck a couple of white plastic hooks from the local DIY shop for the oven gloves and apron on one side of the table.
On the other side, stuck a SORLI mirror.
For the trim (just above the oven door), I tried cutting a polystyrene block to size, but that didn't work - kitchen floor is covered in polystyrene "snow". My husband helped me saw off a section of a RAM frame (using a craft knife and a bread knife!! I really should have bought a jigsaw!). Primed, painted, superglued on. For the separator between the oven and the shelf on the right, I used a fabric wrapped piece of cardboard - when time permits, will replace with a piece of plywood.
That's it! Whew.
~ Kipsy, UK
Pax Closet Palace from Komplement Interior Chest
Materials: Komplement chest of drawers, Solveig panel, Lack shelf, Pax corner add-on
Description: I moved into a basement apartment that didn't have any closet space or space to apply makeup etc. Being a fairly girly girl I wanted to have a closet *palace* not just a closet. I already had three 100cm Pax frames and interior fittings, so I devised a way to make utilize the space I do have as best as possible.
My first obstacle was the corner unit. I have the 201 cm Pax units and as it turns out, they don't make the add-on in that height. We trimmed the side and back pieces down in height using a skill saw. Then we re drilled the appropriate holes across the top of the pieces so it would fit together. A good way to do this is to put your drill in an IKEA hole on the unit and mark the depth of the hole with masking tape. You put the masking tape on the drill bit so you can't drill through the unit and ruin it.
Once trimmed, I assembled the Pax wardrobes as usual.
My second obstacle was that the wall space where I wanted to put the vanity mirror was a built in shelf. To overcome this problem, I got the idea of nailing a Solveig bamboo panel over the unit. I created spacers out of some leftover Pax shelf pieces** and bolted them to the wall. I built an L shaped frame out of 1x4 (to mount the mirror on) and mounted that to the side of the built in, and to one of the horizontal shelves. I bought a cheap vanity light at home depot and rewired it to be a plug-in, which I then similarly mounted onto the built-in shelf. I cut the appropriate holes in the Solveig panel and nailed it around the frame and the light to cover the built-in bookshelf. Problem solved!
I really wanted to use the Komplement chest of drawers because it had the best height/length ratio and because the divided top drawer is perfect for displaying makeup.
I assembled the Komplement interior chest of drawers according to the instructions. I didn't realize it has no back, and is meant to be bolted to the floor of a Pax wardrobe. This makes it very unstable. I built a frame of some leftover Pax wardrobe fronts. **
The interior chest of drawers has two white particle board strips with pre-drilled holes to mount it to the floor of the wardrobe. I used those pre-drilled holes to both stabilize my unit and make it tall enough to use as a vanity.
Luckily, because the chest of drawers has no back, I was able to put a powerstrip in the bottom drawer and plug everything in to the power strip. My lights are on ZWave wireless adapters to be controlled via remote control. My hair styling tools stay in the bottom drawer and plug into the power strip for use. I mounted a Frack mirror to the side of one of my Pax frames for precise makeup application. It's awesome!
The last thing I needed to do was trim the lack shelf to the appropriate length and mount it to the wall with molly bolts.
Additional accessories include the Grundtal pot lights, which are installed to a Zwave adapter for remote control. The Karlstad footstool and chrome underframe, the Gurli throw and Hemnes mirror. I used Fintorp handles, and plan to put the handles on the Hemnes doors as well, unfortunately my IKEA didn't have enough.
** While I was renovating the apartment a sewage backup occurred in a different area of the apartment, where I happened to be storing the pax wardrobe. I was able to get some new frames and had leftover parts that were not water damaged.
~ Kim, Burlington ON
Besta Home for my Snakes
Materials: Besta 192cm, some glasses, and reptile materials
Description: I needed a big terrarium with 4 cases for my snakes. So Ikea was my solution.
An old hack but I think it's already good
~ David, Marseille (FRANCE)
Custom Lego table with side pocket storage
Materials: Lack table, Glis storage boxes, Kusiner wall pockets, screws, paint, epoxy, LEGO base boards
Description: We wanted to create a custom LEGO table for our son. We started with an Ikea Lack table and taped off a space for storage boxes at the back. Then we drew a road and used a router to cut LEGO base boards to mold around the road. We epoxied both the boards and the first set of Glis boxes to the top of the Lack table.
We then painted the road and some land. We added a second set of Glis boxes stacked on top as they are great looking and reminded us of LEGOs. To add some additional storage for LEGO building bricks and instructions we attached a Kusiner wall pocket to the front and side using two screws at the top of each pocket. We simply cut off the extra bands at the top and used a match to burn the edges of the elastic we'd cut.
Voila, a custom LEGO table that A. didn't break the bank and B. is way more stylish that those commercially available.
See more of the LEGO table.
~ Alexis E., Frazier Park, CA
Expedit cutting table on wheels
Materials: Expedit (3 each of 2x2), casters (4 or 5), two sheets of plywood, screws, wood joiner, L-brackets
Description: 1. Prep the plywood first, according to instructions because the drying time can be long. I used stain + lacquer and it took 2-3 days total with drying time. And I only did the parts that will be visible when assembled.
2. Assemble the Expedits according to instructions.
3. Attach the casters to the 31x46.5 plywood. I used 5 casters: one at each corner and one in the middle. My plywood bows a little, but the weight of the bookcases flattens it. (OPTIONAL: Glue/screw/nail the plywood squares at the caster locations. This will raise the table by the thickness of the plywood (mine is 5/8").). Now you have the base.
4. Place the Expedits on to the base. Two back-to-back, and one at the end. Try to make everything fit as nicely as possible. Mine didn't fit perfectly square (I blame it on Ikea engineering), but close enough that it doesn't bother me. (OPTIONAL: Glue down the Expedits to the base so they don't shift. I skipped this part, because I thought they were heavy enough to resist shifting and I want to be able to disassemble the unit to get it of the room. Just in case. Otherwise, the only way out would be through the window, and that thing is heavy.)
5. Use wood joiners to attach the Expedits to each other. I used 6 total although more won't hurt.
6. Attach the top plywood to the Expedits using L-brackets. I used 6... 3 each at the long side.
See more of the Expedit cutting table.
~ rita
Thursday 29 December 2011
Mid-century TV unit
Materials: BESTA Shelf unit/height extension unit, BESTA HOLMBO Door
Description: I wanted a media unit for under my TV, since the rest of my living room has a mid-century feel, I decided that I wanted to attempt my first Ikea hack with some hairpin legs I'd ordered from Hairpin Legs. We used 1" wood screws with attaching the legs. Pretty simple hack, but it looks awesome.
~ Amanda, New Jersey
HOPEN for some under-bed lighting
Materials: Hopen bed frame, Dioder LED light strips, foot-operated light switch.
Description: I installed Dioder led strips under the edge of my Hopen bed frame and then put a switch in the headboard for easy operation.
It was a pretty simple hack. Route out the area in the headboard that you want to install the switch and use the included adhesive pads to mount the LED strips under the bed. The whole hack took less than 2 hours and looks pretty nice.
The switch I selected is intended to operate lighting that's inconvenient to reach, so it's a foot-switch ($10 on Amazon). It takes very little force to operate and clicks on-and-off.
The only thing I'd want to do better in the future would be to source a switch that was darker in color so it'd blend in better. As it is, you can't see the hack under normal conditions, so I'm very happy with it.
See more photos of the Hopen underbed lighting.
~ Maximillian, Chico, CA
Cutting board for crumbs
Materials: cutting board, router, 12 straight bit
Description: We always have some bread or cake around which invariably leads to crumbs all over the counter. This simple mod really improves the board ability to contain the crumbs and make clean-up a snap.
These boards came as a set and were unfinished. I used my router table to cut the 1/2 inch channels with 1/2 inch spacing. I sanded the board to smooth the edges and surface. Lastly, I applied food safe oil to the boards to help prevent them from absorbing undesireable things.
~ Duane Davis, Dedham, MA
Upholstered Fjellse
Materials: Fjellse bed frame, Sultan Lade slatted bed base, plywood, pine beams, foam batting, fabric, staples & screws
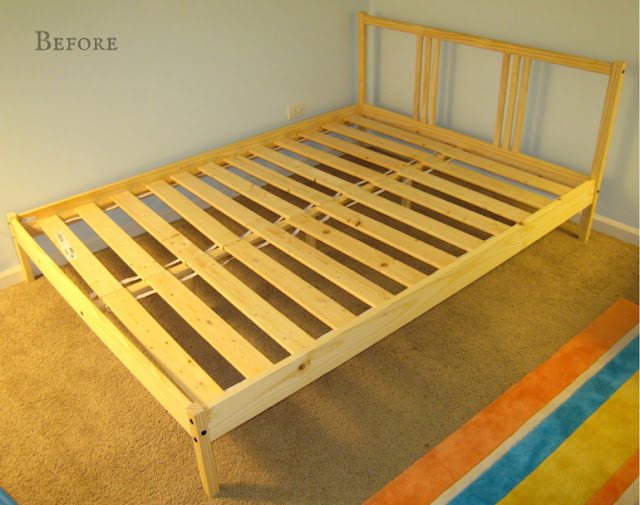
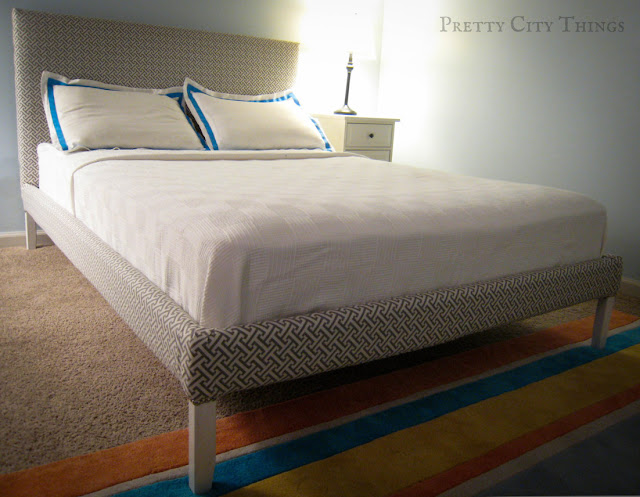
Description: After seeing an similar hack on Ikea Hackers, I took the cheapy Fjellse bed frame, heightened the headboard with a sheet of plywood, and upholstered it all with foam batting and fabric.
Click to read the Fjellse upholster tutorial.
~ Lizzie, Chicago
Ikea for lizard
Materials: Expedit, Tundra, Besta
Description: The Idea was to build a cheap but tasteful enclosure for reptiles.
It all started when I was working the morning shift in the Ikea of Groningen (NL). I had to drive in the pallets of Tundra laminated floors. On top of the pile was a complete sheet of Tundra, for protection. I knew I could use it for something, so I kept it.
Then I looked for a closet with the right dimensions to keep some kind of reptile species and thought of the Expedit series.
Eventually I bought 2 of the small sized Expedit (80x80cm) closets. I drilled extra holes in the all of the top ends of the side plates and placed them with the little wooden plugs on top of each other.
I added the top of one and the lowest part of the inside. Then I had to cut the Tundra sheet the right size and glued it to the back of the Expedit. It had to cut one horizontal shelf in 2 pieces for the down and upper front. Here I cut 2 holes out for ventilation and placed 2 ventilation shafts.
On top of those I placed double U shaped profiles for the glass doors and gave them a nice finish by adding 2 aluminium strips. At last I installed 3 light fittings and put in the glass from a Besta series.
Next up, finding the right lizard!
(no snakes allow by order of the girlfriend ;))
~ Aki Ook, The Netherlands
Wednesday 28 December 2011
Ekby Alex Writing/Sofa Table
Materials: Ekby Alex & Vika Lage/Moliden
Description: I was in search for a very small writing table, but could never find one that would fit my small space. I've seen the Ekby used a few times, but not in the combo I ended up using (at least not yet).
Anyway all you need is the Ekby Alex & either the Vika Lage/Moliden legs. It's pretty simple, attach the legs to the Ekby. I pre-drilled the holes to prevent the wood from being damaged further. After I put it together I noticed it was a little tall, not too bothersome though. I have my chair on the highest setting and it's comfortable. This could also be used as a sofa table. When I rearrange I plan on trying it out as that.
~ Carolyn, TX
RAST to the Rescue: Effectively Hiding the Cable Clutter
Materials: RAST nightstand, BEHANDLA wood treatment oil, a piece of BOMULL fabric
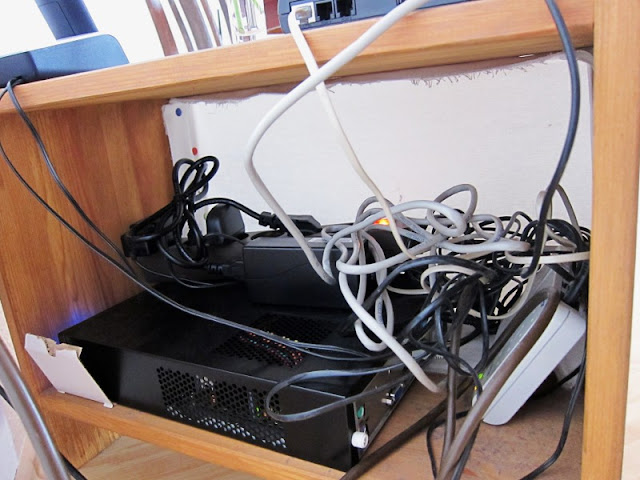
Description: My girlfriend and I were looking for a cheap and effective way to hide the cables of the phone and networking equipment in the living room. The RAST nightstand was just the right size to hold these items but we wanted it in a different color to match our living room as well as a front cover to hide the ugly cables.
The RAST nightstand was given the BEHANDLA wood treatment oil to get a dark brown finish which was closer to the color of the LEKSVIK series furniture. It took two or three coats for the wood to get a solid dark brown tone. We used a simple brush to apply the oil, but a paint roller should work as well.
Finally, for the cover, we attached a double folded sheet of BOMULL canvas with thumbtacks to the inner frame of the RAST. Sitting in front of the power and phone outlets, it perfectly keeps all that clutter out of sight. It even houses a small home server while providing maximum woman acceptance factor. Oh well, and some dust bunnies.
See more of the Rast cable hideaway.
~ Vornoff
Subscribe to:
Posts (Atom)


