Showing posts with label Billy. Show all posts

Tuesday, 30 April 2013

Brightening up a boring Billy Bookcase


Materials: Billy Bookcase and Ikea fabric

Description: I have a very small living space so I found the Ikea Billy bookshelf which was tall and narrow and suited my space perfectly. It is very box like and needed a bit of livening up so I applied fabric to the backing panel and it looks fantastic.

Simply build the bookshelf structure and then before you place the shelves in - apply fabric / wallpaper/ stencil or any kind of material to the backing section.

This can be done with double sided tape or by cutting some cardboard to size and covering that and then placing it in the bookcase.


Lastly secure the shelves in place and this will hold your fabric backing firmly in the right spot.

It definitely adds a bit of character to a very basic bookcase and can be easily interchanged with new patterns as your taste changes.

See more of the Billy backing.

~ Rebecca, QLD Australia

Saturday, 2 March 2013

The Billy-Olsbo-Effektiv Nightstand Hack


Materials: IKEA: Billy extension unit, Billy Olsbo doors for the extension unit, Effektiv doors for the top // DIY store: angle brackets and screws, frosted glass adhesive foil

Description: Creating a nightstand that matches the low depth but still giving enough space inside.

We were in need of some new nightstands for our renovated bedroom. We went for a high Malm bed but the regular Malm nightstands didn'€™t matched our requirements we had, as they were all too huge.


After browsing the IKEA website and the IKEA Hackers website for several days, I came up with this nightstand. Luckily, IKEA sells the same colours in the Malm, Billy and Effektiv series, so no colour trouble there!

You can find the entire Hack with even more pictures on my blog.

~ Jessica, Germany

Wednesday, 6 February 2013

Built in Bookshelves with Window-seat for under $350


Materials: Billy bookcase, Benno Tv Bench

Description: We wanted built-in bookshelves and I have always loved the idea of a cozy windowseat to curl up in while reading a book.

The wall we wanted to build the shelves on was 158" wide, with a slightly off-center window. We decided to use the BENNO Tv Bench as the windowseat. Two31" wide bookcases on each side would be too wide and one 31" and one 15" would be too narrow. So, we had to cut two 31" inch bookcases down to size and then drill our own holes in the end of the shelf that we cut so that we could use the adjustable shelf pegs.

We decided not to use the backing board, we filled the track in with joint compound. I brought a shelf to Home Depot and they matched the paint color very well--although I got semi-gloss and the IKEA finish has slightly less of a sheen, but the line for the track is invisible after being filled and painted.

We removed the baseboard trim behind the bookcases and on the side. We measured from the rear wall to where the studs were on the wall. Once the bookcases were in place, we measured from the rear wall to where we knew the studs were and screwed the bookcases to the studs. We then screwed the sides of the abutting shelves to each other. Then my husband screwed ferring strips to the beam above the shelves and into the top of the shelves, so they are securely attached at the top and sides.

We decided the top of the Benno TV Bench was not deep enough, so we made a brace for the wall, screwing a 2X4 into the beam. We bought a 24 x 48 piece of alder, which we sanded and stained, then affixed to the brace we made on the wall, as well as the top of the BENNO.

Finally, we nailed 2" lattice to cover the space between where the bookcases meet. We replaced the baseboard and picked out nice crown molding for the top of the bookcases. We filled the nail holes and painted everything with the paint we had custom mixed to match the shelf we brought to the home improvement store. We bought some drawer pulls for the front of the Benno so it looks less modern and more traditional.

We love our new built-in shelves and the windowseat has become a favorite reading nook!

See more of the built-in Billy with Benno windowseat.

~ Theresa Novak

Monday, 28 January 2013

Bathroom bookcase


Materials: Billy bookcase, Kvissle organizer

Description: I redecorated my bathroom with all new Ikea products but the one that was hacked was the Billy bookcase. I wanted something that spaced the sink from the wall just enough and would also align with the sink/cabinet. The only thing I found was the bookcase. I also wanted it to float with the sink cabinet but align with the window frame.


1. I plugged in my table saw to cut about 3 inches off the bottom of the side panels of the bookcase so the bottom would align with the cabinet.
2. Cuts were made before assembling the bookcase. I only had to cut the side panels as the back isn't as long.
3. I cut a 2x4 to a shorter width than the cabinet/bookcase so it wouldn't show from the side and bolted that to studs in the wall. Both pieces rest on that.
4. I had to modify the wall mounting portion of the cabinet so that would bolt to studs in the wall but the bookcase is only attached by one screw with angle metal on the bottom going into the 2x4 support and one screw with angle metal in the top corner that goes into a stud. Since the 2x4 supports the weight it doesn't take much to keep it there.


~ Chumly

Thursday, 3 January 2013

Vika Desk with Billy Surround


Materials: Vika Amon desk with Adils legs and Alex drawers, with 2x Billy Height Extensions, Billy Wall Shelf & Capita legs

Description: My old desk had been falling apart for quite some time, and I had been looking for a new one for just as long. I like my desks to have plenty of storage, making good use of the wasted space above the monitor. Sadly I couldn't find a desk that met my needs, so I decided to take matters in to my own hand.

I had seen desks that had been hacked, and looked in to creating my first hack to replace the old desk. I bought the boxes and put them together to create my new desk with more than enough storage, even for a horder like me.


I first created an unhacked Vika Amons desk using three legs and an Alex Drawer unit. I then made the two Billy Height extension units, and fixed them securely using the provided screws to the top of the desk, drilling holes as needed. I left a 1cm gap between the table edge and the height extenders, for looks.


I then made the Billy Wall Shelf, being sure not to use the wallmounts provided, and attached Capita 21cm legs in all four corners. An alternative is to use the Capita Brackets instead of the legs, but the weight of the wallshelf is more than enough to keep it secure and steady when standing on top of the Billy Towers.

For a first time hacker, this is a simple hack which is just a matter of drilling a few holes where needed. It gives plenty of room between the billy units for a monitor and speakers can be housed atop them.

~ Fudce, Birmingham, UK

Tuesday, 18 December 2012

Billy Wall Shelf Video Cabinet


Materials: BILLY Wall shelf, OLSBO doors, MDF for french cleat, various fasteners, table saw, drill

Description: The frustrating part of using Ikea pieces is that they almost never fit A-V components. You find the piece you like, but the gear is too big. You find a piece that will fit the gear, but it is a lot larger than you want.

I already installed a Besta wall cabinet when it occurred to me that you could omit one of the internal uprights from the Billy wall shelf and it would accommodate one of the long Billy shelves.


For mounting, there is almost exactly 1/2" available for installing a french cleat. I used T-nuts and machine screws, plus one wood screw to the remaining internal upright, to secure the top portion of the french cleat to the Billy. The lower portion of the french cleat was secured to two studs. With the lower portion being not as wide as the upper portion, you can easily slide the Billy left and right a few inches to get it exactly where you want. If you are unfamiliar with what a french cleat is, just do an internet search, which is what I did. You will find the T-nuts along with the other furniture specialty fasteners. If you go to one of those large hardware warehouses, we won't mention names, they should have them, but don't be surprised if they don't know what they are. The rear view of the Billy with the french cleat installed shows the bottom of the T-nut. Just do an internet search. It's out there.

I used two of the anti-tip brackets that came with the doors to add attachment points securing the french cleat to the top shelf.

To finish it off, I bought one long and one short shelf, and three Olsbo doors.

Compared to the Besta, the Billy has real veneers and is a much nicer size.

I still have some tidying to do - cable management and a power outlet behind the Billy so that there are no visible cables or wires.

~ Sutton, California

Tuesday, 11 December 2012

Billy Bookshelf DVD Shelves


Materials: Billy Bookcases, 1" x 2" Pine board

Description: After building the Billy bookcases, I need a way to display my DVDs without sacrificing shelf space. I made these little shelves to double stack the cases. The cases in front hang over the shelf about half an inch. A fairly simple 'hack' but I think it turned out pretty well.


~ Crash

Friday, 30 November 2012

Built-in Billy Bookshelves for under $250


Materials: 3 billy bookshelves, crown molding, lattice, quarter round, base molding, calk, paint, screw drivers, drill, finishing nails (optionl: chalk pro reel set, shims)

Description: Step 1: Clear out the closet if needed and remove doors. We had to remove the poorly installed wood shelves. (It was fun to rip them down!)

Step 2: Put those Billy Bookshelves together. I put all 3 together by myself in under 90 minutes. You will need both a Phillips and flat head screwdriver for assembly.

Step 3: Wedge the shelves in your closet space. A friend is helpful for this maneuver. We were incredibly lucky with measurements. We had about three inches to spare with the bookshelves in the closet. We also had to account for a dip in the floor. We used shims (scrap wood) to keep the shelves level.


Step 4: We used a chalk line pro-reel to make sure each shelf was lined up on the floor, otherwise the molding would have been a pain! And we nailed the base of the shelves directly into the floor. They are not moving!

Step 5: We used a chisel to make the bottom part of the two ends of the shelves even with the rest of the bottom of the shelf so the base molding could sit in there.

Step 6: Install the lattice where the two book shelves meet to make it look like one piece.

Step 7: Install crown molding above the book shelf. Nail to top of closet or molding around the closet.

Step 8: We installed quarter round on each side to cover an unsightly blemish in the original wood work.

Step 9: Fill in the nail holes with putty or calk and let dry. Then paint.

Step 10: Decorate your new built-in!

See more of the Billy built in.

~ Stephanie Anderson, United States

Wednesday, 28 November 2012

BILLY gets a bar


Materials: BILLY

Description: Please join BILLY and I for a drink

I love to invite friends over for game night. While playing we love to eat and drink good together. That is why I decided to turn my BILLY bookcase into at BILLY bar cabinet.

I took the smart and easy way out andI turned to Parts of Sweden where you find a complete package for the BILLY bar cabinet.

How to:

I went online and ordered the complete package, a mirror and some green furniture foil. First I put the foil on the back of the BILLY. This way my BILLY is the star of my family room and it loves to be in the centre of attention!

Before you get started with the bar cabinet read the brief instructions thoroughly. The paper with the manual also includes a smart template showing where to drill. It works perfectly.


First mount the mirror on the back of the bookcase. Set the mirror on the fixed shelf that is in the middle of a high bookshelf. NOTE: The mirror is not included in the package, so do not miss it! Please note that the back of my BILLY is green.


On the back of the mirror glass is tape protected with protective paper. Remove the protective paper and press the mirror glass gently against the bookshelf cover.

Time to mark out and screw one half of the hinges, "mounting plates" as it appears on the description. Take the description that also has a template.

Place the template provided and press with an awl through the paper where it is checked for holes. Remove the template and screw the half hinge in the holes you made with the awl.


Put the bar-door flat on a clean surface. Place the other half of the hinges in the large holes.


Now, mount the flap hinges on the sides of the cabinet. Note that there is one for the left and one for the right side and they are different! Mount the flap hinges on the bar door as well.


Fitting the locking magnet. You should mount this on the upper shelf edge. Remove the rack from the shelf and place it on a flat, clean surface. Measure the center of the bottom. Keep locking magnet so that it comes about 20 mm from the front edge of the shelf. Mark the screw holes with an awl and then screw locking magnet.

Replace the shelf, measure exactly and mark the inside of the bar-door as well. Then attached the locking magnet on the bar-door. Use the awl to make it easier to screw in the mounting plate.


Now all you have to do is:
Invite your friends, turn on some Swedish House Mafia and ask: would you like an Absolute Greyhound?

Thursday, 15 November 2012

Freelancer console


Materials: Billy bookshelf

Description: First you may need to saw the upper part of the furniture to get the length needed (once turned into a console), we sawed about 1/4 of it.

Position the shelves where you want them, then use 2x2 screws per shelves so they can stay vertically.

You can reuse the top of Billy to gain an extra shelf, we added it horizontally in the middle bookcase and maintained it with 2x2 screws.


One layer of melamine special undercoat, then two layers of blue/gray paint.

Add 4 small castors and fill the new console with your stuff !

~ Tibotron, Paris, France

Thursday, 1 November 2012

Old mirrored Billy


Materials: Billy + Ydre doors, dishwashing soap, cooking foil

Description: I have got a dark brown Billy, with glass doors, but since I bought it, it was clear to me it could be perfect with two old mirrors instead of the glass doors.


But two ancient mirrors really weight too much for the poor Billy doors so, I took the cooking foil and attached it on the backwards of the Billy doors: first detach the doors and put them on the floor, then cut the foil to the same dimensions of the glass plus 1/4 inch per side, then dilute a bit the dishwashing soap and put it into a detergent spray bottle, so that you can vaporize it all over the glass. The foil will adhere at the glass forever!


Put back the doors and here it is, the modernity of Billy with the antiquity of an ancient mirror

~ alberto gregori

Tuesday, 23 October 2012

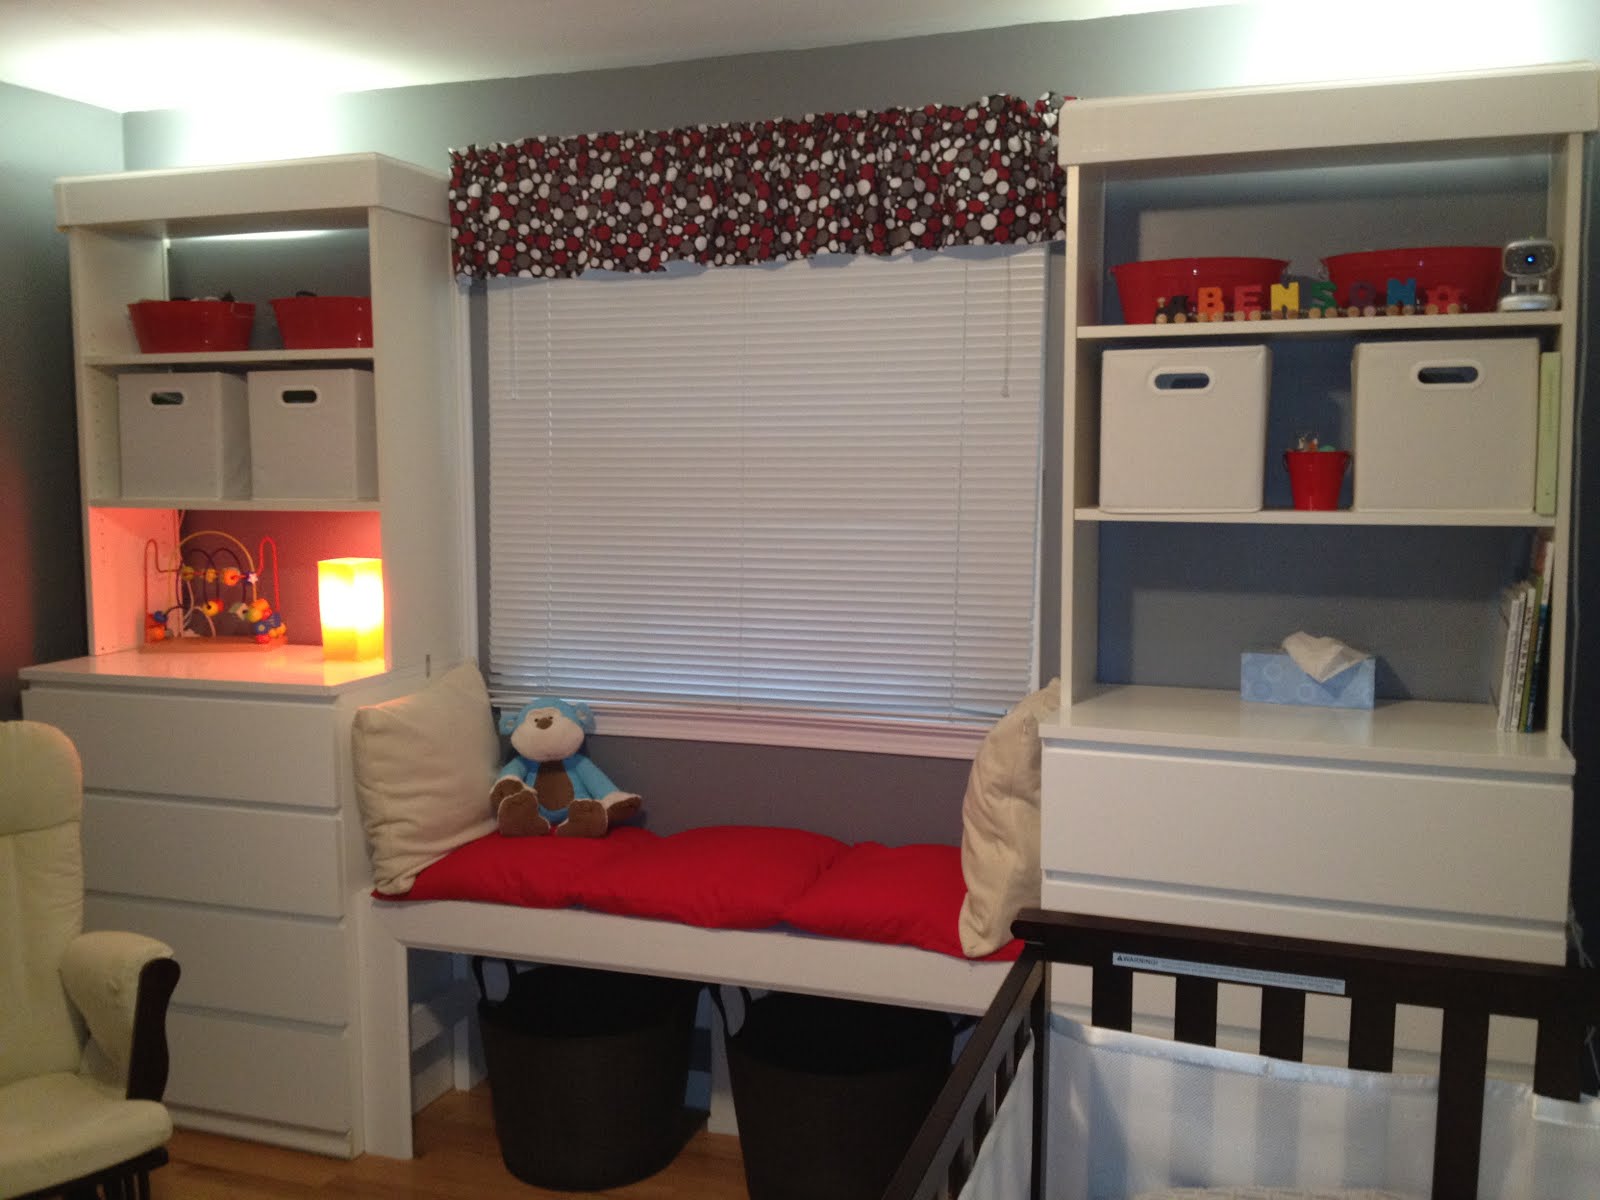
Mock Built Ins with Malm and Billy


Materials: Malm 4- Drawer, Billy Bookcase

Description: We noticed that the Billy Bookcase and the Malm dressers have the same width. We decided to stack one on top of the other to create a built-in-look while giving us some additional storage. We built each of the two dressers as instructed. For the Billy shelves, we build them as instructed, except we did not attach the top or the back.

Next, we turned the Billy upside down and placed it on top of the Malm. Thus, the base of the Billy is actually the at the top of our shelves. This allowed the top of the Malm to be accessible without being obstructed by the bottom shelf and base of the Billy. The Billy and the Malm are held together by brackets. We also attached each piece to the wall. We then trimmed the base of the billy (now the top of our shelves) with crown molding to give it a built-in look. We also trimmed the bottom of the Malms.


We build the bench ourselves, as Ikea didn'??t have one to meet our specifications.

We then used the Granat cushions on the bench. We also hid an integrated lighting strip (I can'??t recall which one) behind the crown molding on the top of each Billy.

~ Rachel, Detroit, MI

Thursday, 18 October 2012

Old World Library


Materials: Billy Bookcase

Description: We have quite an extensive book collection and didn't want boring bookcases. We also didn't have a ton of money.

Base board heater prevented putting anything directly on the floor in front of the wall. We screwed a board to the back wall (same as is done with the lower Ikea kitchen cabinets). We then bought metal flanges and pipe from the hardware store and set a board across from the wall to the flanges. Set the bookcases on the board and secured.


I built the cover boxes with trim boards and painted to match. Carpet and chairs were from obtained locally online. Easy peasy. And we don't think it looks bad either.

~ Robert Fontaine