Showing posts with label Udden. Show all posts
Wednesday, 16 May 2012
UDDEN goes living room
Materials: UDDEN Wall units, coated chipboard, metal angles, screws
Description: I was looking for a sideboard/storage unit for the living room. As I have a open kitchen that can be seen from the sofa, I wanted something to match with my UDDEN kitchen units.
Still considering different solutions, I bought two wall units for the kitchen. As I assembled the units in the living room, I realized a nice solution that just needed very little hacking:
I built a rectangular base from coated chipboard and metal angles (approx. 10 cm in height), stacked six wall units on the top and fixated the ensemble with some metal screws here and there...
Et voila! a nice and clean sideboard with lots of storage (and pretty cheap as well).
~ Folke, Berlin
Thursday, 19 January 2012
The Foldable Udden Desk
Materials: UDDEN drawer unit, PAX BALLSTAD closer door, PERFEKT plinth, plus various bits and pieces. Screwdriver, Sandpaper, Saw etc. etc.
Description: This might not be your typical hack that people can try themselves but I hope it will help inspire people to solve their own furniture problems. :)
I've been making videoreviews of DVD box sets on youtube for a few years and always filmed my videos on a plain white table. After moving my DVD collection to a much smaller room I came up with the idea of building my own custom-style reviewing table in order to save on space. The basic premise was to design a table that would be somewhat transformable so I could minimize it when I wasn't using it.
I bought all my items brand new from IKEA and started to build.
I used an UDDEN drawer unit as a small table by adding a sawed off closet door (PAX BALLSTAD) to the top of it (the drawer unit doesn't come with a top as it's actually only meant to be hung from a work bench).
Then I used another part of the closet door together with a PERFEKT plinth to make an extended desk that you can fold down when it's not needed.
And that's it. A drawer unit, a closet door and a plinth turned into a clever desk.
I also made a video about this project where I talk about the process and show more of it.
~ Oskar Falk, Sweden
Saturday, 17 December 2011
Individual Stove for your modular Kitchen
Materials: Udden Working Bench, Udden Cabinet Base
Description: So Ikea sells a stove in their Udden-Series which I found kinda "meh". For about 300�, you only get the most basic functions like a grill, but not even a hot air function or a pizza mode.
So I decided to buy an Udden working bench; those come in two sizes, the smaller one is almost the same size as a regular cabinet used for stoves. This applies to most stoves sold in Germany, so please check yours out first if you live elsewhere.
I installed an Udden cabinet base, then used an electric jigsaw to cut out the hole for the cooking field.
When doing so, you should use a napkin or something else between the base of your jigsaw and the plate, or else you'll get nasty scratches.
And that was about it, it worked like a charm and looks pretty good if you ask me!
~ Andr�, Germany
Sunday, 30 October 2011
Kitchen unit becomes chest of drawers for babyroom
Materials: Udden console + 2 Udden drawer units + Numerar worktop
Description: We were looking for a nice chest for our babyroom, needing a lot of space. As we had a silver color bed, we also wanted a silver color chest. Difficult to find, so that's how we came to this idea. An easy one!
We removed the worktop from the console and put a Numerar worktop on top of it.
Then, the original way, we installed the two Udden drawer units, for enough space.
Together with some colorfull stickers the chest was finished! (Ikea now also has nice Keith Haring stickers)
This way the chest did not look like a kitchenchest anymore.
~ Gaby, The Netherlands
Thursday, 15 September 2011
Hacking with leftovers: the three tables
Materials: Udden workbench, Inreda magazine rack, Brada Laptop stand, Ribba consoles, Bygel Trolley, Rast bedside table, Pax hook, Honeycomb door, wood, Fabian shelf.
Description: Hacking often leaves leftovers, but sometimes these are perfect for a next project. I actually like this kind of chain-reaction hacking when bits from one project inspire the next.
Like I said, my next project was going to be a standing desk. I work a lot at home, and my wife often does too. We shared one desk in the attic, a Galant desk. She wasn't too keen on switching to a standing desk, I was, and I also wanted to improve the general organization of our attic workplace, all on a small budget and in an attic with an all but level floor (it's more of a U-shape). This hack evolved through some testing and try-outs:
1. Sell corner Galant, buy straight Galant desk (2nd hand), for a more compact workstation.
2. Test drive a standing desk with a Rast table on Galant, realize it's nice to work standing up.
3. Try out prototype of final setup with Udden workbench frame from previous hack and wooden worktop from never-used hobby table in the attic corner.
4. Suddenly realize you now have a place and enough stuff to make a small workstation for your wife, who has very different desk organizing habits.
5. Make small/snug workstation and wife happy with it.
6. Measure height for standing workstation, make standing desk with enough storage space.
7. Use leftover piece of Rast table to make a laptop/couch table.
The standing desk is the Udden workbench I had from a previous hack with a solid wood top cut to fit. Three thick wooden planks attached vertically help carry the honeycomb door (painted white) at the right height, and keep it from bending; two on the sides from front to back, which stick out a little on the back to keep room for cords between desk and wall, and one at the back in the middle.
The door is attached with small brackets to prevent sliding. The door worktop now sticks out over the front of the workbench, so my legs don't bump into the cabinets. I got the whole setup level despite the U-shaped floor with the adjustable legs on the Udden bench.
The small section cut from a Rast bedside table works as a monitor stand. My document holder is a Brada laptop stand with an Inreda magazine rack on top; the Inreda rack was a chance find in the as-is section. It makes the document holder much larger, fits the color of my screen bezel, and on the Brada stand it leaves a small bit of room for my mouse cord to pass through. The two Udden cabinets hold my printer and paperwork, and hide all the cables.
Since my wooden worktop had large holes (it used to be above a radiator, the holes let air pass through) these are great for passing wires through. The Udden cabinets have room behind the shelves for passing water tubes etc, which also helps in working away all cables. I wanted a drawer for small desk items, but instead of installing one under the worktop, I used the Bygel trolley. It's less work, has a drawer, can act as movable extra workspace and is a perfect place to hold my laptop bag.
The Grundtal magnetic containers attached to it hold paperclips and staples etc. With no drawer there, the extra room under the worktop is great or stashing stuff that would otherwise clutter the desktop, and it holds the desktop computer at reach in a relatively dust free but ventilated place. The Vitamin stool is actually too low, but we already had it and it works nice for occasional resting between standing up. The Pax hook hangs on the cabinet door to hold my headphones.
The sitting desk is basically the Galant desk and Bekvam chair we had, with a monitor stand on birch wood Ribba photo ledges, inspired from this one. I cut one Ribba ledge in pieces for the sides and used a full length one in the back. Now my wife can hook up her laptop and place it under the monitor.
The printer sits on a small Ikea drawer unit we already had. I had the printer and monitor ready for sale, but this proved a much better use! Three metal brackets sticking out just over the table top edge help to prevent the monitor stand from tipping over the side. A Brada laptop stand works as a document holder. The Fabian shelf holds her books at arm's reach.
Inspired by the modular coffee side table hack, I chain-hacked the leftover large section of the Rast table to make a nice laptop/couch table in the living room.
The only things I bought were the Bygel trolley, the Fabian shelf, the honeycomb door (these are really cheap) and the Udden cabinets for the workbench. The cabinets were the most expensive items, but they do provide a lot of extra comfort.
~ G.V.M., The Netherlands
Tuesday, 23 August 2011
Udden Stainless Steel Fireplace Wall
Materials: (5) Udden panels, Stainless Steel Screws, Wall Anchors, finishing nails, trim lumber (about 1/2" thick) , saw, wood stain, laser level, wall fireplace unit
Description: I had originally purchased some Udden backsplash panels for our kitchen, before realizing they had to be attached to a specific Udden cabinet which I did not have. When we started to renovate our basement, inspiration struck, and this fireplace wall was the result. The instructions seem laborious, but it's a pretty easy process once you get started.
1. Measure the height of your ceiling to determine number of Udden panels and trim pieces required. Our basement ceiling was around 90" high, or so. We laid out the Udden panels (gently) along with the wood trim to determine if any of the trim needed to be cut down to match the height. Make any cuts necessary, and pre-stain (or paint) all wood trim.
2. Using a laser level, start from the bottom up and begin to build your fireplace wall. Place the bottom-most trim piece, using the laser level as a guide (chances are good your floor is not perfectly level). Use the finishing nails to attach the wood trim to wall, making sure to hit the studs for support.
3. Next, hold up the Udden panel where you want it, and mark the pre-drilled hole placement on the wall with a pencil. Install your wall anchors at those locations. Put the Udden panel back on the wall, and attach to the wall anchors using the stainless steel screws.
4. Repeat each step until you have reached the ceiling, and cut down final top trim piece as needed. Add a trim piece on each side.
5. Take your wall-mounted fireplace unit (this one burns alcohol-based gel, available at most major home improvement stores) and measure the mounting bracket locations. Install wall anchors as needed, ideally screwing into the wood trim. Our particular setup required screwing through one of the Udden panels, which took a little more planning. Using longer mounting screws, drill into the wall anchors, leaving an appropriate amount sticking out to hang the unit.
6. Hang your fireplace unit, polish the stainless panels, and enjoy your new fireplace wall!
~ Shannon Adamson, Colorado, United States
Friday, 10 December 2010
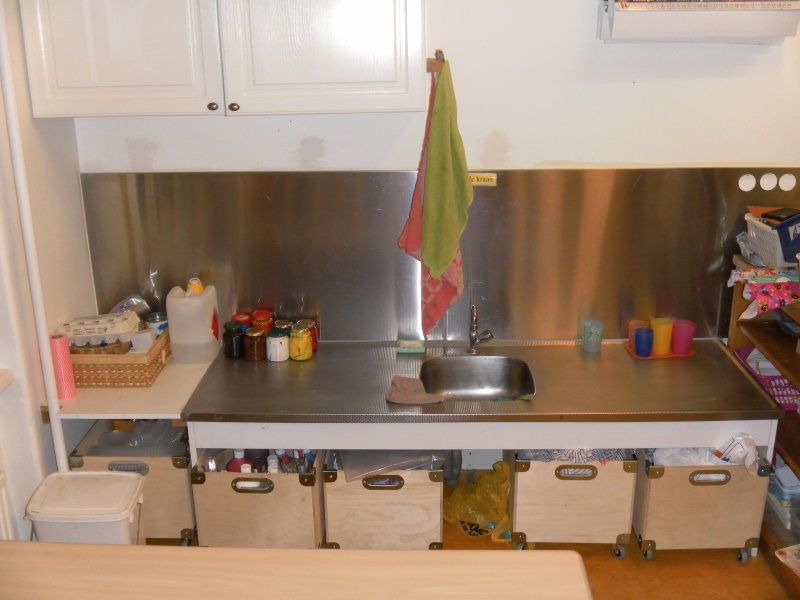
Primary school kitchen ergonomic makeover
Materials: Two Udden workbenches, five Snack wood boxes (now sadly discontinued), Rill weels, Molger hooks, scrapwood for cleats, high-tack glue, screws, plugs, drill, saw, hammer.
Description: My kid's school teachers had put up a request for a mother to make new curtains, for under the classroom kitchen sink. After inspecting the small arts and crafts kitchen, I concluded it was an ergonomic horror for the teachers: they had to stoop down to the floor (on hands and knees) to get anything from under it. Besides, the tiles were practically falling off the wall, and they needed extra storage space in the classroom. Being a dad, I didn't see myself sewing curtains and prolonging the dysfunctional setup, so I took a different approach.
After some negotiating, the teachers got a little budget to redo the kitchen, with second hand kitchen cabinets. While at Ikea to purchase the wooden Snack boxes for under the countertop, I discovered two Uden workbenches on big discount, called the teacher and she agreed to use them to replace the old tiles.
I hammered the rims flat, and used a French cleat, scrapwood pieces jammed under the rims and high tack glue to fix the two panels in place, and finished with some sealant kit (polymer). (Tip: to prevent wobbly effect, attach a sizeable piece of wood in the centre of the panels).
The boxes with wheels make it much easier to store and reach art supplies. I had a strip of Molger hooks lying around so I attached that to the hanging cabinets for towels etc. Best thing: the stainless steel tops double as magnetic backboards to attach things to. From shabby kitchen to luxury style art corner, all for around one hundred euro's and an afternoon of work.
I didn't take before pictures, so the before pictures are from another classroom with a similar setup as the before situation, just to get an idea of the ergonomic disaster.
~ G.V.M., The Netherlands
Wednesday, 28 July 2010
UDDEN hacked as His and Hers shoe rack
Materials: 2 UDDEN Kichen Cabinets, drill, toggle bolts
Description: In my rental unit I had a nice entry but no coat closet to hide my shoes in. The standard skinny shoe racks never appealed to my eyes from the design perspective. They screamed "shoes". And I decided to create my own shoe something. From the onset, I knew that this would have to reflect our style through the rest of the apartment which is ethnic contemporary. It would not only hold our shoes but also daily mail, and some of the artifacts.
I used a UDDEN Kitchen Cabinet and mounted it on the wall with an offset now creating a nice table top to showcase the artifacts on one and got a beautiful box to hide the mail away on the second. And thats our His and Hers shoe rack. My total cost was $70, atleast $30 less than the not so good looking skinny shoes racks that hold the same number of shoes. If needed one could also get extra shelves from Ikea AsIs Department and add a second shelf to fir more shoes. I used shoes boxes so one pair was in the Shoe box and another on top of it and this fitted approximately 16 pairs of shoes in one cabinet.
~ Ekta Naik
Thursday, 3 June 2010
Simple kitchen island
Materials: 2 Udden and 1 Pragel
Description: With 2 Udden and 1 Pragel we made an island for our kitchen! Very cheap and very beautiful!
~ Francesca Romana, Roma
Subscribe to:
Posts (Atom)