Showing posts with label Duktig. Show all posts

Tuesday, 30 April 2013

Little Kids Puppet Theater


Materials: Duktig, Ramsta, Trofast

Description: I wanted to get a puppet theater for my 5 year old grandson. There wasn't one at Ikea and the lemonade stand was too big and could easily fall over. So I made one very simply from the Duktig tool bench and he helped me make it! We also added the Trofast bin as directed.

I constructed the bench following the instructions exactly but left out the blue peg board from the back in step 11. This small bridge part is now the front of the stage and holds the curtain and lights. We also used the battery operated Ramsta lights as spot lights for the stage. (His favorite part). They come with two self adhesive pads, but no AAA batteries. Each light takes 3.


I then velcroed a dry erase/magnet board to cover the front opening. This can announce the name of the show with magnetic letters or write with a dry erase marker. Last step is to add a sash curtain rod to hold the drapes in front of the stage. (See pic for all accessories.)

The drapes were made by simply sewing a pocket in the top and pushing the sash curtain rod in the pocket.
The holes in the 'stage' become a handy spot to add scenery to the show or to stand a finger puppet on a dowel.
If you wanted to make the over head bridge part larger you could use the Duktig microwave shelf part instead of the top of the tool bench. This was my original idea, but later decided, it wasn'€™t necessary.

~ Followmetaichi

Wednesday, 4 July 2012

Duktig Kitchen Goes from Bland to Bling


Materials: Apa storage box, Tag handles, Duktig mini-kitchen

Description: My boyfriend's sister and I wanted to give her 2-year-old daughter the Duktig mini-kitchen as a birthday gift, but we were unimpressed by a few things:

1) It's boring. Adults might like the minimalist, white and natural wood look, but no little kid is getting psyched over that.

2) No fridge. Where do you store all your play food?

3) The oven has a shelf in it instead of an oven rack. Not very realistic.


We fixed these issues pretty simply, basically by painting the hell out of it. As for the missing fridge, we used an Apa storage box on its side, spray painted metallic silver on the outside and painted white on the inside. We attached hinges to keep the door on, and used Tag handles in two different sizes to act as freezer and fridge handles. I used my Cameo cutting machine to design and cut out a Frigidaire-style label with her name on it for the front of the fridge, just to make it that more awesome. The stove situation was solved by painting the shelf grey and drawing a grid on it with a Sharpie.

My niece loved the finished product and it was definitely the highlight of her birthday.

~ Adrienne, New Hampshire

Thursday, 10 May 2012

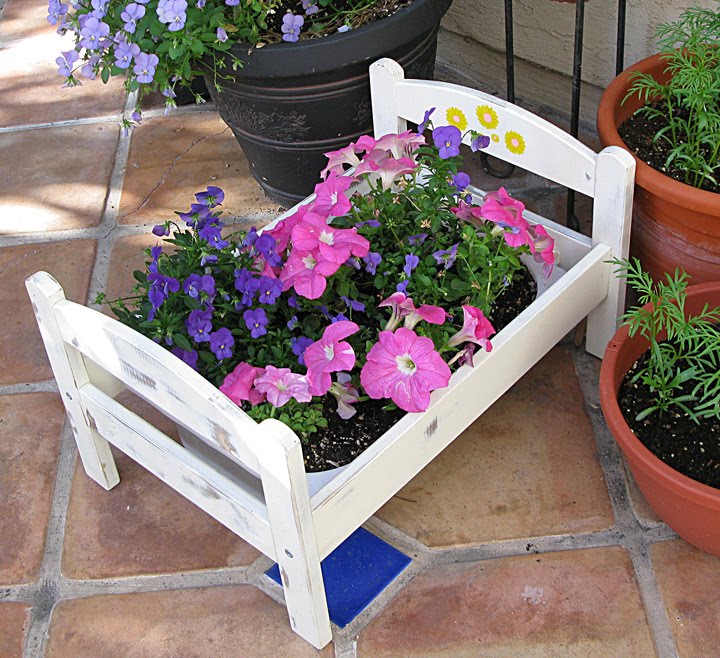
A sweet little flower bed


Materials: Duktig, 4" Trofast, hammer and 1 nail

Description:
This is really simple!

Build Duktig and leave out the base board.

The 4" tall Trofast fits in it perfectly side to side. (Trofast 16.5" x 11.75" x 4")

Put holes in the bottom of Trofast with a hammer and large nail or use a drill.


Fill Trofast with potting soil and then plant with flowers.

Place Trofast inside Duktig.

You're done!

If you want to get more creative: paint or stain your Duktig and seal it with an outdoor varnish. Trofast comes in a bunch of colors so you could match everything.

If you want to get more complicated: Duktig's length is about 3" longer than Trofast, so you could cut and drill the two length boards for a perfect fit. I did not do this.


(I had used my Duktig as a doll bed previously, that's why there's glue marks where the base board had been.)

~ Carmina Caballes, San Diego

Sunday, 29 January 2012

DUKTIG bunkbed for dolls

Ikea Duktig bunk bed for dolls

Materials: DUKTIG doll bed, paint, metal brackets, material & stuffing optional

Description: Name brand doll beds for the 18in dolls are expensive. I had already found the DUKTIG bed to be a great deal. As the doll collection expanded, so did the DUKTIG collection. Short on space in a room that the girls share, we decided the dolls needed bunkbeds. The beds will not stay on top of each other on their own so we used a metal bracket.

1) paint pieces (optional)
2) lay headboard & footboard on firm surface & hammer the bracket into place securing the two beds together.
3) assemble side rails
4) you can use the bedding provided or you can spruce it up.

~*~*~*~*~ a more skilled woodworker could drill holes in the top of one headboard/footboard and the bottom of the other, then use a dowel pin to secure the beds together. This would provide a seamless look, and allow the beds to be taken back apart into single units.

~ Sonya, Virginia, USA

Tuesday, 10 January 2012

Making Child's Play of the Ikea Doll Bed


Materials: Duktig doll bed

Description: $105.95 for an American Girl doll bed vs. $20 + a few supplies for re-doing the Ikea Duktig doll bed ($20). A happy outcome for me, my pocket and my daughter Elle!


Here's what you'll need:
The Ikea doll bed
Sand paper
Primer
spray paint
piece of MDF

Optional stuff:
12" x19" piece of 1" thick foam
Half yard soft cuddly fabric
Stuffing/batting/pollyfill (i.e. whatever you want to stuff the pillow with)
Vinyl decal of the dolls name
Scrap fabric for the sheet and quilt

1. Sand the wooden frame.
2. Paint a thin even coat of oil based primer on all sides of the frame and let dry.
3. Lightly sand any rough spots.
4. Spray another thin even coat of primer. Let dry.
5. Spray paint the entire frame with a thin even coat of the color of your choice and let dry.

Click for instructions on the Duktig doll bed makeover.

~ Stacey, St Pete FL

Monday, 2 August 2010

Cookie stand for children


Materials: Duktig (plastic glasses), Kalas (plastic plates), Pyssla

Description: This is a colourful cakestand for children party.

You need: 1 set duktig plastic glasses, 1 set kalas colourfull plastic plates, and strong plastic glue.
First place the 3 selected plates upside down. Glue the Pyssla beads to the plates, all along the border. When it is dried, glue the glasses to the plates, as it is seen on the pictures!


And it is done: you have a colourful party cakestand! (You can do 2 piece, from the sets)

See more of the cookie stand for children.

~ Anita Csorba, Budapest, Hungary