Showing posts with label Kassett. Show all posts

Tuesday, 1 May 2012

Molger and Kassett united


Materials: Molger bench, Kassett boxes (largest size)

Description: I do like the concept of open storage but was sick of the dust collecting on the actually not that attractive bottles of cleaning agents and rolls of toilet paper.

So I bought two Kassett boxes in the largest size available which would be able to accommodate everything stored on that bench easily.


Since they were to high to fit in between the boards I took the bench apart, drilled new holes in the legs and put it back together. A simple measurement which created a lot more, easier to clean, room for storage.

~ Nadine, Hanover, Germany

Friday, 6 January 2012

Kassett Decoupage

Mod Podge Kassett boxes

Materials: Kassett, pictures, Mod Podge

Description: I had a couple calendars sacrificed by friends at the end of the year and a need to dress up the Kassett boxes for our Expedit TV stand for use as toy storage boxes.

I cut out the best images from the calendars (in this case Curious George and Dr. Seuss), and used the Mod Podge to glue one to each side of the box, facing the top. (It's easiest to do this while the box is still unfolded and flat.


Mod Podge Kassett boxes

After the images dry, coat the entire box with three coats of Mod Podge or so, which seals the images to the boxes, makes them a bit shiny (unless you use matte Mod Podge) and offers a bit of waterproofing--essential if you want to be able to wipe them down.

Mod Podge Kassett boxes

Assemble, and you're done. I've got double-sided boxes--Curious George on one side, Dr. Seuss on the other.

~ Thomas, United States

Saturday, 24 December 2011

Spray-painting Ikea Kassett Boxes


Materials: Kassett boxes, school glue, paint brush, and spray paint

Description: -If needed, remove metal fasteners and label holder from the bottom of the box and flatten it out to be spray painted.

-Prepare the lid to be painted by using school glue and a paint brush to brush glue on the metal parts of the lid. Make sure the metal gets a good coat (it only requires one) especially around the round fasteners on the sides.


-Once the glue dries you can spray paint the two parts whatever rockin' color you've picked.

-When the lid is almost dry, like just a tiny bit tacky, you can start peeling the paint off the metal. It comes off easily and clean. There may be a few specks on the edges where there may not have been enough glue but they flick off easily with your nail or an exact-o knife.

-Wait for the top and bottom to be completely dry then put them back together and you're done! Super easy and now you have a box in the exact color you wanted!

See more of the painted Kassett.

~ Laurie Millar

Wednesday, 6 October 2010

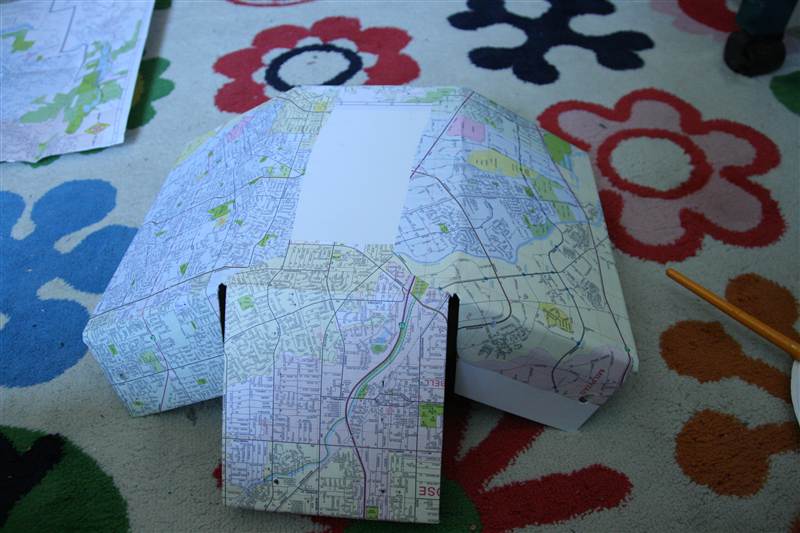
Mapped-Out Kassett Boxes


Materials: White Kassett cd boxes, various road maps, scissors, glue (rubber cement or 3M Super-77 spray)

Description: I noticed the Kassett boxes are dirt cheap ($4/pair) but horribly boring. So, to spruce them up, I got various road maps and gave them a face-lift.

I got all of my road maps from AAA and bus stops. If you're an AAA member, they have a plethora of free maps you can pick up for no cost at any office. Also, transit maps are great, free, and very interesting.

I used 3M's Super-77 spray glue, but after finishing I would HIGHLY recommend you rubber cement or another alternative instead. The spray glue is just too messy.

This is a pretty simple hack... pretty self explanatory. Never the less, I followed these steps:


1.Work panel-by-panel
2. Do the front first. Pick out the part of the map you find most interesting. Cut a piece approximately 1.5" larger than the panel, glue it down to the face, and fold the edges over.
3. Continue working on the back, then the sides, then one rectangle for the bottom.
4. After everything is dry, you'll have to clear the holes for the mounting hardware. I used a dental tool, but an exacto knife works great too, especially for the slits on the front label holder. Feel around from the inside of the box, poke through, then complete clearing the hole from the outside.
5. Put it all together again.

~ Sean S, Los Angeles, CA

Wednesday, 9 June 2010

Hanging file boxes


Materials: Kassett magazine box, smead hanging file frame, measuring tape, marker, hacksaw, flathead screwdriver

Description:
1. assemble kassett magazine boxes according to included instructions
2. measure hanging file rails to fit interior space of box, mark with marker (will vary depending on size of paper files you are using)
3. use hacksaw to cut off excess portion of hanging file rails
4. assemble hanging file frames within kassett box and insert hanging files


~ Carole dDodge, Hollywood, FL