Showing posts with label Skruvsta. Show all posts

Friday, 25 November 2011

Skruvsta upholstery

IKEA Skruvsta reupholstered

Materials:
1 Skruvsta Swivel chair, 3m Kajsastina Fabric, stapler,staples, staple remover, sewing machine, scissors and a wrench n�10

Description: Time to change my white Skruvsta swivel chair.

IKEA Skruvsta reupholstered

Step 1: Get all your tools.
Step 2: Remove the four bolts underneath the chair with a wrench n� 10. If you have separated both parts put the bolts back on, so you don't loose them and protect yourself for step 3.
Step 3: Start removing the staples, I didn't count them but there are many of them. Be careful, injuries are possible.
Step 4: After removing all the staples, now take the fabric off and loosen all the seams, but mark your patterns so it is easy to fit them together afterwards.
Step 5: Place your patterns on your new fabric and start cutting.
Step 6: Sew all your patterns together.
Step 7: Put the fabric back on the chair and start stapling.
Step 8: Place the underframe back and tighten the bolts.
Step 9: Last but not least, put the pillow back, take a seat and relax...

~ S&M, Belgium

Friday, 13 May 2011

Waiting for the mail


Materials: SKRUVSTA office chair and post bags

Description: A while ago, I got hold of 5 old post bags from our former company. As a remembrance of the company I used to work for for almost 25 years, I knew that I wanted to make a new cover for the Skruvsta chair. First I have washed the bags twice, they were very very dirty and stiff I used a lot of fabric softener to make the genuine jute more flexible.

First I peeled off the orange fabric and cut the bags open. IKEA used about 300 staples... Then I tore the seams, so I had all the different parts of the fabric separate and ironed them flat.I have used these parts as pattern, easy! I had 5 original post bags from our old post company, once called PTT (now TNT). I have puzzled with the red/white/blue stripes (the Dutch flag) so it would fit in one line on the three different parts on the inside of the chair. Then I sewed all the parts together and placed them over the chair.


With an electric stapler and with the help of a friend, we stapled the cover onto the chair. She was pulling the cover and I shot the staples into the wooden parts of the chair. I have used 14cm. long staples. On the back of the chair I used the text of the bag which means Owned by the PTT.


I sewed two straps of the original bags on the back site of the chair. I have used a thicker seat (6cm) and used the old zipper, which I placed on the back site of the seat instead of on the bottom, because I have made the seat doublesided. The number on the chair (80) is the year the bag was made. Real vintage bags!

~ Denise Witjas, The Netherlands

Thursday, 13 July 2006

hate the fabric colour? just paint it!

nothing like new colour to bring an old piece of furniture back to life. but when you have non-removable fabric covers ... bummer? maybe not.

greg of ecoroofs everywhere shows us on his ikea skruvsta how you can paint the fabric and even make it look like vinyl.
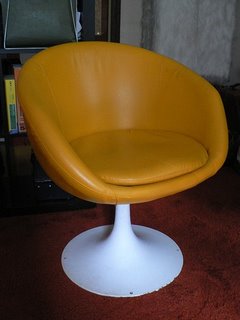
this is greg's skruvsta. in its previous life, it had prints and a pedestal with castors. 
he painted it honey yellow and added in a retro looking pedestal he scavenged.

"i used acrylic paint and added fabric medium, sometimes called textile medium. that turns the paint into fabric paint.

tip! most people use 'art store paint' you buy in expensive little bottles, but a little known fact is that you can use regular old house paint, as long as it's acrylic. I think it might have to be latex too but I'm not sure.

i then did a test patch on the bottom of the cushions.

but the old print/colour showed through the yellow paint. i got kilz primer and had it tinted yellow at home depot. you'll have to make sure that the primer is water based latex as the oil based version has chemicals in it that would eat the foam that the chairs are made out of.

next, i washed the fabric to remove any sizing stain blocker that interferes with paint adhesion. i didn't wait for it to dry, just painted on the kilz with a brush after adding a little (few ounces) of fabric medium.

tip! i bought the biocolor brand from earlychildhood as it was by far the cheapest and easiest to use, as no heat set is required and costs around $10 for a 16 oz bottle, (with shipping).

i sunned the chairs for a couple of hours till they were dry, then painted two additional coats. i bought a gallon of paint for two chairs, but could have gotten away with just one quart, i think.

i'd say you can probably paint any fabric this way. acrylic paint is by nature extremely flexible and there's no cracking at all. the texture is more like vinyl than the original cotton. the colour doesn't seem to fade in the sun. so far no problems at all after 4 months."

sounds complicated to me. but i'm sure you diy pros out there dig this.

tags: , , , , , ,