Showing posts with label Sniglar. Show all posts

Monday, 8 April 2013

SNIGLAR trundle crib


Materials: SNIGLAR crib, bed base and VIKARE guard rail

Description: My two daughters are just 18 month apart and houses in Spain are not very big. Since they had to share room, and I didn't want to invest in a big, bulky trundle crib, I decide to build one from my SNIGLAR crib.

Easy as abc. I already owned two SNIGLAR cribs so I just had to put a VIKARE guard rail into the second bed base, add some felt to the bottom of the base so that it would slide with ease and put this bed under the crib.

My older daughter gained a new "big girl" bed while the small one passed to the crib.

Happy kids, happier mother! :)

See more of the trundle crib.

~ Bebestilo, Spain

Friday, 26 October 2012

Ikea Sniglar Changing Table to kids desk


Materials: Hinges, screws, saw, sandpaper, Sniglar changing table

Description: Saw it in half. Put the hinges and screws to set the wooden top.


~ Roula, Greece, Thessaloniki

Tuesday, 9 October 2012

Condo Perfect Baby Changing Table


Materials: 1 Sniglar Changing Table, 1 Kusiner Wall Pockets, 2 hooks and eyes, 5 metal hinges, 1 bead chain, 1 pack of small cork or rubber pads, handheld drill with various bits

Description: Living in a small apartment or condo, with no room whatsoever for the baby's changing table, you can make a sweet fold-up table out of a cheap Sniglar unit that will live on the wall only 5 inches deep, with parts to spare. It took me a few hours of design and installation but it was worth it!!

Instructions: Assemble one of the two tabletops per Ikea. Optional: cut up one of the legs to add mass to the four ends of the tabletop's long sides.

Make the bolts flush to the tabletop's sides by drilling in slightly to the wood. This will allow hinges to sit nicely over top of the wood.


Fasten two of the four legs to the tabletop using your hinges. Best to drill guideholes into the wood first to make some space for screws. Measure the unit to the wall at the height of the legs, and attach it with hinges using any necessary reinforcements (I used Zip-It anchors into drywall, not as strong an anchor as wood, but holds the weight fine).

To prevent the legs from buckling if knocked accidentally, measure the distance from the bottom of at least one leg to the wall. (Mine was 20.5 inches to the baseboard.) Cut the last leg to that size and attach it to one of the other legs at the floor with a hinge. Fold it up vertically and install a smaller eye and hook so the legs can stay closed together. Including a small chain will make it easier for mom and dad to lift up and close.

Lastly, fold the whole unit up against the wall and measure out a larger eye and hook to hold it up and out of the way. Stick on small cork or rubber pads as needed to make it all quiet! Refer to the photos if my words aren't enough. Cheers and good luck.

~ Nathan Medd, Vancouver, Canada

Tuesday, 3 July 2012

Baby Changing Table and Dresser


Materials: Velcro Tape, Peel and Stick Wallpaper, Sniglar Changing Table, Brimnes Chest of 3 Drawers, Driller & Screws

Description: After a futile search for a reasonably priced nappy changer/chest of drawers I decided to make my own first IKEA hack. Here it goes.

First I assembled the chest of drawers according to Ikea's instructions.


Then I covered the Sniglar's top shelf with peel and stick wallpaper (just because it did not match the decor), assembled it and added screws for support.

Finished the changer by sticking the Sniglar shelf to Brimnes top with adhesive Velcro so it won't slide off.

~ Lyn, Dubai

Wednesday, 27 June 2012

Baby Hack Attack


Materials: Rast Table & Commodes, Sniglar Change Table, Latt Kids Table, Eivor Leva Fabric, Bygel Rails & Containers, Satta, Oskar, Panna, etc...

Description: With 4 (yes four!) Ikeas in Berlin we can't help but poke through the As-is section(s) on a regular basis and pick-up a bargain or three. *even if the As-is turns up nothing we always manage to find a deal in another area, especially since discovering the awesomeness that is Ikea Hackers - Your wondrous collection of creativity inspired us to hack these beauties for our little munchkin!

For more info, photos, how-to's & Ikea product links click here.

~ S., Berlin

Wednesday, 9 May 2012

Guest bed makes space for baby changing table


Materials: Hemnes daybed and Singlar changing table

Description: Convert a day bed to a comfortable toddler bed with changing table.

1. Cut the legs of the Sniglar changing table and paint the frame white.

2. Cut the excess length of the Hemnes daybed mattress and use this piece as a separator between the bed and the changing table.

3. If guests arrive, remove the Sniglar changing table and place the excess mattress back in place. It reverts back to being a full length day bed.


See more of the Daybed plus changing table.

~ Kika y Luka, Barcelona

Wednesday, 15 February 2012

SNIGLAR - Crib co sleeper

SNIGLAR co-sleeper crib

Materials: crib SNIGLAR (39 �), 4 wheels (0.85 � c / u) and a hinge (2.60 �)

Description: After 2 years of living with our son Ivan who is a candidate to win the prize for the child on the planet with least sleep, it was clear that with the new one is coming to us, we are not to play, and although Mr. Estivil criticize us, we wanted a co-sleeping crib to avoid those early months in which the baby eats were every 2 hours, with consequent little walks in pajamas and disoriented, we took from our bed to his crib, in darkness and stumbling over anything (shoes, teddy, our moral) that was lying on the ground.

Buuuuuut the crib co sleeper we had seen cost a pretty penny and while we would have gladly paid for sleep, I am an Ikea hacker, and I proposed to have a brand new challenge. Make a co-sleeping crib for six pence.

Me bought a crib SNIGLAR (39 �), 4 wheels (0.85 � c / u) and a hinge (2.60 �). And I and my dear miter saw we got to work.


SNIGLAR co-sleeper crib

The crib SNIGLAR 125x65 cm measures. I stop the crib to 87x58 cm. (inside of 83x54) and the base at the level that we should have for our mattress (in our case, the top of the base is at 43 cm. To put a mattress and the result is flush with our mattress bed).

After several cuts, drills and screws the result is what you see.

A solid crib, super easy to move, and that can convert in a co-sleeping crib very easy.

I love the result. I hope the baby is on his way too and we all happily sleep.

A greeting!

Javier.

PD.: The chains that hold the caps took them out of the back pockets of jeans that bothered my wife, SUPER HACKER!

~ Javier, Madrid - SPAIN

CAUTION: "Safety is paramount. Please review safe sleep environment guidelines like this for infants before attempting to convert your crib into a sidecar." ~ Jules

Thursday, 9 February 2012

Toy Kitchen from a changing table


Materials: Sniglar changing table

Description: First I cut a little bit the legs of the changing table to make it kid's size.

Then I painted it with spray paint. I put and glued a piece of plywood bought at Home Depot on one side of the changing table. On that I also glued a little shelf found at Hobby Lobby.

For the sink I used a salad bowl bought at Walmart and for the stove simply some old CD...

A little curtain on the front and that's it!


With the changing table I also made a toy workbench! Very easy...

~ Elena @worldwidemom.com, Las Vegas

Monday, 26 December 2011

Sniglar to Display Case


Materials: Sniglar changing table

Description: Transforming a Changing Table Into a Display Case.

The former table consisted of two frames, each one with an MDF board, held by a groove into the frame. So it was mostly a matter of replacing one board by a glass plate, and putting the frames together.


- Make shelves.

- Add hinges and latches.

- Paint and oil.

- Replace one board by a glass plate.

- Add LED strips.

See more of the Sniglar display case.

~ Pascal Bauermeister, Switzerland

Monday, 19 December 2011

Sniglar changing table makeover

IKEA Sniglar changing table makeover

Materials: Sniglar changing table. Komplement drawer. 2 pieces of wood 72x1.4x4cm. Paint. Velcro. Fabric

Description: Needing a small (and not so expensive) changing table that had to stay in the entry hallway and therefore had to "hide" the diapers a little our search turn up none. So with a little paint and fabric we came up with this.


IKEA Sniglar changing table makeover

First all parts of Sniglar and the two pieces of wood where painted with a non-toxic paint.
Sniglar was assembled, then the two extra pieces of wood were placed under the top. The racks for Komplement went on the extra pieces.

Then with a lot of measuring I made four pieces of fabric that fit onto the sides of Sniglar with Velcro bands glued on the top and bottom sides as well as on the Sniglar table.

Got a few pieces of fabric leftover so made some little "bags" to put diapers and stuff in.

~ lotta h, stockholm sweden

Monday, 28 November 2011

Better than sticking the kid in the actual dresser drawer

compact junior bed with storage

Materials: Malm chest of drawers (2), Sniglar bed (1), Ivar side unit (2). Also a Pax wardrobe.

Description:
We're a family of five living in a small, two-bedroom flat. The two teenage girls share a room, and Junior Muppetface Bananas, age 4½, sleeps in the "master bedroom" (ha) with us. When he was a baby he slept in our bed, then he got his own, and the room which is about ten metres square got more and more cramped.

And then he needed a bigger bed (his, while not a crib, was crib-sized). What were we to do? We needed to be able to open the door to the room, after all! Ikea assures us every year that the company caters for those of us with limited space - well, we all know that ain't true. The options are actually very limited and unimaginative. (Also, in Sweden they still operate in a 1980s dream world where we all live in big flats or houses and a standard double bed is, indeed, 180 cm wide. That's minimum then. They don't offer any bed frames here for a bed that is 140 cm wide except the Malm, and that adds on so much on the sides that you don't save any space in the end at all!)

After ranting for a good while I submitted to the necessity of hacking. I also made my husband submit. We're both really un-handy people so I tried to come up with a solution that involved as little building as possible. The enclosed photos aren't great, but they show the important bits. (The room is actually so small it's hard to step back and get everything in the frame!)


compact junior bed with storage

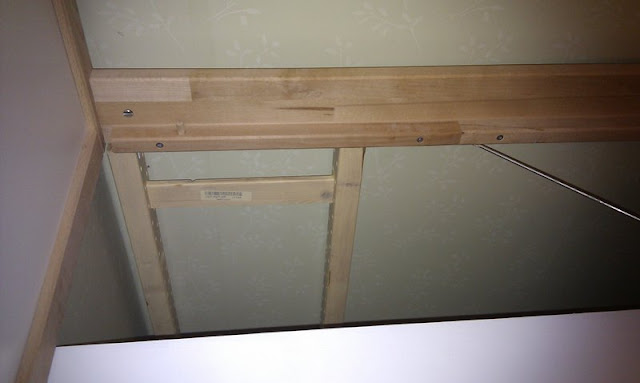
The Sniglar bed frame was bought second-hand, and the legs were sawn off. It was then placed on top of two Malm chest of drawers (also bought second-hand but for all the hassle that was we shouldn't have bothered, frankly, but that's another story). Our biggest problem was how to support the bed on the inside, against the wall. Originally I'd planned to use two adjustable height desk legs (Vika Kaj), but as we were sawing and sanding away like merry elves I remembered that we had some Ivar side units in the cellar that might do the trick for nothing. We sawed two of those off to the same height as the Malms, drilled a hole in them for one of those wooden plug things and a corresponding hole in the bed, banged the whole lot together with loads of wood glue, secured it some more with metal L-shaped brackets, realised it was still not super-stable dammit so used another bracket to secure the Ivar bit to the skirting board, and then shoved the Malms in underneath. Hey ho, job done! The chest of drawers are 48 cm deep or so, and the bed frame is 75 cm wide, so the majority of the bed is supported by the Malms, with the Ivar bits just propping the inside up so to speak.

At the bottom end of the bed is a Pax wardrobe, which is just put together normal style. The only "hacky" thing about it is we put the back on white side out, facing the kiddie bed so to speak. I'm going to hang a curtain in front of it on "our" side, because there is no room for doors. We still haven't figured out how to secure the wardrobe to the wall or anything else, but we'll think of something. Probably this will involve borrowing a bad-ass drill from a friend, one that will hopefully be powerful enough to punch a hole in our concrete-and-rock bad-ass wall (there's a reason why the Ivar unit was secured in the skirting board).

The result is a bigger and more comfy bed for Muppetface Bananas, in a more secluded corner, with room for his and my clothes underneath, and a whole wardrobe with room for clothes for my husband and even some leftover space for my skirts. Also a little more privacy for us, since the wardrobe sticks out a bit and becomes a half wall.

~ bani, Uppsala, Sweden

Tuesday, 10 May 2011

Sniglar grows up too!


Materials: Sniglar changing table, saw, sanding paper

Description: Sniglar makes a great set of play tables when it's no longer needed for nappy changing!


Simply saw it in half, sand raw edges down, and voila!

We also screwed on (when it was used as a changing table) 2 Sigfried wooden brackets to the side to hold a plastic top and tail bowl, which works equally well as a toy/ bits and bobs bowl.

It also matches some of the other Ikea children's range, like the Mala easel.

~ Hettiella, Scotland