Showing posts with label Kura. Show all posts

Friday, 16 November 2012

KURA Bunk Bed


Photo: IKEA.com
Materials: 2x KURA Reversible bed, Allen wrench, screw diver and drill.

Description: We wanted to upgrade our KURA Reversible bed into a bunk bed, so our littlest(3) could sleep underneath and we could still help our oldest(6) into bed when he is sick or already asleep.

We decided we would just buy a second KURA and use its parts to convert ours into a bunk that looked like stock and not like crap.

Parts used from second set. Corner legs with most holes. Rails with cutout for panels. Panels.

Everything fit pretty mush as expected. The lower bunk upper rail that goes into the ladder required a bit of drilling. This piece mounts upside down and would be offset by an inch. So drilling it open a bit allowed to use the link that connects it to the ladder railing.

Also, since this rail is upside down (to hold panel) a hole on the opposite end coner leg was added so we could use the mounting bolt for it.

Other then that, it was pretty straight forward.
Looks like it was meant to be like this and didn't take us long to modify.

~ AL, Chicago

Tuesday, 24 July 2012

Bed in the air!

SAFETY WARNING: This hack is not proven to be safe. Do not attempt to replicate this unless you have a professional to ensure that it is structurally sound and safe for a child's use. ~ Jules

***


Materials: Kura bed - Sniglar changing table

Description: During last year's house renovation, we created a new room for our son. The problem we faced was that his IKEA Kura bed could not fit inside the new room. So I decided to modify the Kura bed.

The modification involved three stages:
Firstly the bed had to be raised high enough so that the door of the bedroom could open without issues.

Secondly the bed had to be shortened by 8cm in length so it could fit near the wardrobe. And finally the bed had to be made safer because of the new height.


For the first step I started by dismantling the bed from the old bedroom. Then I went to a local shop and bought 2 new wooden legs in order to provide to the bed the required height. Two of the old wooden legs of the bedroom were put together and formed the third led. Since I did not wanted the fourth leg to be in the middle of the bedroom I decided to hang the fourth corner of the bed by the ceiling. I used heavy duty chain, which was attached to the bed by three screws and from the ceiling by two heavy duty metal hooks.

The second step was performed in parallel with the first. As I said the bed had to be shortened by 8cm. In order to do that I used and electric saw to cut the wood and an electric drill in order to make the new holes for the existing screws that were originally used in the bed.

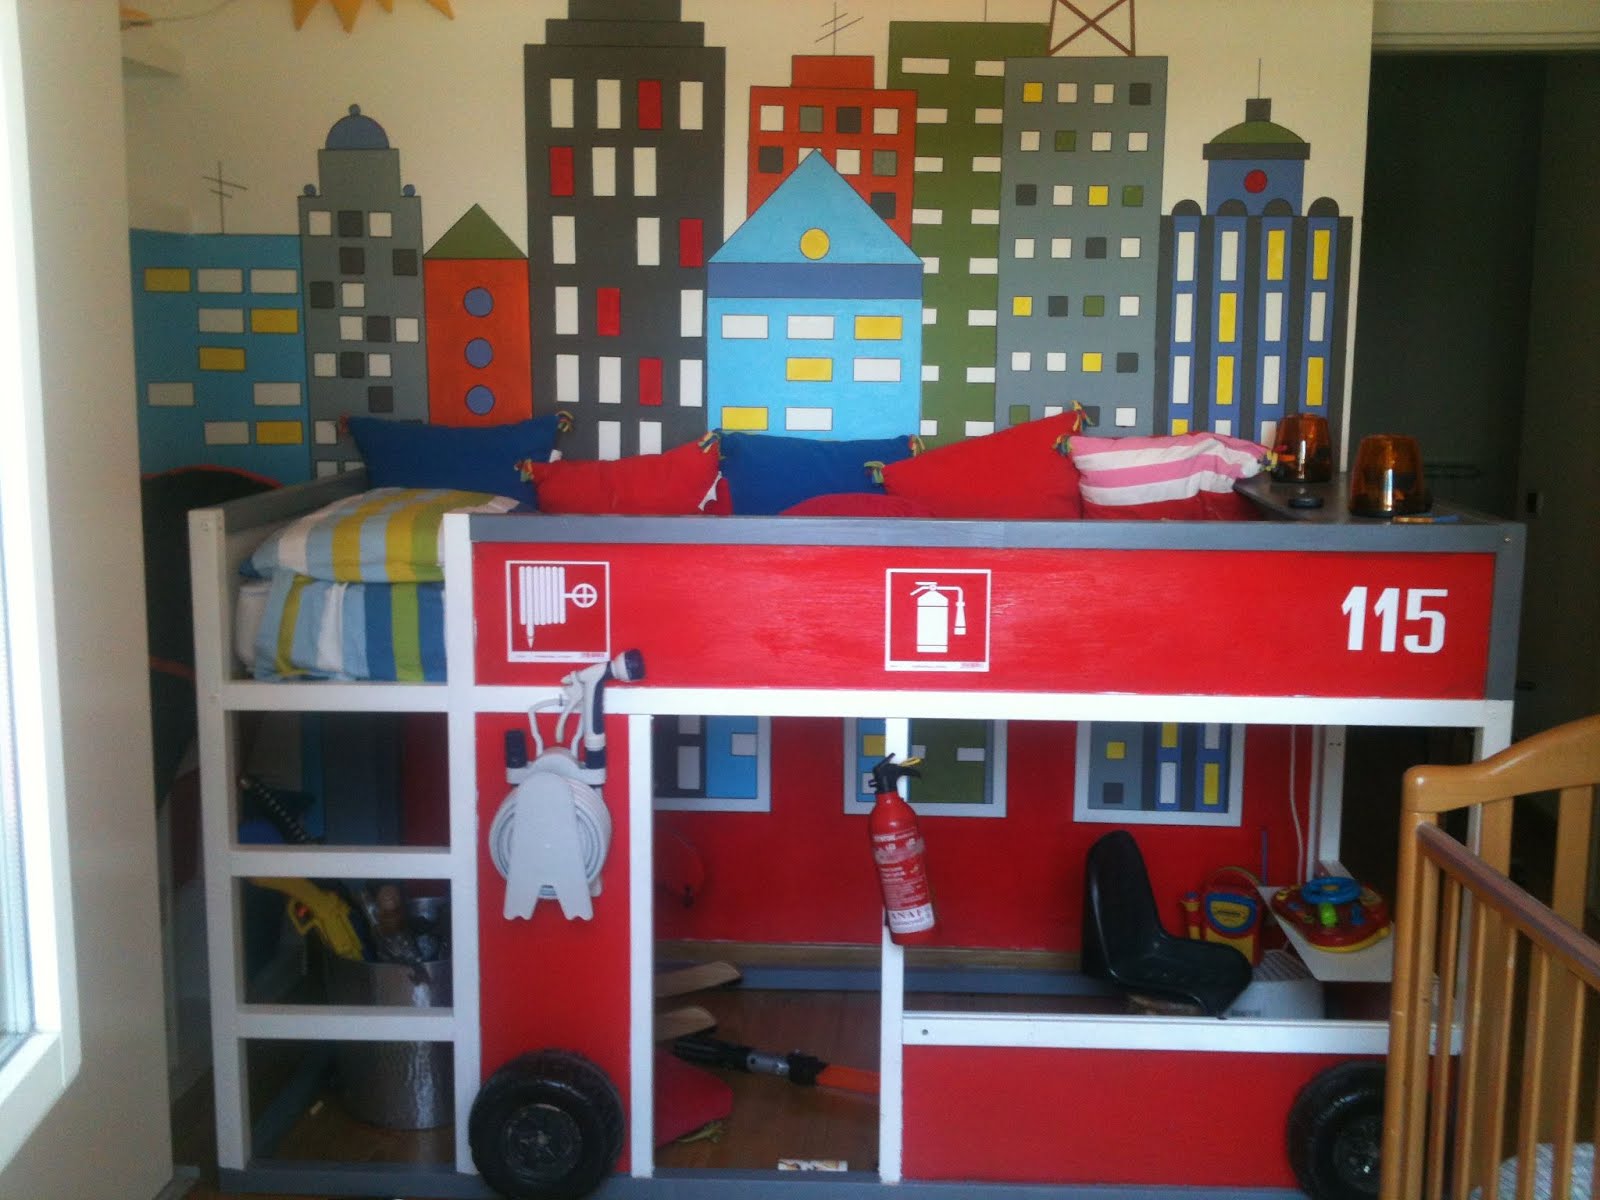
The last step was to attach a safety banister. For that part I used an old IKEA Sniglar changing table which was not useful anymore. Using parts from the changing table I constructed the safety banister which was attached to the bed as shown in the photos.

The final thing to do was the attachment of a new ladder in order to make climbing and descending easier.

All legs of the bed were secured firmly in the walls. It is impossible to move the bed at all.

For this project I have spent about 8 hours. The tricky part was to be able to lift the bed since I was did all the work by myself. The solution was to assemble each side of the bed separately and then attach all sides together.

This solution provided extra playing space for my son in his bedroom. He enjoys his new room and his modified bed for more than a year now. Friends and family have been impressed by the result, especially the younger children.

~ Ioannis, Athens, Greece

Sunday, 24 June 2012

Kura Firetruck


Materials: Kura Bed

Description: My second son has a passion for cars, so the idea of recycling the bed of his older brother and turn it into a firetruck. I have added some plywood to create the door and the window, I set on the wheels of an old toy car and have painted in red, grey and white the different part of the "truck".


I have equipped the bed with a little fire extinguisher, flashlights on the top, a garden hose and some stickers. On the wall I painted a skyline with bright acrylic colors and in the sky I made the "Ikea sun" shine!!

~ Rosandra, Italy

Sunday, 13 May 2012

A castle bunk bed


Materials: 1 Kura bed, 4 Flynn Lill, 1 Ribba, 2 Sultan Florvag, 1 Barnslig Natten, 1 Dioder, plastic duct 10 cm x 3 mt, pink painting

Description: A castle bunk bed for my two little daughters, with special effects, I hope you enjoy it :)

See more of the Kura castle bunk bed.

~ Anna, Italy

Tuesday, 24 April 2012

Girly Kura bunk bed


Materials: Kura bed, Sultan lade, 2x2" beams, mdf, paint, wallpaper, screws, screwdriver, saw

Description: It was time for our daughters to share room and two beds would take up unnecessary floor space. I was after a bunk bed where we could place our 15 months girl in the lower bed and our 4 year old on top. The Kura bed was perfect in size and height but I dislike the blue and pine combo plus it only had one proper bed...

I bought a used Kura bed and went to the hardware store and got a 6mm mdf and some 45x45mm beams. The hardware store helped me cut up the mdf in the same size as the panels around the top bed. Also had to cut the beams to same size as top bed and mill a groove in to the beams around the bottom bed in order to fit the new mdf panels.


Painted all pine parts as well as one side of the new mdf panels white. Mounted wallpaper (with standard wallpaper glue) on the blue panels as well as on the unpainted mdf.

When mounting the bed I simply added my extra beams and mdf panels and secured them with wood screws. To get a proper bed on the bottom I placed a Sultan Lade slatted bed base on top of two beams.

See more of the Kura bunk bed.

~ Susie, Sweden

Safety note on mattresses: 
Susie's hack placed the bottom mattress on a Sultan Lade slatted base on top of 2 beams, which is an excellent move. If you're thinking of skipping this vital step, don't! An Ikea employee mentioned to an IKEAHackers' reader that the bottom mattress should not be placed directly on the floor, as it is a health hazard.  Any standard (non organic) mattress should never be flat on the floor because the lack of air makes chemical vapors build up and escape through the top of the mattress, creating a health hazard for the person sleeping on it.  A bunky board should do the trick to lift the mattress and provide the needed air flow. [thanks Kristin!]. ~ Jules

Sunday, 8 April 2012

Kura bed with slide


Materials: Kura bed, Kura tent, Trofast Frames (3)

Description: The bed is the Ikea Kura bed with optional tent attachment up top. I had painted all the blue panels of the original bed with chalkboard paint and the natural wood frame with semi-gloss white paint when we first bought the bed. The bed now sits on a plywood platform (2 cut pieces actually since one wasn't quite big enough) that rests on three Ikea Trofast frames. The plywood is also supported in the back and under the slide by 2x6 wood screwed into the wall studs. I also added the vertical support and horizontal bed guards for the lower bunk to keep kiddos from rolling out in the event of a sleep over.


We built the slide ourselves using 2 sanded 2x4s, an 18 inch wide scrap of plywood left over from the bed platform and an 18 inch wide piece of what I believe is intended to be dry erase board. The slide is 7.5 feet long and starts pretty high up so it is steep but apparently quite fun. At the top of the slide is a platform for him to climb onto before sliding down the slide.

Underneath it all is wide open space for a secret hideout (shhhh, don't tell him I told you). It is accessible by crawling under the slide.

See more of the Kura bed with slide.

~ Julie, Seattle, WA

Friday, 2 March 2012

Kura be Pretty


Materials: Paint, wrapping paper, mod podge, Krylon Clear Glaze spray

Description:
Our two little girls share a bedroom and it's not a very big room at that. We decided that a bunk bed would be wise, and Ikea's Kura was the perfect choice. [Since it's not too high for a daredevil two year old to be on.]

With its unfinished wood and bright blue panels, the Kura is quite unattractive as is. So makeover is a must...


Step 1: Paint. While it was put together we painted the wood with a white paint/primer in one. Could have been done while it was apart but this seemed easier. We allowed the first coat to dry over night, then added a second coat. Took about half a quart of paint.


Step 2: Covering Panels. We went back and forth about what to do with the panels. I knew I wanted to cover the blue and ended up going with wrapping paper. This portion of the hack was very frustrating. I had a very hard time gluing [mod podge] the paper on perfectly. Despite my efforts bumps and wrinkles in the paper were inevitable. I had to redo several panels. I love the paper I chose, but if I were to do it again, I would choose something thicker.


Steps 3: Protecting Panels. Since paper is paper and little kids are well... messy, I wanted to at least try to protect the paper I used. I sprayed it with a few coats of krylon clear glaze.

Step 4: Reassemble and twinkle. Once the panels were dry we slid them back in place. Then added a strand of twinkle lights beneath top bunk and Voila!


~ Brittini, Portland Oregon

Saturday, 21 January 2012

Girly Kura Bed Hack

Girly Kura Bed Hack

Materials: KURA bed, scrapbook paper, Mod Podge, wood primer and high gloss black spray paint.

Description:
I love the look and functionality of the Kura bed but wanted to make it a little more girly to fit in with my daughter's Paris themed room. I purchased the Kura bed from Craigslist, primed the wood with spray primer, and spray painted it black with high gloss paint.


Girly Kura Bed Hack
Girly Kura Bed Hack
Girly Kura Bed Hack
Girly Kura Bed Hack


For the panels I brushed Mod Podge glue over scrapbook paper from Hobby Lobby. Hobby Lobby has so many types of scrapbook paper that you could really find any pattern to fit in to a child's room theme. I added Christmas lights underneath the bed to give it a beautiful homey feel. My 3 year old absolutely loves her new bed and so do I!

~ Tiffany M., Dallas, Texas

Wednesday, 30 November 2011

Ladder into steps

Trofast as bunk bed steps

Materials: Kura, Trofast, bits of wood railings

Description: I needed to figure a way to save space in my girls bedroom but the problem with the Kura bed we had was that my daughters could not climb up or down the ladder to get into or out of the bed.

Trofast as bunk bed steps

We bought a Trofast storage unit as a replacement for the stairs. It worked great! They could both climb up and down into the bed but to make it safer we added some railing to the Trofast unit.

Trofast as bunk bed steps

We bought 3 posts from the hardware store and cut them down to size, screwed them onto the sides of the unit. Cut the railing to size and attached it to the posts and the bed. We also screwed the Trofast to the Kura bed to make it more sturdy and stable.

We love it and hope you do too.

~ Grace S, Victoria, Australia

Thursday, 25 August 2011

Castle Bed


Materials: KURA bed, MDF

Description: Inspired by an idea I saw on this blog, in addition to my own ideas, I came up with this exciting bed for my son who's into knights and castles.

We bought the KURA bed and cut out sections of MDF to create a facade that would be mounted onto the KURA frame. My dad and I used a sabre saw to cut battlements and a window on one side. We glued an extra thickness of MDF on top for the battlements to create a relief effect and to strengthen the area against inevitable rough "boy play". We painted the bed and the mdf a dark grey and sponged a light grey over the top to create a stone effect. I liked the lighter color on the battlements to make them stand out.


A third thickness of mdf was added to the top of each tower to allow us to drill a hole that would hold the flags I bought online.

We made the front piece hang down about an inch from the bottom of the KURA bed to allow a surface to attach the curtain rod to. My mom, who owns an embroidery business sewed and embroidered the curtain. The moon and star lamps were a fun addition to the play space below, since it's a little dark underneath.

It was a lot of work, but the look on Lawson's face when he walked into that room was priceless!

~ Casey, McKinney, Texas

Wednesday, 17 August 2011

Girly girl KURA bunk


Materials: KURA, FABLER, SULTAN LUR�Y, RIBBA

Description: We wanted a low bunk bed for our little girls (aged 3 and 1) and we came across a pre-loved KURA for a real bargain, so no harm trying a hack..

The KURA nearly fits our needs except for a few things: colour, side of ladder and lack of bed base.

We spray painted the bed in Rustoleum satin white, painted the panels and slats for upper bunk to get the bed in plain white and ready for some girly girl makeover. Added die-cut foam butterflies which I painted with my scrapbooking paint mists, sewed some pretty covers for the cushions to. I found a new, never used FABLER canopy (which needed to be hacked cos it can't fit into the girly girl theme) and ripped out the felt circles and flags and replaced with sequins and felt butterflies.


I wanted the girls to have a cushy headboard so I bought some foam and vinyl and made a sort-of tufted headboard with some fabric cover buttons kit.

I hate to have the mattress lying on the floor, so we bought the SULTAN LUR�Y (which does NOT fit) and trimmed down the width just a little in order to fit that in..


Did I miss anything? Oh ya we needed the ladder to be on the right so I had to do some measurements and careful drilling to fix the ladder on the other side (I'm not sure if the KURA they have in stores will allow you to change the position of the ladder without drilling cos I do see extra holes on the post on the right but mine was a pre-loved item 2 years old)..

We had a recess on the wall where the bed is up against, so we used the RIBBA picture ledge and screwed that into the bed frame on the outside to hold soft toys. Something similar with some Ikea drawer organizer box we had lying around the house unused for the lower bunk bed.

While we were at it, I made a simple hack of the MAMMUT stool and trimmed off the legs of the HEMNES and added a DIYed bottle cap knob and modpodge some pretty paper for the drawer lining (sorry no pic)..

~ : Lynn

Tuesday, 28 June 2011

A cowboy's nest


Materials: KURA Bed

Description:
We wanted to make this plain bed more interesting for the boys. I have seen extreme makeovers USA, and wanted to do something big. I bought wood planks, measured up, and built this cowboy bed, with help from stepdad. And painted it after, and made some great pillows. :)


See more of the Kura bed cowboy's nest.

~ Gunn, Norway

Monday, 16 May 2011

Fun Kura Makeover


Materials: IKEA Kura bed, fabric, Fabri-tac, shower curtain, shower curtain rod

Description: We loved the Kura bed, but the blue wasn't a good color fit for our soon-to-be four year old daughter's room. I had seen a couple of Kura hacks before, and knew that it could be done.

To cover the panels, I used three yards of a simple fabric in a color that I loved. Three yards turned out to be *just* enough without having to piecemeal any pieces together. I cut fabric from my yardage to the approximate size of the panels (just laid the panels on top of the fabric as a template), and then glued the fabric to the blue side. I had to trim really close to the edges to make sure that the cut ends didn't show on the inside of the panels...learned this the hard way.


After the bed was all put together, we added a curtain (made from a shower curtain) underneath the Kura bed. The length between the posts happens to be perfect for a shower curtain rod! She is ecstatic about her hideaway (a.k.a., the "princess fort"), and I'm ecstatic that I got to reclaim the floor space that her toddler bed was taking up in the room!

See more of the Kura makeover.

~ Kendra, PA

Thursday, 10 March 2011

An Ikea Kura bed felt playhouse


Materials: Kura bunk bed, felt

Description:
I recently finished a felt playhouse for my daughter as the bottom of her bed is being used for toy storage.

Read more about the Kura felt playhouse.

~ Anna

Monday, 31 January 2011

Personalized Kura Bed fit for a Princess with Playhouse Underneath


Materials: Kura Bed, wooden letters, wood cutouts, bunk bed curtain, paint, canopy, SMILA BLOMMA wall lamp

Description: We wanted our 4 year old daughter to have a bed with stairs leading to a loft to sleep and space underneath to use as a playhouse.

We bought a Kura bed, painted it 3 different colors. The trim is painted light pink, the smaller panel in front is fuchsia and the longer end panel is purple with pink slates. We added a princess canopy on top. We attached cutouts on the front panel and added wooden letters to the front panel with the words princess and her name. We made the bottom a playhouse by attaching a bunk bed curtain with working windows, curtains, and doors on the bottom of the bed using double-faced adhesive velcro and placing a pink SMILA BLOMMA wall lamp for her to use when she reads her books is hanging out in her "house" as she calls it.


See more at of the Kura bed with Playhouse.

~ Adrian and Leslie-Ann, Northern Virginia