Showing posts with label VIka Annefors. Show all posts

Tuesday, 16 April 2013

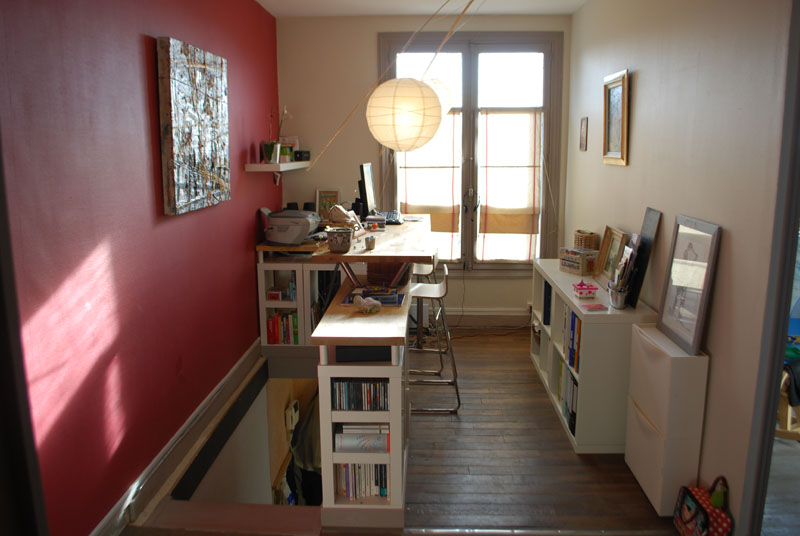
Integrated Computer/Music work desk


Materials: Old computer desk table tops, Vika Annefors storage, Vika Alex drawer unti, Capita bracket, Ekby Robert Wall bracket, Ekby Laiva shelf, Ekby Osten Shelf, Jigsaw, Summera Keybaord Pullout tray . Kasset boxes

Description: The purpose here is to reduce the footprint of my chunky computer desk that looked so imposing.

Instead of ditching the old computer table, I reused the table tops from the old computer table. I used a jigsaw to cut the board to reduce the depth (since the new computer is going to be much smaller).


before

I used a pair Capita brackets to mount the smaller board to create a second tier.

I placed the printer on the top tier and the whole wall started looking bulky again. So I built an Ekby wall shelf against the wall under the table. I housed the printer on that wall shelf.

Next I mounted Summera Keyboard tray under the bottom tier.

I bought this tiny little Dell computer Optiplex 7010 - Ultra Small Form Factor. For come reasons, it fits the Vika Annefors very much. So I bought 1 Ekby Osten shelf, cut it into 2 pieces to create 2 more tiers of shelves to house the computer and the audio box.


The computer CPU now fits into the Vika storage unit perfectly.

The music keyboard and the monitors are put in place, wires all dressed and I got some Kasset storage boxes to fill up the shelves.

This new computer table houses a lot more things and equipments and yet take up less space than the previous table.

~ Wai Hoong, Singapore

Wednesday, 4 July 2012

Solid oak desk for a designer


Materials: VIKA ANNEFORS, two VIKA ADILS table legs, NUMER�R kitchen countertop, sized at 126cm x 62cm.

Description: I just put up a blog on our website, about a desk that we hacked from Ikea parts. We�ve got a new employee starting with us soon, so I had to get another desk in.


See step by step instructions for the solid oak countertop workstation.

~ Kishen

Thursday, 21 June 2012

Slim desk


Materials: Malm Occasional Table in White, Vika Annefors Table leg with storage in white, Rubbermaid shelf in white (12"*36"), drawer glides (14"), "L" brackets (5), wood screws, drill

Description: I was looking for the perfect size desk for our spare room. We had the Vika Almon with some legs but it was too large and cumbersome for the space. I spent some time looking at hacks, nothing really worked with what we were looking for, so we made our own.

A Malm Occasional Table with some shelf space and a keyboard tray on glides to provide a bit of extra room when being used.

Instructions
1. Assemble the Malm Occasional Table - omit the casters.

2. (now we did ours a little backwards and regretted it but here is how it should be done) Take the top of the Vika table, a piece of paper the same size (we used the paper it was wrapped with), a dowel, a screw and some tape; tape the paper ever so lightly, just enough so it doesn't move, take a dowel, puncture holes where the dowels are supposed to go, same with the screws. Now gently remove the tape and transfer the paper to the Malm table (sitting upside down), make sure the the holes are facing the way you want the Vika table to be assembled under the Malm table. Tape it with the same care. Take a drill, make sure you use the right bit for the size of the hole, make all the screw holes then all the dowel holes, you essentially only want to puncture the top and that will be enough.

3. Assemble the Vika table as per the instructions using the new holes as the top and stopping *before* you put the bottom on. Now affix to 2 L brackets to the bottom portion that will go against the Malm Table. Put on the bottom as per instruction. Affix the other side of L bracket to the Malm Table.

4. Put together the drawer portion using one side of the Malm Table and the rest of the L brackets on the other side.

Turn over, (put bit just scraps under the non supported part of the Vika table, we'll get something permanent later on), enjoy!

The stool is the Nils Stool in Dillne Gray/Beige

~ Tee, Alberta, Canada

Tuesday, 28 February 2012

Sofa Fleece Blanket Bin and Magazine Storage

Sofa Fleece Blanket Bin and Magazine Storage


Materials:
VIKA ANNEFORS x2, White Emulsion Paint, Glue (Double-sided Adhesive Tape or Instant Grab Adhesive)

Description: We needed somewhere to store our sofa's fleece blankets and my wife's collection of magazines and newspapers. We already had a white BESTA JAGRA TV Bench so I wanted a similar looking piece of furniture to put behind the sofa. Upon visiting our local IKEA store I spotted the VIKA ANNEFORS.


Sofa Fleece Blanket Bin and Magazine Storage

Basically, you turn the VIKA ANNEFORS on its side. If you follow the diagram, you'll notice the panels are reorientated to hide the shelf support holes. Two of the under surfaces are bare MDF and once the unit is on its side one of these will be visible, so you have to paint it white before assembly. I used white emulsion paint. The other surface isn't seen because it is butted up against the second unit. The shelf is glued into position with double-sided tape (or an adhesive of your own choosing).

We're pretty pleased with the result and the living room looks a lot tidier for it.

~ Malx, Fareham, Hampshire, England

Saturday, 7 January 2012

Music Producing Desk

Music producer desk


Materials:
VIKA AMON, VIKA CURRY, VIKA ANNEFORS, EKBY JARPEN, BILLY

Description:
I wanted to build a desk to produce music and still have enough space to work and do everyday stuff.

In the beginning I planned to build everything on my own, but soon I realized that it must be cheaper and easier to combine some IKEA furniture.

There were some requirements I had, that didn't make the selection that easy:
- It should look awesome (of course)
- It should match my existing furniture like a Malm bed. I also wanted a very simple and clean design.
- The speakers should be on the same height as my head.
- The working space should be big enough also having some space for two monitors and a two RU 19-inch rack.
- Did I already mention that it should look awesome?


Music producer desk
Music producer desk
Music producer desk

This is what it turned out. I am quite happy with it, although the black of the table doesn't exactly match with the brown-black of the two Billys, but that's ok, you don't recognize, when you don't look too close.

Music producer desk

The white switch, by the way, is to switch the power of all the music equipment (speakers, monitor mixer, audio interface, ...) at once and will of course be replaced by a black one as soon as I have one ;)

~ Michael

Saturday, 24 December 2011

Railing desk


Materials: Vika Annefors - Numerar - Capita - Glenn

Description: I replace the existing railings which threatened to collapse, a structure formed by Ikea elements to create an office.


~ Pasquier Nicholas, Nantes - France

Friday, 9 December 2011

Stolmen cat tree


Materials: STOLMEN, VIKA ANNEFORS

Description: Stolmen post with fastening accessories along with Vika Annefors bench as foundation.


Two holes drilled with 52mm holesaw through Vika Annefors.
Steps made of simple pinewood from local hardware store. Drilled with holes for Stolmen and the fastening kit.
The steps finished with cat scratch friendly carpeting.
Capable of entertaining four heavily built and active Siamese and Oriental cats!

See more of the cat tree.

~ Maria Gjerde and Jan Ove Strand, Norway

Thursday, 19 May 2011

Recipe Bar/ Planning Desk


Materials: Ikea Vika Annefors, Ikea Vika Amon, Ikea Capita Legs

Description: I like to cook and have amassed a large collection of cookbooks over the years. We had been looking for a way to make a Recipe Bar and/or Kitchen Planning Desk for a while, but we didn't want to spend a lot of money. This is where the IKEA as-is section came to the rescue.


We started with the Vika Annefors storage piece and simply elevated it to bar height by attaching Capita legs. Then we attached the Vika Amon tabletop. The tabletop was cut short to our desired length and then a 2x2 was used as a ledger board to secure it on the wall.

Ta-da! Instant planning desk and recipe storage! Thanks to the as-is section, we spent a grand total of $60 on this project. We still need to add some trim and finishing touches, but we still really really love it.

~ Heather Conley, Newport, KY

Wednesday, 22 September 2010

Reclaimed wood desk


Materials:
VIKA ANNEFORS, MICKE Storage unit, VIKA LERBERG

Description: I really love some of those reclaimed wood desks but they are quite expensive, so I decided to buy these white and clean table legs (VIKA ANNEFORS, VIKA LERBERG) and start a quest for old and damaged wood pieces to create a contrasting look.

1- I found redwood beams/mantles and cleaned and dry them for about 2 days.
2- I used some tools to distress even more the reclaimed wood, particularly the edges.
3- Using glue and clamps, I putted all the pieces together and added two metal joints underneath to reinforce.
4- I applied a wood stain and sealer coat to protect wood and enhance the color.

Voila! The desk or worktable stands out with all the other Ikea elements in white. You can be creative and add marks and elements as you wish (nails, decals, paint drops, etc.)


~ Rix Cerezo, Glendale, CA