Showing posts with label Bladet. Show all posts
Thursday, 3 January 2013
Designer table lamp with Bladet vase
Materials: Bladet 45 cm Vase Article Number: 301.221.99
Description: Buy a 45 cm Bladet
Make 2 holes with a drill for glass (diameter about 0,8 cm). One in the upper part and one in the lower part of the vase.
Buy 5 meters of colored electrical cable of your choice. Some example here.
Buy some sheet of colored polypropylene. Best results with a thick sheet of at least 1,6 mm maximum 3 mm. Took mine here but it is 1,2 mm thick. Better search for something thicker 'cos the upper clear part tends to bend.
Cut the polypropylene using the sketchup template I uploaded here.
Using a cutter, lightly score the polypropylene along the lines between blue and white surfaces and bend it at 90�
Join all the parts as show in the photos.
I used a g9 lamps holder with super short 15w CFC lamps like the one shown below.
If you change lamp you have to change the template according to the new dimension of your light emitter.
Hope you like it.
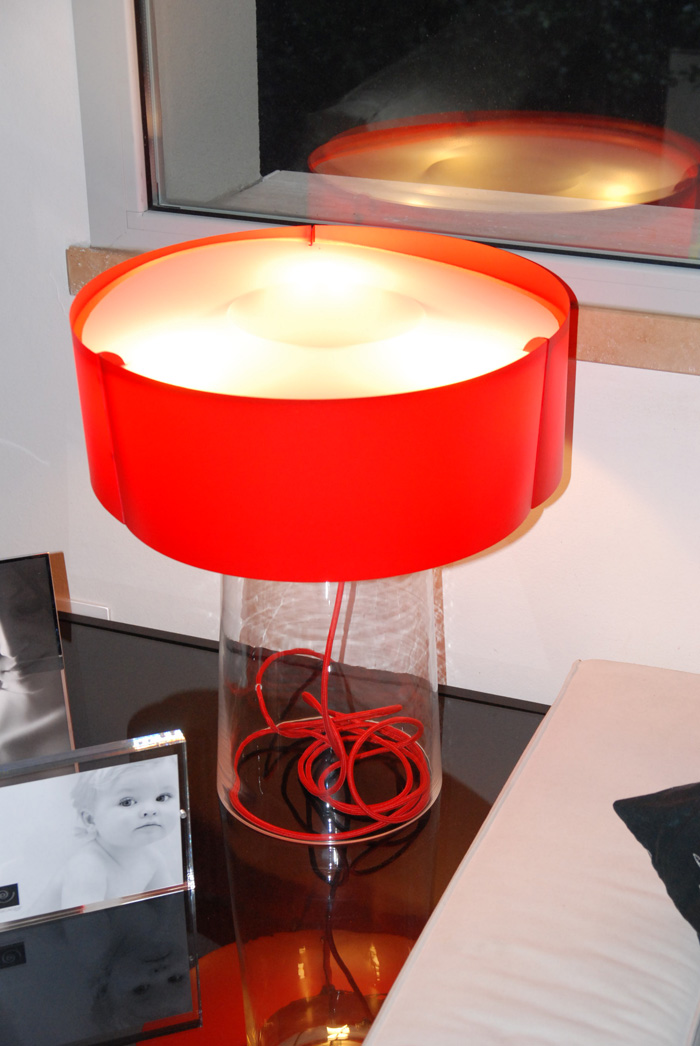
~ Andrea, Florence Italy
Monday, 24 December 2012
Designer-Lamp from a vase
Materials: BLADET 45 cm
Description: Here my "??Hack�?" of an IKEA Bladet (45 cm) vase into a "??Designer-Lamp"�.
The "Highlight" of this floor lamp is the use of a Squirrel Cage bulb (in my case a Globe with a Diameter of 120 mm).
The vase "Bladet" is very suitable for this project, because of the thickness of the glass (about 10-12 mm at the ground) which is quite insensible, as you have to drill a hole with a diamond coated hole saw drill in the middle (!) of the bottom.
I have never drilled a hole in glass before and used a very cheap diamond coated drill (...eBay), watched some "??how-to-drill-glass-videos" at youtube and it was quite easy.
The required electrical material (screwed tube, screw nuts, a porcelain bulb socket (for screwed tube), cable, light switch and a plug) you should find at your local do-it-yourself-store.
Because I took a squirrel cage bulb I used a dimmer instead of a light switch because it looks very cool, if the bulb is just glowing.
After drilling the whole (in the diameter of the screwed tube), you have to assemble the bulb socket on the tube. Afterwards you fix the screwed tube with each one nut over and one nut under the glass-bottom. If you add rubber washers, you can "move" the tube a little bit if you worked/drilled inaccurate.
As distance between bottom and ground (because of the cable) I fixed five rubber buffers (DIY-store) with double-sided tape.
At least I filled the vase with sand up to the bulb-socket. This looks cool and prevents the lamp from tipping over.
~ J�rg, Germany
Tuesday, 13 July 2010
Plant between the lines
Materials: Bladet trio from Ikea, puffy and fabric paint
Description:
1. Choose colored puffy or fabric paint.
2. Draw directly on the planter with paint in patterned or random graphic designs.
3. Allow puffy or fabric paint to dry.
~ Erica, Michigan
Subscribe to:
Posts (Atom)


