Showing posts with label art. Show all posts

Monday, 8 April 2013

Sidewalk Sandwich Board


Materials: Hemnes 3-drawer, hinges, eye screws, chalkboard paint

Description: The idea for this hack came about as I was disassembling my broken Hemnes 3-drawer and realized the sides of the dresser looked just like the sides of those little chalkboard stands you see outside of bars and cafes.

Supplies:

1. Chalkboard Paint. We decided against spray paint after reading a few reviews that it isn't as durable, and thought it might be a little more manageable to get in the right places since not everything was going to be painted. Granted, the can of paint was $14, but for this hack we barely put a dent in it.
2. Two Hinges. It doesn't really matter what kind of hinges, they just need to be about 1.5 inches in length.
3. Two Eye Screws.
4. Some Twine. You'll only need about a foot/foot and a half, so just use whatever you have around the house.
5. Painter's Tape.
6. Cheap Paintbrush. Any kind. I think mine was about 2 inches wide.
7. A Sharp Knife. Definitely wait until the paint entirely dries before peeling off the painter's tape. Even so, you might have to score along the edge with a sharp knife before attempting it - the paint is thicker than most, so even with the good tape you might hit some patches where the paint wants to peel into the board area.


Total cost: About $20

How To:

1. Take the dresser apart. Keep the left and right side panels and remove all the leftover screws and hardware.
2. Add the hinges. Lay the two pieces face down with the tops together and screw in the open hinges. Make sure you don't put them on backwards - you want the sandwich board to be able to completely fold flat when done.
3. Add the eye screws. Drill a pilot holes on either side of the center bottom interior beam. Then screw them in and tie the twine to either end, to the length you want.
4. Paint. Tape off the edges. When you start your first coat, you have to work fast so that it dries smoothly. I'd recommend painting one vertical section at a time, going left to right and making sure to swipe your paint brush from top to bottom across the whole piece when you're done with that section, so the paint has minor vertical lines.
5. Wait. Wait a full 24 hours before applying a second coat. And another full 24 hours before drawing on it with chalk.
6. Write some drink specials. Then enjoy them. The end.

See more of the sidewalk sandwich board.

~ Lauren, Texas

Thursday, 17 January 2013

Norden Table becomes Interactive Art Table


Materials:
Norden table, paint, clear varnish, plastic pipe clip, permanent maker

Description: The plain wooden Norden table in our kitchen started to look boring after a while, so we decided to repaint it and to turn it into an interactive art guestbook.

We first painted the table white, then sprayed stencil portraits of our friends on the surface. Finally, we applied three layers of clear varnish to seal the table for everyday use.


On the side we mounted a plastic pipe clip to hold a permanent maker. The idea is that all our guests may write their name and some personal greetings on the table, just like in a guestbook.

See more of the Lack art table.

~ Kane, Braunschweig, Germany

Friday, 26 October 2012

Fracking Repair Droid


Materials: Stainless Steel, Aluminium ( Aluminum ), Acrylic, Electronics, Oh and Ikea Blanda bowls!

Description: A 22nd century autonomous droid like device designed to repair the subterranean fracture damage caused by Shale and Coal Gas mining called Hydraulic Fracking that was done during the late 20th and early 21st centuries.

IKEA items used for this work that I call the "Fracking Repair Droid" were some IKEA kitchen condiment bowls in stainless steel called "Blanda" - a 50mm diameter size and a 120mm size.

The Blanda bowls are used in the knee joints and for the main top and bottom body bowls. I used 12 small 50mm Blanda bowls for the knee joints, six made up the spherical shape and another six made up the smaller backing cups ... these hide the centre screws that holds the two hemispheres together. In between the two hemispheres is a plate of acrylic machined to emit light from 2 LEDs in each knee joint.


These Blanda bowls used for the Knee Joints on the leg/arms of this "Fracking Repair Droid" were hacked by machining the outer surface in a Lathe, drilling bolt holes whilst in the Lathe, welding stainless steel nuts to the inside to secure the holding bolts positions.


The Body Blanda bowls were machined in a Lathe to produce that brushed/polished surface, drilled for central mounting bolt, and hand drilled to mount the legs/arms.

You can find all the images and videos here on my website and here.


This "Fracking Repair Droid" is a work of art designed to give emphasis to a backstory about the dangers of Hydraulic Fracking to recover Shale and Coal Gas, hence the name. This hack was created as a means to get attention to the dangers of Fracking and due to the large amount of machining etc.


~ Scott Branden, Olinda, Victoria Australia

Wednesday, 30 May 2012

EKBY Book Gallery Display Shelf


Materials: EKBY Tryggve and EKBY Valter

Description: For a recent photography exhibition I decided to showcase a book next to some framed work. While a RIBBA picture frame shelf would have sufficed, I wanted something a little more conducive to page turning while the book was stationary, so... I got hacking.


You'll need the following, give or take a few items:
- 2 x EKBY Tryggve 31 1/8" x 7 1/2" wooden shelves
- 2 x EKBY Valter 7 1/8" wooden brackets (I used black here to match my photo framing)
- Buzz-saw or handsaw
- Detail sander or just sand paper/brick
- Biscuit joiner
- 2 x biscuits
- Misc. wooden dowels (approx. 5/8" thick)
- Wood glue
- Wood filler
- Tack nails
- Hammer
- Tape measure
- Pencil
- Mounting hardware
- Paint (if desired)
- Lacquer (if desired)

Total time: ~1-2 hours (minus glue and paint dry time)
Total cost: $14 for EKBY items (all other materials were in kind)


1. Measure EKBY Tryggve shelves to desired length. For this hack, we cut the pre-existing 31 1/8" wide board down to 18 1/2".


2. Place you book on the shelf to get a sense of where it may sit or rest. Here we determined that there was too much space on the top so we reduced the 7 1/2" depth/height to 6 1/2" for each shelf piece.


3. Use a piece of scrap wood or dowel if you would like a retaining lip on the bottom of the shelf.


4. For added stability to your shelf cut a biscuit joint, glue and clamp.


5. Once your boards are joined and stable, attach dowels to the ends of the shelf. This will create a cleaner edge to the unit. As you can see, we have also added the bottom lip, for retaining the book. Smaller dowels are also glued and nailed to the bottom of the shelf for added support.


6. Fill in any gaps or holes will wood filler. Sand for smooth surface.


7. In order to mount the shelf at an angle, the EKBY Valter brackets must be used upside down, so that the angled part slopes downward. See image above for TOP and BOTTOM of where the wall mounts are.


8. Using a handsaw, cut off the unwanted end of the bracket.

9. Sand down the end of the bracket.


10. Align the brackets to the top of the shelf and mark where they should be glued and nailed.


11. Glue and nail!


12. Here is the completed shelf, pre-paint.


13. Paint as desired. I used a Behr glossy oil based paint. Several coats. Followed by a spray lacquer finish.


14. The finished and installed product!

Have fun and happy hacking!

~ Angry Alan, Providence, RI

Sunday, 20 May 2012

Help kickstart the largest IVAR hack


Materials: Ikea Ivar Chair

Description: Our Ikea hack could quite possibly be the largest Ikea hack ever! This summer we will be constructing a 1000 square foot pavilion made of 400 Ikea Ivar chairs arrayed and stacked in a 3-dimensional sine wave surface rising above the ground in Freedom Park, Atlanta Georgia. It's public art, but also usable in that people can actually sit on it to socialize and spend time in the park sitting in the chairs.

The design is very particular to the Ikea Ivar chair because the slightly bent angle of the seatback creates a special texture to the sculpture. And the fact that the Ivar chair is constructed with 2 full prefabricated side pieces allows the transfer of load vertically from chair to chair down to the ground in a monolithic, continuous way; the prefab sides act each as bridges, unlike other chairs where the legs are independent of the other elements. The Ivar is optimized structural unit and texture. The other advantage is also the flatpack design made by Ikea. Transporting 400 chairs would be impossible without the flatpack. And the simple assembly is also what makes this chair the perfect chair to be a construction unit for a public pavilion.


We construct SEAT by additively attaching chairs to each other, using wooden wedges and threaded rods to bridge the gaps between the legs and seatbacks. First a central spine arch is made to which all of the "suspended" chairs are then "hung." Where the chairs touch the ground they are cast into two concrete pads which anchor the pavilion.

Our idea is that from afar, SEAT will appear like a foreign object in the landscape. Closer yet, SEAT will reveal its unique geometric texture created by the special shape of the Ivar chairs. Upon approach, the audience will recognize the compositional objects, and the dexterity with which the chairs are repurposed for art. The audience will be free to sit upon, inside, and underneath SEAT, exploring it as a personal garden playground.

Conceptually, we're responding to the idea that chairs really are remarkable pieces of furniture. When you think about the loads they are required to carry, both dynamic and static, in supporting people of all sizes and dimensions, you realize just how strong they actually are. But of course we don't think of them as structural components, we just think of them as chairs. Their domestic identity overwhelms almost any other interpretation of their use. With SEAT we're turning that identity inside out using chairs as a whimsical element of structural sculpture.

We're also trying to drum up some help to realize the project. So I'm sending along our Kickstarter campaign. We know it's a tough time to help, but it's also a tough time to build. Maybe some of your enthusiastic readers could lend us a hand. We tried Ikea, but they weren't interested unfortunately. Anyway, it really could be an amazing hack! Thanks for your time and hope you like it.

See more of the 400 IVAR seater.

~ Brian Brush, Atlanta, GA

Sunday, 22 April 2012

Besta Photography Display


Materials: Besta Cabinets, Besta Glass Doors, Digital Photos, A Good Neighborhood Print Shop

Description: This is fun way to dress up Besta wall cabinets and display your photography, art, or kids' drawings!

1. Purchase Besta wall cabinets. Any size/combo will do. In this photo:
Two 47 1/4" x 15 3/4" white Besta wall cabinets
One 23 5/8" x 15 3/4" white Besta cabinet.

2. Purchase one glass aluminum door for each section. This combo takes 5 doors.

3. Take out the white/black paperboard insert in the glass door and measure it. That is the exact size your art should be.

4. For photos, crop your digital photos to that size in a photo-editing software program. A few settings to consider: CYMK, 300dpi.

For kids' drawings, choose a semi-thick piece of drawing paper and cut it to the dimensions above.


5. Take your photos to a good neighborhood printshop to be printed. Kids' drawings can be laminated to look more professional, or left alone to be changed out for a new piece every so often.

6. Cut off any white border left behind by the print shop.

7. Insert photo into glass door, put white/black paperboard behind it to keep it flat.

A wonderful way to display your photography or kid's art!

A few tips: choose photos that belong to one theme, and keep them all in color or all black and white. A common element helps unify the group.

Hope you enjoyed this!

~ Form & Function

Thursday, 19 April 2012

A modern IKEArtpiece


Materials: Nightstand, paint, cutter, glue

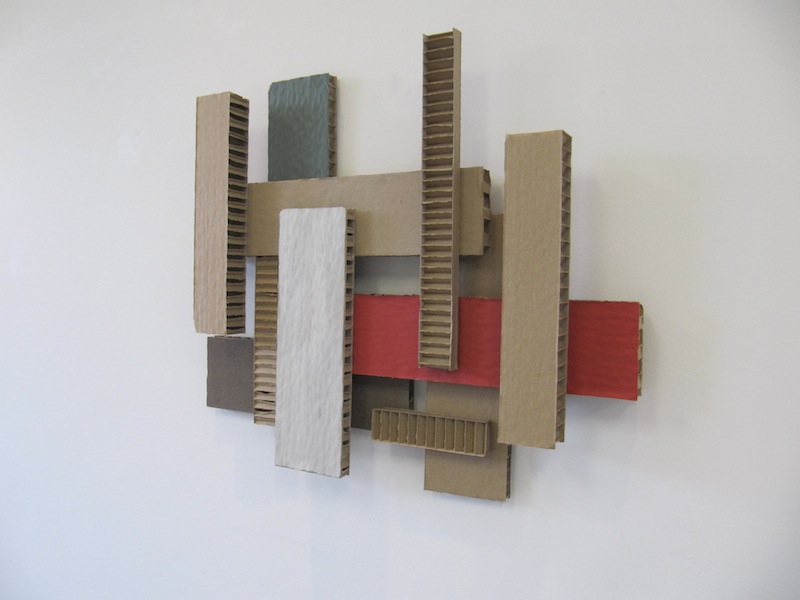
Description: Dynamic visual art for your wall that provides the creation of effects through the use of pattern, color and shade. A mid twenty century "De Stijl" style piece that features a dimensional abstract design. A modernistic wall sculpture at low costs, thanks to Ikea.

Unwrapping my Ikea DIY nightstand left me with large quantities of cardboard. Not only board in the ordinary thickness, but also pieces of exceptional sizes.

Every Ikea item comes with other cardboard dimensions. Try your luck. ;-)


Choose the colors that suits the rest of your interior. Use only a few colors. Use woodglue and acrylic paint for a fast result. Ready? Protect your piece of art with a protective coating to prevent discoloring.

See more of the IKEA art.

~ Marijke Bruin, Holland