Saturday, 28 April 2012

Coffee Table Coaster Frame


Materials: Vittsjo, Poster Board, Beer Coasters, Mod Podge, Hot Glue

Description: This simple hack can turn your coffee table into a frame for an awesome collage. By using the fairly inexpensive Vittsjo coffee table ($50), some poster board, hot glue, and a little elbow grease, you can have yourself a great conversation piece. For this hack I used cardboard beer coasters that you get at any bar/restaurant. Here's how I did it:

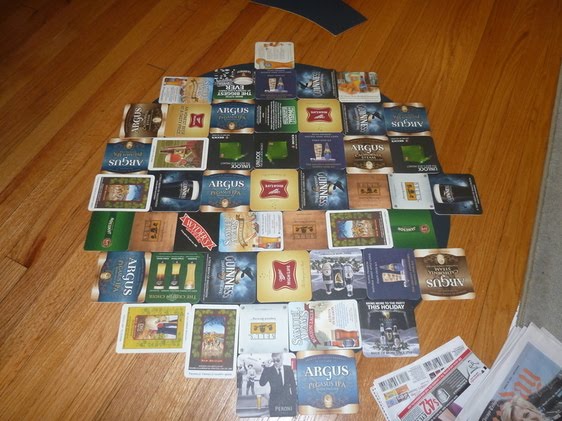

1) First, layer your poster board (I used 3 sheets) so the overall area is larger than the glass top. Tape them together so you have yourself a single piece. I chose black poster board to match the color of the table. Carefully set the glass table top on your poster board, and with a marker, trace around the outside. Remove the glass and cut along this circle. You now have the base for which the coaster will be glued to. Note: If you are using pictures/photos instead of something thicker like coasters, I recommend using a large piece of cardboard (available from the box the table came in) rather than poster board. I didn't use cardboard for this project since it would make the "insert" too thick and the glass tabletop would sit higher than the table lip.

2) I used two layers of coasters, mainly because the round coasters do not fit together nicely and you end up with large gaps between them. The bottom layer consists of all square and rectangle shapes. This allows for an even fill as your base. As such, I recommend using your least favorite coasters for this step since they will be mostly covered up by the second layer. First, lay out your coasters on your poster board circle. It's okay for coasters to hang off the edge, you will trim them in the next step. Once the coasters are all laid out, carefully hot glue each one to the poster board. Glue the entire perimeter of the coaster to insure a good stick.

3) Now that the first layer is glued, carefully trim the excess coasters around the edge of your poster board circle. You should now have the first layer glued and trimmed into a circle. Next, spread a layer of Mod Podge over everything, being careful to spread it evenly and between all cracks. Mod Podge is a waterbase sealer, glue, & finish, which will protect the coasters. Allow about a half hour for this to dry. Once dried, see if your insert will fit on the table where the glass top normally sits. If it is too large you may need to trim the edges.

4) Now it's time to glue your second layer of coasters. These will consist of circular, oddly shaped, or your favorite coasters. This layer does not have to be packed tightly together like the base layer. Spread them out however you like, keeping in mind this layer does not need to hang over the edge of the circle. Like before, apply hot glue around the perimeter of the coaster to insure a good stick. Apply a layer of Mod Podge over these new coasters, simply to give them a nice glossy finish. Allow the Mod Podge to dry.


5) Now that everything is dried, set your creation onto the table ring where the glass normally sits. If done correctly, the coasters should not sit higher than the lip on the table. This insures the glass cannot slide off of the coasters. Carefully sit the glass on top of the insert, and voila, you're finished.

6) Why stop there? These inserts are very easy to drop in and out of the table. Make a collage of travel photographs. Gather book covers of your favorite novels. Assemble DVD sleeves of your favorite movies. The possibilities are endless.

~ Justin P

EXPEDIT Bed Frame


Materials: (2) EXPEDIT 5X1 Shelving unit's, FIXA floor protectors, (2) sheets MDF, (1) 4X4 post, wood screws, power drill

Description: While spending some time in the US, I wanted to show my brother the potential of IKEA furniture. A few days later, I surprised him with a modern, functional upgrade to his bed.I wanted to provide adequate storage in a room with minimal space. My idea was to take advantage of the DRONA boxes in conjunction with the EXPEDIT shelves.


Step 1: Using the completed EXPEDIT unit, I was able to take proper measurements for the EXPEDIT unit that needed to be trimmed down.

Step 2: Cutting the EXPEDIT to the correct size. For in-depth information on this part of the process, please visit this instructable.

Step 2.5: The extra material from this step can be used for various items. In our case, we used the extra pieces to provide numerous shelves throughout the space.

Step 3: With both finished EXPEDIT units, I was able to take measurements for the MDF. Due to my situation, one piece of MDF was not enough to completely support the bed. At this point, you can also measure the correct height of your 4x4 wooden post supports. This supports will placed under the MDF for added support.

Step 4: This is an optional step. Depending on the type of bedding used, some of the MDF support layer can be visible. As I was pinched for time, my father recommended the fastest fix all solution: Duct Tape! As many know, Duct Tape comes in a variety of colors. My local home improvement store happened to have a roll of black. We covered the edges of the MDF to blend this portion with the EXPEDIT unit. If you have more time, I would have went with a painted MDF.


Step 5: Using FIXA floor protectors, I covered key points on the EXPEDIT units and the 4X4 posts to prevent the flooring from being damaged. It also prevented the MDF from damaging the EXPEDIT surface.


Step 6: With all the pieces completed, it's time for final assembly. The EXPEDIT's should be set in place first. Next, we set the 4x4 support posts in their location. From here, you can bring in the MDF sheets. With the MDF in place, you can then move forward with attaching the MDF to the 4x4 posts.

Step 7: For extra support, brackets can be used to attach the MDF to the EXPEDIT 5x1 ONLY. ** DO NOT attach anything to the EXPEDIT 2x1 unit ** The 2x1 unit is a free floating piece. It can be removed to enable more storage under the actual bed frame for the user(several plastic bins fit well in this space).

Step 8:Lastly, place the mattress on the MDF.


Sadly, our local IKEA's were sold out of the DRONA boxes in black. The bins pictured can purchased at "The Red Bulls-eye"

~ RJ Caraynoff

Updated: 1 May 2012

Maximilian's version for a Queen bed


When I moved in my new flat I had a smaller room than before. I needed a place where I could store all my LPs and I needed storage under my bed. When I measured the Expedits I found that they are perfect for LPs and I decided to use them to build my bed.

What you see on the pics is the finished bed (don't look at those cables, I didn't yet have the time to let them disappear). My first idea was to have an open corner which than would be covered with milked acrylic so I could put a lamp behind it to have some nice diffuse light in in my room. But since the Expedits take lots of their sturdiness from those end parts, I decided to ditch that idea for now, especially having in mind that a bed is not always only for sleeping...


I used the "Expedit Bookcase size reduction" instructable to cut them (140x200cm which is queen size in the US I believe). I than used metal brackets to attach it to the wall and to connect both Expedits with each other. After that I put wooden bars at the wall and one in the middle to later hold the slatted frame and the mattress and basically that's it. So now I have space for all my LPs and enough storage for things I don't use on a regular basis. The biggest size you could get with two Expedits attached like that would be 180x200cm but I don't have the space for that.

~ Maximilian

Friday, 27 April 2012

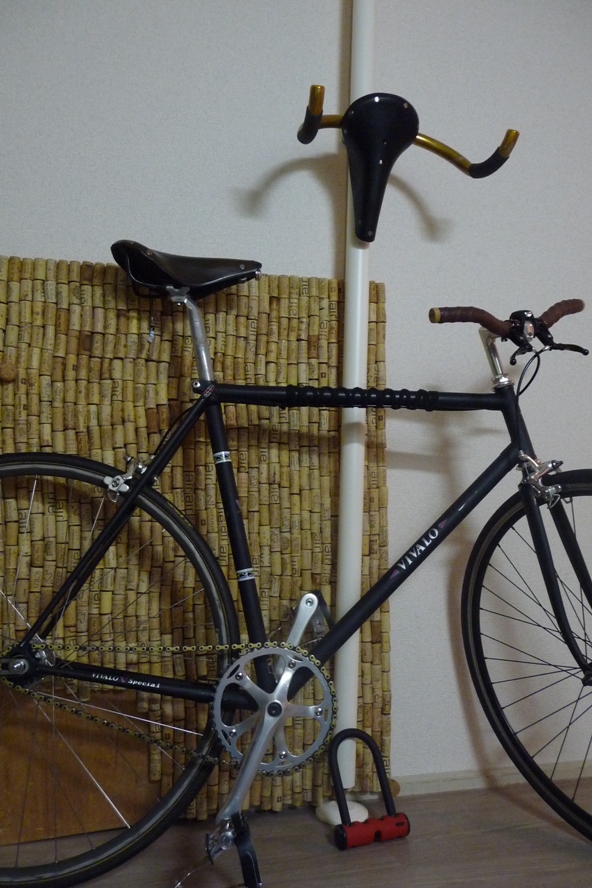
"Ideale" bike rack: Stolmen becomes art!


Materials: Stolmen pole with end fitting

Description: Wanted to get a bike rack for my Keirin track bike but solutions available are rather expensive. Thus, decided to get creative some spare bike parts and build an awesome bike rack.


Used the Ikea Stolmen pole, placed a ring (shape similar to the Greek omega or a traditional lamp shape, cost me less than $2 a pair!) holding the Nitto B123aa Gold handlebar to one Stolmen end fitting, and then took it to the "art" level using a vintage Ideale 80 saddle to make it look like a bull head.

Hope you like, I really do!

~ Luis Vieira, Osaka, Japan

Expedit shelves + countertop = optimized work station for long but narrow room


Materials: Expedit shelving units (2 times 2x2, 1 time 2x4), customized countertop, Expedit inserts for 2 drawers, Skubb boxes

Description: We have a long (~4 m) but very narrow (~1.65 m) room in our flat, which has to satisfy a lot of different functions. The first part of the room was already equipped with our cloakroom, but a workspace was missing (including 2 huge printers/scanner) and most important a lot of storage space for household stuff such as flat iron, bottles, tools, towels etc.

First we tried to cope with an old Vika Amon desk (60x120 cm)and an even older Billy (60x202 cm), but that didn't work fine as we were always annoyed at the legs of the desk which got in the way when we wanted to grab something from the lower part of the shelf. Furthermore, there was a lot of unused space.


So we decided to go for something new. We chose Expedit shelves to be our storage space as they come in a variety of formats, can be equipped with shelves, doors and boxes and look clean and modern. At our home improvement store we bought a customized countertop (165x79x2 cm), which cost about 40� and matched the colour of our Expedits, and fastened it at each side with screws on a 2x2 and a 2x4 Expedit, respectively.

Then we added a second 2x2 Expedit on top of the first (with the countertop in between) to make use of the room's height. Again, we fastened it with screws to be more stable. Finally, we added drawers and boxes to our Expedits and put in all that stuff we didn't know where to store before.

We are pretty happy with the result that uses our available space perfectly, looks both neat and clean and can be easily extended if necessary.

~ Heike, Munich, Germany

Turn a trivet into a stylish wine glass rack


Materials: LAMPLIG Trivet, NUMERAR Countertop

Description: Nice large wine glasses but no space to store them? Ikea's Lamplig trivet comes to the rescue. After cutting the trivet in half you can place them into anything. I had a Numerar countertop leftover, it looks pretty sleek. Stores 22 62cl wine glasses.


Some notes if you wanna make one yourself:

Make sure to cut exact halves so you can use both halves.

The grinder will leave a nasty sharp burr, make sure to file the halves well.

Drilling the holes on precise (strict tolerance) spots can be tough, but very important. I used a drill 1mm larger than the pegs diameter.

No glue needed, due to the tolerances in the trivet and in the holes in the wood, you'll get a perfect press fit.

Cheers!

~ Michiel Hoedemakers, Eindhoven, The Netherlands

Armchair 30 minute makeover


Materials: very old IKEA chairs, nonage on them, spray paint and 8 covered buttons

Description: Found these chairs at my local thrift shop.

Removed the pine colored legs and spray painted them Oil-rubbed bronze.

Covered 8 buttons with a sunburst material.

Drilled holes through the back.


Sewed on the covered buttons to make it a tufted back.

All in under 30 minutes!

See more of the armchair upgrade.

~ Kim Uccellini, Pittsburgh

Hacker help: Any idea how to stop a clock from clicking?


Materials: Rusch wall clock

Description: I'm looking for your help. We bought some Rusch wall clock, they're cheap and quite sharp. And, more over, when you don't like 'em, you can easily hack'em.

But.

There is a but.

They're too noisy.
I can hear the one in the bathroom from the bed, and it's like 5meters. Not ensuite. And I have a PC in my bedroom, on most of the nights.

But it tics and tics and tacs.

Any ideas?

~ jo