Thursday, 3 January 2013

Designer table lamp with Bladet vase


Materials: Bladet 45 cm Vase Article Number: 301.221.99

Description: Buy a 45 cm Bladet

Make 2 holes with a drill for glass (diameter about 0,8 cm). One in the upper part and one in the lower part of the vase.

Buy 5 meters of colored electrical cable of your choice. Some example here.

Buy some sheet of colored polypropylene. Best results with a thick sheet of at least 1,6 mm maximum 3 mm. Took mine here but it is 1,2 mm thick. Better search for something thicker 'cos the upper clear part tends to bend.


Cut the polypropylene using the sketchup template I uploaded here.


Using a cutter, lightly score the polypropylene along the lines between blue and white surfaces and bend it at 90�

Join all the parts as show in the photos.

I used a g9 lamps holder with super short 15w CFC lamps like the one shown below.


If you change lamp you have to change the template according to the new dimension of your light emitter.

Hope you like it.
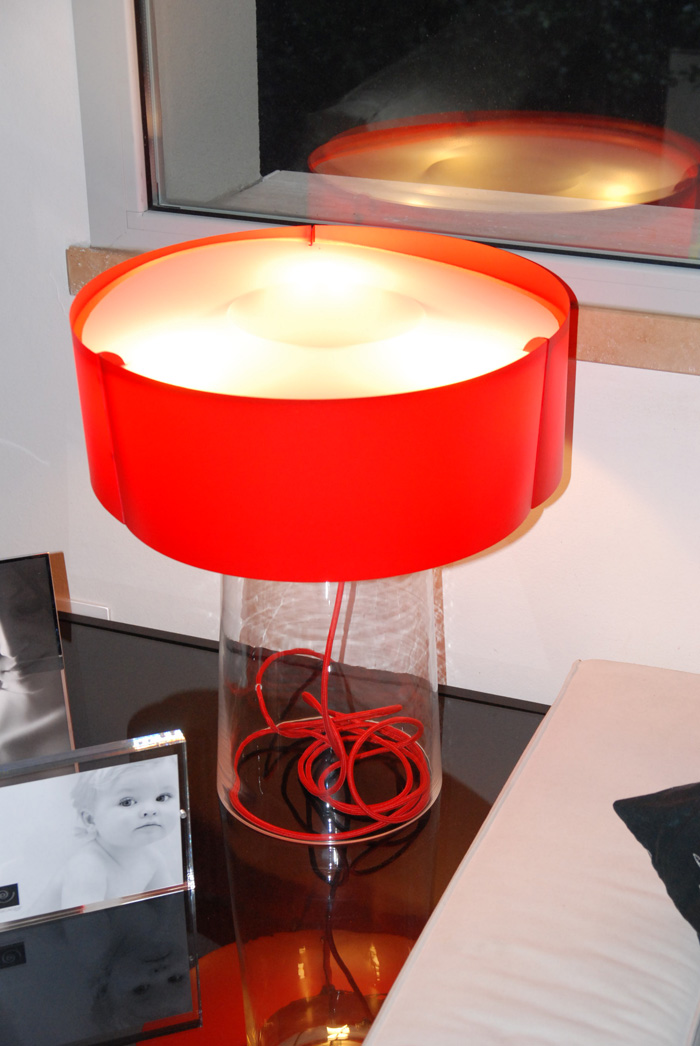
~ Andrea, Florence Italy

Wednesday, 2 January 2013

A Fullen Washstand Re-Vamp - Bathroom


Photo: IKEA.com
Materials: Fullen Washstand - Melamine

Description: We recently tiled our bathroom and fitted a shower bath but having a small bathroom, we were pretty much limited to the size of washstand we could fit in and the Ikea Fullen one had the perfect dimensions. It looked a bit cheap (and it was at only �20) and needed something doing with it.

We kept the housing as it was but took off the flimsy doors and a friend who works in a local kitchen company made me 2 thick bevelled edged black, gloss doors. We fitted those and bought new handles to match the other handles we had in the bathroom.


I then bought a couple of chrome radiator pipe covers and fitted them to the bottom of the legs on the washstand so they look like metal feet and I covered the internal thin shelves in a zebra print plastic. This not only protects the thin wood from rotting when returning bottles that have been used in the shower and bath but looks great too.


We then bought the Talleviken sink for �50 and used the mixer tap we took off the old sink we disposed of. We are really pleased with it and the whole unit cost �70 with a small added cost of new doors and handles.

~ L.D., Manchester, UK

Ikea Besta goes Pirate (and loses a leg)


Materials: Ikea Besta

Description: Those that have multiple Besta cabinets next to each other may not like two legs 'next to each other'.

This little hack (although it's a bit of work and you need the proper tools) is a way to get rid of that superfluous leg.


The steps:

0. Get your Ikea Besta cabinets. Attach them properly to each other (preferably 4 screws).


1. Get am aluminum plate approx 2 mm thick.

2. Drill proper holes (4x 4mm for mounting, 1x 8mm for the leg itself).

3. Route out a section of the Ikea Besta cabinets. Don't go too deep, there's nothing below the top cardboard layer!

4. For strength, I've glued a piece of paper using 2 component glue on the bottom of the routed section, and saturated the cardboard with the glue. This isn't required though.

5. Ikea Besta cabinets are made of cardboard. You can't use those to mount the alu plate, so I added little wooden blocks on the inside (things will be hidden from view by a door anyway).

Okay, that pesky extra leg is gone now. Your Ikea Besta just went pirate...

~ BluezNL, Netherlands

Shoe/Boot Rack


Materials: Ikea Futon Base-Jigsaw-Screws-Stain

Description: This Shoe/Boot Rack was made from a dismantled Ikea Futon Base. A little jigsaw work and some wood glue, stain and screws and Voila!

~ Ken, Canada

Tuesday, 1 January 2013

The Academic's Expedit Workstation


Materials: Expedit TV Storage Unit, Non-Lights

Description: I live in a 1 bedroom apartment, and space is a premium. I needed my Expedit to be my book shelf, my computer work station, and my TV.

1. I put together my Expedit TV Storage Unit as specified in the IKEA manual.

2. I put the TV in place.

3. I found that the unit was dark, and added to Non Spotlights from Ikea.


4. I purchased a Kensington keyboard holder from Amazon which perfectly fits my Macbook.

5. I hid my radio/receiver behind the books and nested the speakers with the books on the shelf below the TV.

6. I decided that I need there to be light above the Expedit, so I added four Non Spotlights above the unit to illuminate the space above it.

7. I hated that the center of the room was the TV, so I found a piece of art that fit into the width TV space. This allowed me to cover the TV during most of the day. I remove the art when I am using the TV as an extra screen for my computer, or when I am using it as a TV monitor.

8. I purchased a wireless AC remote control unit to control the Non Spotlights to avoid having to toggle buried switches whenever I wanted to control the lights.

Thanks! Follow me on Twitter @jasonoutlaw

~ Jason Outlaw, Cambridge, MA

In Cabinet Pot Lid Holder


Materials: IKEA Magazine Rack

Description: I dismantled the rack into 2 halves, flattened and re-bent the legs, re-attached with rivets and screwed them stacked into inside kitchen cabinet door.

~ Ken, Canada

Kvartal panels mounted inside a sliding glass door


Materials: May need a grinder, or the exact sized screws (sheet metal screws for metal framed doors), plus the regular Kvartal tools

Description: A 3 panel combination fits perfectly inside a 6 ft wide sliding glass door.

1. Join 2 triple tracks, Cut the track to fit the opening, leaving a 1/4 gap on each end to fit the end caps.


2. Mount the 3 mounting brackets on the inside top of the door frame, screwing to the metal or vinyl door frame. This is the only tricky part. The screws should be sheet metal screws for metal frames, and wood screws for vinyl frames. Use self-drillers or drill pilot holes.

Be sure length of screw will not stick through so far as to block door from sliding past the screws. Not having handy, the perfect length of screw, I used grinder to grind down end of screws. I was able to fit the grinder in the door frame after mounting the brackets, but you can also grind them down in a vice. The screws for the bracket on the fixed side of the slider did not require grinding down, because the door did not reach that far---the protruding screws did not interfere.

Mount the end brackets 1/4 inch from the end to allow room for the end caps. The bracket at the seem may need to be shortened with a grinder or hacksaw to not interfere with the sliding of the door, in which case you will scr ew only one screw into the door frame. You may, alternately, be able to screw brackets into top of door frame to avoid having to worrying a out the length of screws. But, then you would need to drill holes through brackets at top of brackets.

3. The rest of the assembly is a normal 3 panel Kvartal assembly.

~ Paul Nugent, Phoenix