Friday, 2 December 2011

The Shabby Chic lamp makeover


Materials: Ek�s shade, Rodd table lamb base, own craft accessories

Description:
My dried birthday roses from July were my inspiration to make this old Ikea light totally shabby chic. Otherwise I probably would have thrown it away, but this modification made the life cycle of this poor (and btw very inexpensive) thing a little longer.


1)Do a little roughening to the lampstand with a sandpaper to get this mat black / silvery finish.

2)Collect different beige, golden and shabby stuff together to get inspired of the new looks. Go through your mom's treasures - I'm sure she has kept at least some old curtain ribbons. :) A huge part of my crafts accessories are actually from my (future)-mother-in-law.

2)The damaged edges of the lampshade can be hidden with a decorative ribbon.
You can attach it easily with a glue gun.

3)Finish the look with golden bow.
If the lampshade has any wrinkles this is a good opportunity to hide them (like I did).

4)Choose the cutest dried roses and glue them to the lampstand. Make the stand look softer by adding a twisted twine around it.

5)Make your bouquet even more sparse by adding some other attractive flowers or leaves to the composition.

6) Finally, glue another twine around the lampstand bottom.


See more of the shabby chic lamp.

~ Kaisa, Helsinki, Finland

Nordmyra map hack


Materials: Nordmyra, map, PVA glue, scissors, varnish, brush.

Description: Inspired by some lovely tables and chairs I saw in Columbia Road, East London, I decided to try a quick and easy Ikea hack on a seen-better-days Nordmyra that was hanging round the flat looking a bit sorry for itself. I'm very pleased with the result.

Step 1. Find a lovely old map (or buy one on ebay, like I did), and give it a good iron to get the creases out as much as possible.

Step 2. Get out the allen key and take off the back and seat from the Nordmyra.

Step 3. Draw round them on the map, and cut them out, so they snugly cover the chair pieces. You might need to trim them a little.

Step 4. Squirt the maps with water and slap on the PVA glue. Stick to the seat and back panel. I then used a little roller that I found to get out any airbubbles and get as flat a finish as I could. Then I mixed some extra PVA with water and painted it over the top of the maps. All the water means that the paper gets saturated, and stretches a little (you have to be careful not to tear it) but then as it dries and shrinks very slightly, you should get a really strong bond, and a lovely flat finish. Well that was my logic anyway, not sure it's really necessary, but it made me feel better, and the finish on these does look really good.

Step 5. Leave to dry, then slap on a coat or two of varnish and reattach to the chair frame. Stand back and appreciate your work.


A simple hack but very effective. Lovely finish, special chair, cost: under a fiver (as I already had the chair).

~ Alix Wooding, London

Thursday, 1 December 2011

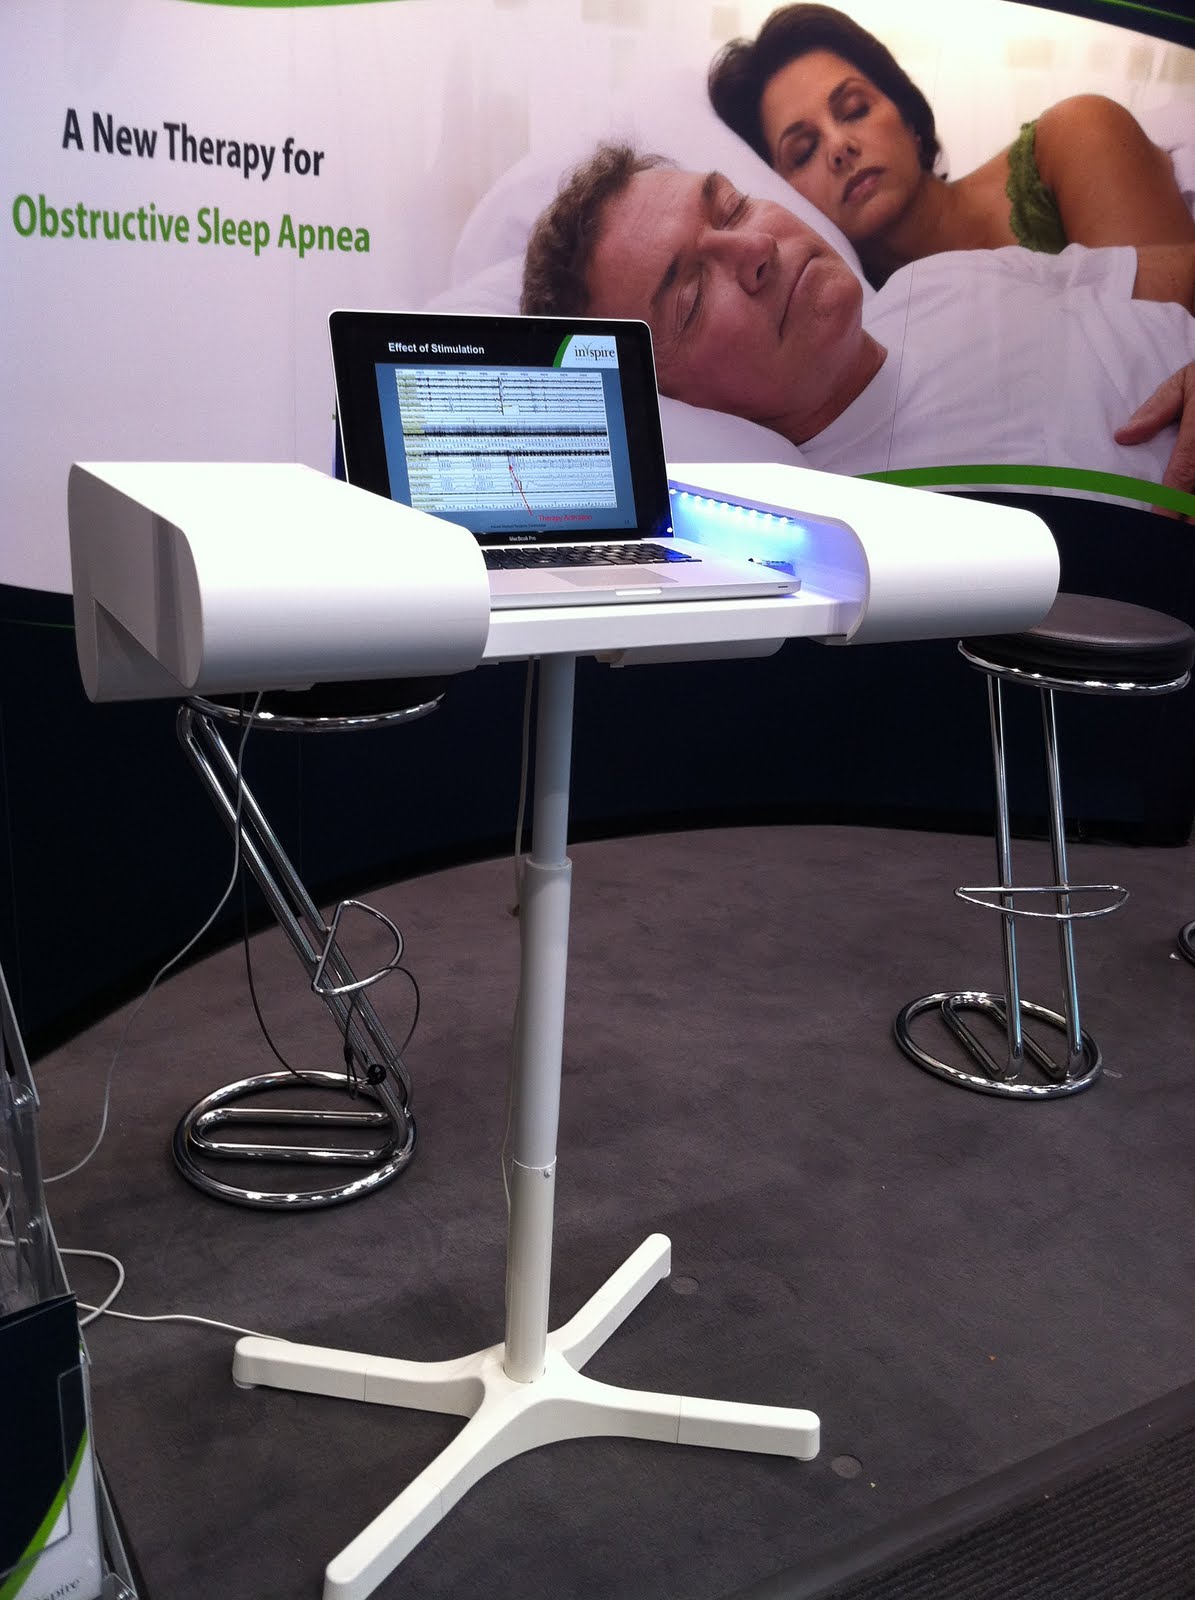
Contemporary Laptop Counter


Materials: Dave laptop workstation, Vika Kaj adjustable leg, Dioder LEDs

Description: I work for a small start-up company in high-tech medical equipment. We participate regularly at exhibitions during conventions. I used to rent a counter from the congress organizers. Renting such a counter for 3 days costs between 200 and 350 �. Now I found an alternative, which also looks better compared to the worn-out, overpriced rental� I can use it again and is easy to transport if by car.

At Ikea I found "Dave", a plastic, modern looking laptop workstation. Since this a table, it was too low to make presentations on a laptop while standing in front of it. How to turn this workstation into a counter?


I picked-up "Vika Kaj" at Ikea. This is a white adjustable leg. Both ends of "Dave" are very different and I could not find a quick way to make Dave's leg longer to fit the height of the laptop station to my needs. With a grinder I cut Vika Kaj in two. Also with the grinder I made a slot of about 5 cm at the bottom. The aim was to make the bottom end conic, similar to the original leg. After inserting the half Vika Kaj in the original leg, I drilled 3 holes, put self-tapping screws in it and painted the bare metal parts in white.

Dave was now high and stable enough for my purpose. To make the whole workstation look slicker, I attached 2 bars of colored leds lights "Dioder", using double sided tape.

The result: an original, high-tech looking counter for my booth at exhibitions. I have just used it during 3 days on an exhibition in Germany and it did the job!

Total price:
Dave: 99�
Vika Kaj: 10�
Dioder: 29,95�
Total: 138,95�

~ Herve, Belgium

Stolmen bike stack

IKEA Stolmen bike rack

Materials: Stolmen

Description: Ikea Stolmen system used as a bike rack. Not really the cheapest solution, but at least no more black stripes from the wheels on my walls. And as a spin-off, the floor is much easier to clean. Also nice as a "showroom".

IKEA Stolmen bike rack

See more of the IKEA Stolmen bike rack.

~ Rainer, Berlin

Skatedeck wardrobe


Materials: Stolmen Hooks

Description: I simply used Stolmen Hooks linked to a skatedeck as a wardrobe. Hope you like it.


See more of the skatedeck hanger.

~ Rainer, Berlin

Loft bed upgrade


Materials: Morrum or Robin Loft Bed, towel and kitchen rails, utensil holders

Description: My daughter shares a room with her little brother. The aim of this project was to give her as much storage up in her loft bed as possible, and to keep all her toys/books/clothes within the confines of the loft bed.

I started with a wooden loft bed (I'm unsure if it is a Robin or Morrum - see photo, right). It was too tall, so we sawed about 10 cm off the bottom so it was higher than a bunk bed but with room to sit up/play.

The next step was to prevent the toddler climbing up into the loft bed. This aim was achieved by drilling holes through the top of a destroyed Kurrs chest of drawers and cable-tying them to the ladder (I didn't use screws as the toddler is handy with a screw-driver).


We installed an Ikea towel rail across under the foot of the mattress to hang her clothes.


I installed an Ikea kitchen rail across the bottom side rail of the bed, and attached large and small Ikea kitchen utensil containers to hold big and little shoes. These containers kept being bumped off, so I drilled a hole through the back of the plastic containers and cable-tied them in place (yes, I know I have a bad cable-tie habit, but they do make it easy to re-configure things as the kids grow so fast, and are childproof, at least so far).


To provide storage for books/toys we used sheets of 295 mm wide melamine mounted on angle brackets. They WERE straight before the toddler used them as a climbing frame.

Two hooks for bean bags, and loops to click bike helmets through were later additions.

A 595mm deep piece of melamine mounted on angle brackets serves as a desk (with a Jansjo light clipped above). The fit ball does double duty as a desk chair and a toy.

A 295mm deep melamine shelf above provides extra book storage in bed, so she has a spot to hide from her brother with books and toys to hand.

Lastly I installed a smoke alarm BELOW the mattress near the desk (and light). I was concerned that if something caught fire under the bed and it would take too long for the smoke to rise above the mattress and reach the ceiling smoke detector.

I've been very careful not to put any hooks or protrusions outside the bed high up - it is essential that if a child falls over the edge they don't get caught/hung/strangled on the way down.

~ KBarker

Expedit (Computer) Desk


Materials: 1 x Expedit Shelving Unit (2x2; 601.352.99); 1 x Expedit Desk (601.160.69); Opt.: 1 x Besta (401.021.48) + 1 x Inreda (= drawer for Besta; 701.050.27) or some 'Expedit-Stuff' like drawer or something...

Description: I was looking for a low-priced Computer-Desk. On my way through the internet I saw the 'Sitting + Standing Desk Combo' by 'Keith Rozario, Malaysia' and liked it at first sight. I took the "sitting part" and modified it a little:

As already mentioned the Expedit Desk is originally designed for the 2x4 or the 4x4 Expedit Shelving Unit.


To put a 2x2 Unit with the desk together, you'll need some brackets.
I used the remaining brackets which we're intended for wall-mounting of the 2x2 Unit. (Even though you can use those brackets, you should use some better wood-screws!)


Caution:
The desk is not as high as the shelf (Desk: 76cm/ Sh.Unit: 79cm). Fortunately it is adjustable in height by only two "screws". Unfortunately the "screws" in the package are not long enough. :(

I used Screws with a length of 7cm. The length is dependent on the distance to the ground to keep the desk in the same level as the shelf.


Note: The screws can be covered with a good looking pipe, tube or something.

That's it for the desk.

As you can see, I modified the 2x2 unit so I can use it as a computer storage (Image 3).
For this I have rotated the rack cross around 90 degrees so that the long board is vertically mounted.
I've omitted one of the small boards to get the right space for my computer.
I chose this option because the desk stands in the corner of the room and I needed a place for my computer (and legs^^).

Note: The wooden peg in the middle of the long board can be cut and dyed black. ;)

If the desk is to be used without a computer (or maybe only with a Laptop or something), the 2x2 unit can -originally- also be used as storage space with all the Expedit-Stuff like drawers or something.

In my case, it serves as storage for the computer, external hard disk(s) and power strip (Image 3 was taken before I adjusted the cables^^).

I've created additional space for storage with Shelf "Besta" on top of the 2x2 unit.

I think, it is an low-priced desk with potential!

~ Marcus H., Karlsruhe, Germany