Monday, 3 October 2011

FADOnet


Materials: FADO lamp, HTC Diamond package Arduino UNO and Arduino Ethernet Shield from Arduino.

Description: I have the pleasure to present you the FADOnet. This concept is based on the FADO Lamp, the packaging of the HTC diamond and is enriched with electronic system.


This Lamp is connected to the internet and transmit his state to the network. Additionally this lamp can be updated according interactions with other applications. For example you can change the lamp color when you received an email, when you receive a call and whatever notifications. This object is a lab object to study smart objects interactions and communication mashups (mixing communications applications). IKEA furniture is a good provider to build an home simulator and hack opportunities.

On an original idea of Olivier Le berre (Bell Labs researcher), the first version was designed by Sameh Ben Fredj (Bell Labs PHD Student) to be design in this form by Fabrice Poussiere (Bell Labs Researcher).


~  Fabrice Poussiere, Villarceaux

Sunday, 2 October 2011

Solid wood countertop for lazy families


Materials: Numerar countertop

Description: Ikea recommends to handle solid wood countertops this way:
"Wipe clean with a soft cloth dampened with water and a mild dish detergent or soap, if necessary. Wipe dry with a clean cloth.... Regular treatment with BEHANDLA wood treatment oil prolongs the life of the countertop."

And what if you are lazy and forget to wipe it down every day and forget to oil it for one year? Moisture appears and you start to think solid wooden is beautiful, though not for you.

As we did not find any better countertop in the near, we decided to change a bit on the recent one.


Pull off countertop, excise around the sink, and lay mosaic tiles.
It is more resistant and persistent.

~ M�rta Czir�k

Mirror, mirror Malma on the wall


Materials: Malma x 32, 4 cm wide double sided carpet tape, tape measure, carpenter's square, spirit level, marker

Description: In the dining room of our new apartment we had a very special decorating challenge. On the back wall (facing the whole living area) was a large 1970s smoked glass mirror. And it was glued to the wall. Now I realize that in some context this might be cool, but it just really wasn't working for us. In fact we hated it. But not to worry, we had plenty of inspiration from the Internet, and in no time we had come up with a perfect solution.


On one of our many Ikea visits we purchased 32 Malma mirrors (red finish), after carefully sorting and selecting the nicest ones. We also bought one or two spares just in case.


The most important part of this hack was the careful measuring and placement of the Malmas. We started from the center of the old mirror and worked our way out, much in the way you would place tiles. The mirrors were attached directly onto the old mirror with several generous strips of carpet tape each. We haven't had any problems with the tape holding, non of the mirrors have moved a bit. The Malmas overlap over the edges of the old mirror by just a bit all the way around.

In spite of being a simple hack, this has become one of the most commented-on features in our home. It has created a striking feature wall, while at the same time reflecting light into the back of the apartment.

~ marikorose, Athens, Greece

Tolsby jewelry stand


Materials: Tolsby, scissors, fabric with small holes

Description: I made this movie to show you how to make this super easy hack.

Link to the video on youtube.

~ Astrid, Holland


If it looked familiar, you're right. Jen posted this one some time back. ~ Jules

Saturday, 1 October 2011

Lack-ed Painting


Materials: Lack end and coffee table tops, spray paint, acrylic paint, brushes, design inspiration, mounting hardware

Description: After watching too many home decorating shows and realizing that there was no way that my teeny-tiny decor budget would cover all the walls in our new apartment with the large scale art I had in mind (to hide the stark white apartment walls we aren't allowed to paint - argh!), I decided to try my own hand at creating artwork for our home. When I went to the local craft store and realized how annoyingly expensive larger scale canvas is (especially the nicer canvas that's stretched over a much thicker frame), I figured I'd have to improvise.

Ikea As-Is to the rescue! For $6 total, I found 2 Lack end tabletops and 2 Lack coffee tabletops, all in perfect condition (birch and black finishes, respectively). Freakishly expensive canvas problem: solved.


So I'm generally a wuss when it comes to sanding by hand (and since I was too cheap to rent/buy a sander), I just made sure to buy spray paint that was made to cover smooth surfaces and put on an extra layer or two in the colors I wanted (don't forget to spray paint the edges too!). Note to self: don't spray paint at twilight... as you'll see on some of the pics, I didn't do such a great job near the edges! Unsurprisingly, the silver spray paint dripped a bit, but I ended up kind of liking the effect and purposely dripped it over both of the silver "canvases" to add a little interesting texture.

I went to town with the cheap acrylics and crappy brushes I had around the house, and reinterpreted a pretty floral design I found online. Voila! Art! (or something vaguely like it)


We had a bit of trouble hanging these straight (not much of a surprise, I guess, that a 100+ year old brownstone has crooked walls/ceiling), but in the end just drilled a hole about halfway through the back of the "canvas" and pushed it onto an extra long screw drilled into the wall.

The fun thing about this hack is that even if you're an exceptionally lame-to-barely-mediocre artist like me, you aren't wasting incredibly expensive canvas if you mess up or just want to experiment and learn! You can get large scale art without breaking the bank. I suppose you could also use stencils quite easily on this, and I'm currently working on another one (using an Ikea As-Is desk top!) with a more watercolored, abstract design that's turning out surprisingly cool.

Total cost for "canvas" and spray paint: < $15. Not too shabby, eh? Especially when getting several frames of nice canvas of that size will set you back well over $100, even at the cheap stores! It was a fun way to be creative, and an easy way to tie together my black/stainless kitchen appliances and red curtains with a design I liked, not to mention it distracts from my big boring white wall! (sorry for the mess on my countertops... reorganizing cupboards was my distraction for waiting-for-paint-to-dry!) Now for the rest of my apartment.........

Good luck!

~ Kathryn, Chicago

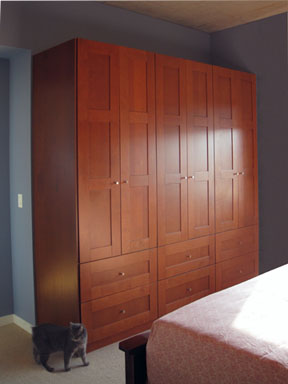
Bringing the Kitchen into the Bedroom


Materials: Akurum/Adel with Komplement wire baskets

Description: The beautiful warm wood finish of the ADEL kitchen door and drawer fronts suited our master bedroom decor better than any of the finishes in the PAX closet line. So we decided to make our bedroom closet out of kitchen cabinets. But the AKURUM kitchen cabinets didn't have any of the closet accessories such as the wire basket drawers and hanger rods.


We combined 3 AKURUM High Cabinets with 2 drawers. The center cabinet is a TV/media center and is flanked on either side by clothing closet cabinets.

Since the AKURUM interiors are 1/2 inch wider than the KOMPLEMENT closet fixtures we had to add 1/4 inch plastic spacers (found at any hardware store) to get the wire drawers and hanger rods to fit inside the AKURUM cabinets.

~ Cece Cutsforth and Gregg Meyer, Portland, OR

IKEA Expedit workspace


Materials: IKEA Expedit bookcase (2x2), Ecpedit bookcase (2x4), Lack wall shelf 75.25" long, 1 - 3/4"x4'x8' sheet MDF

Description: The area under my basement stairs always seemed to attract unwanted clutter and I was in need of a larger work area for my computer(s). I already had an Expedit desk setup (desktop and 2x4 bookcase)and I didn't want to "waste" that. After looking on this site I found a few setups that were inspiring using the 2x4 bookcase horizontally.


I measured out the area and started to plan out what I could do. Buying another Expedit bookcase, this time a 2x2, I drew up the best use for the sheet of MDF as the main desk material. Over the course of 3 days of spare time I cut, test fit and assembled the custom desk. A little love from a router, sander and paint made the setup complete.


After putting all the computer goodies on the new work surface I went to the local auto supply store and picked up some plastic conduit tubing for engine compartments (really cheap) and ran my cables inside those. Any other remaining cables that I could tack up I did on the underside of the desk. In addition I used scrap pieces of MDF to create landings under the holes for the cable chases, this allowed me to store additional cable neatly and keep it all up and out of sight.

Overall desk size:
Width - 9' 4"
Depth - 2' 6"
Height - 2' 6.25"
Return Width - 1' 3.5"
Return Length - 4' 11"


Favorite features of the desk:
- 9" deep, 6" tall monitor shelf that runs the length of the desktop (plus a small return).
- integrated 2 gang electrical box.
- integrated led lighting under the monitor shelf.
- plenty of leg/desk space.

Future plans:
- install picture rail(s) on the block wall for inspiration pieces.
- pendant lighting over the main desk surface from the underside of the stairs.
- would like to incorporate a mini-fridge into the 2x2 bookcase (then I'd never have to leave for a drink!).

See more of the Expedit desk.

~ Michael Johnston, Long Island, NY