Wednesday, 30 November 2011
Zigzag Fullen Bar
Materials: Fullen Sink Cabinet, Metrik Handles
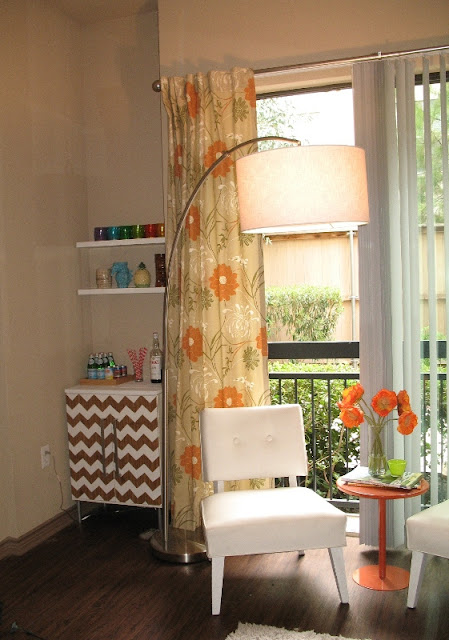
Description: We have a nook in our apartment that's too small to fit a bar cabinet. My husband and I are classic cocktail fans and we needed a place to store some of our bottles and a place to display our tiki glasses. The Fullen sink cabinet was small enough to fit in the space.
1. The legs were grey plastic which looked cheap so I painted them with Martha Stewart Polished Silver Metallic Paint.
2. I got my hardware store to cut a board into a 23" x 15.5" rectangle for the top, which I painted white and topped with a coat of clear acrylic.
3. I attached the top to the base with contact cement.
4. The chevron pattern was made from wood grain contact paper. I drew one zigzag onto the Fullen box and cut that out as my template to trace onto the contact paper. I did one door at a time, but I wish my contact paper had been wide enough to go all the way across so that it wasn't so difficult to match up the doors.
5. I attached the doors to the cabinet and used an Xacto knife to make the pattern on the two doors match.
5. Drilled holes to attach what I think are Metrik handles.
~ Heather Sherrod, Houston, Texas
Ladder into steps
Materials: Kura, Trofast, bits of wood railings
Description: I needed to figure a way to save space in my girls bedroom but the problem with the Kura bed we had was that my daughters could not climb up or down the ladder to get into or out of the bed.
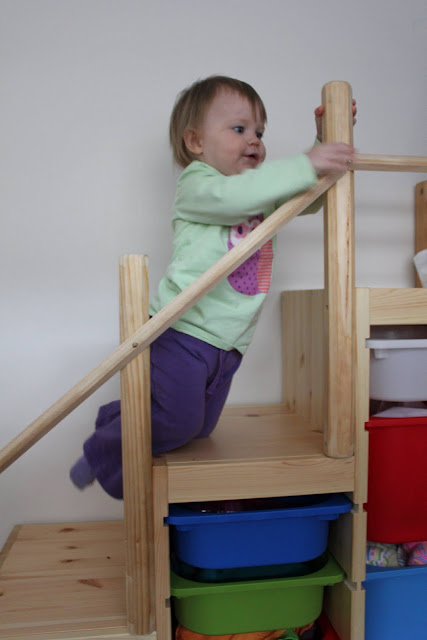
We bought a Trofast storage unit as a replacement for the stairs. It worked great! They could both climb up and down into the bed but to make it safer we added some railing to the Trofast unit.
We bought 3 posts from the hardware store and cut them down to size, screwed them onto the sides of the unit. Cut the railing to size and attached it to the posts and the bed. We also screwed the Trofast to the Kura bed to make it more sturdy and stable.
We love it and hope you do too.
~ Grace S, Victoria, Australia
Metal night stand
Materials: Helmer, Capita, drill, grinder
Description: We stumbled onto the Helmer and thought it would be perfect as a night stand with 6 drawers for all out stuff. However, with our bed being so high off the ground and the lowest drawer being pretty much on the floor, it didn't seem like it would work. But my wife loves the look of the Helmer (especially when our Edland is white, the red really pops). So I decided to buy the Helmer along with a box of 4" Capita
1.) assemble the Helmer as per the instructions
2.) use a 3/8" drill bit to make holes on the corners of the base
3.) use grinder to cut the thread portion of the Capita plates
4.) Thread the bolt into the new holes
5.) screw the legs on to the Helmer
I am contemplating if I should mount a Jansjo on the side of the Helmer using the same method as the legs. Since it is a night stand, might as well have a reading light.
~ Roy, Vancouver
Lack Table Top Recovery
Materials: Lack Table, Mod Podge, gel stripper, putty knife, wood filler, 2.5 yards of fabric, foam brushes, sand papermetal container/can, scissors, gorilla glue, utility knife
Description: After sanding the top lightly, I stripped the finish off of the table and filled the hole with wood filler. After painting it and deciding it was ugly, I decided to go find some fabric to mod podge on to it. I bought 60" x 2.5 yards, which was just barely enough to cover the table.
After mod podging ever so slowly, I folded the edges underneath and cut holes out where the legs screw in. One of the legs was broken slightly, and so I added gorilla glue to tighten the leg. I trimmed the fabric and let the material dry (which became more oil cloth like overall) Oh and for the last picture, I did put the shelf on the bottom of the table after everything had dried.
See more of the Lack table top recovery.
~ Shanna Durrant, Bountiful, UT, USA
Ekby Jarpen in the hallway
Materials: Ekby Jarpen shelves, Vippa hooks, Ekby Robert Brakets, Besta frame
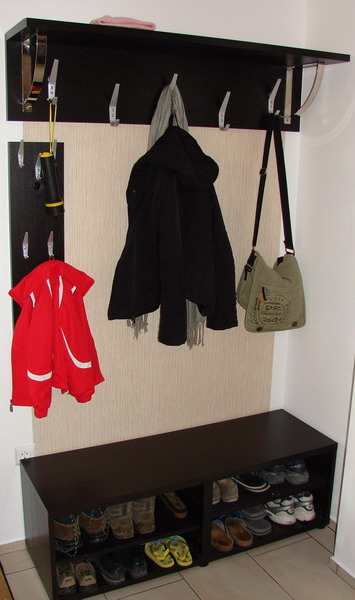
Description: Moving into a new apartment we had trouble finding some hallway furniture to fit in the designated place. As we had three extra shelves we didn't need and a Besta frame which was bought as a TV stand but was never used, my husband came up with this idea.
Items used:
- 2 Ekby Jarpen shelves 119 x 28
- 1 Ekby Jarpen shelf 79 x 19
- 5 Vippa hooks - large
- 5 Vippa hooks - small
- Wallpaper
- Black spray paint
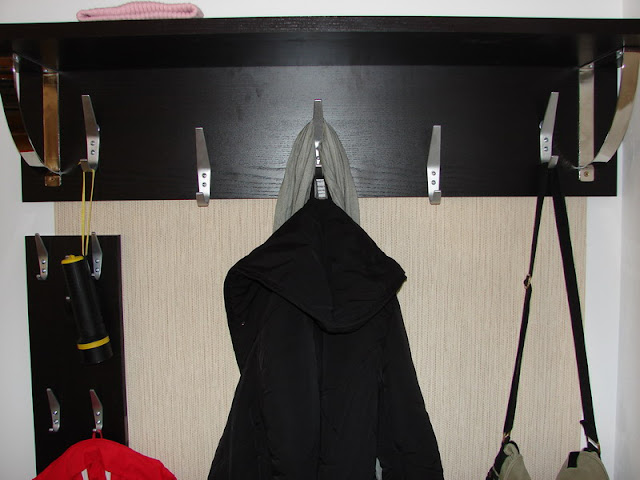
My English is not very fluent so I'll let the pictures speak for themselves. The shelf which is used as support for the hooks was fixed to the wall and the hooks are masking the screws. The smaller shelf has three hooks for keys and two for our kids' jackets.
The part of the shelf which is not finished (should normally go against the wall) was painted black.
~ Laura, Cluj, Romania
Tuesday, 29 November 2011
Hacker help: Got a swiveling desk tray?
Description: I was referred to IKEAhackers.net through the Design forum on Craigslist. I bought some swiveling desk trays from IKEA two years ago and the item has been discontinued. I'd like about six more of them. I'm contacting you now in the hopes that you or a visitor to your site may know where I can find something similar before I commence to 'hacking' IKEA's design (not IKEA's materials) and fabricating my own swiveling desk trays out of frustration.
I've included pics of the wonderfully simple, efficient, functional, and affordable swiveling desk tray IKEA once offered. Thanks for reading. And cool site. I love re-purposing stuff.
~ Clint, San Diego
What a BONUS of a light!!
Materials: BONUS Cutlery, DOKUMENT Paperbasket, Kitchenstuff
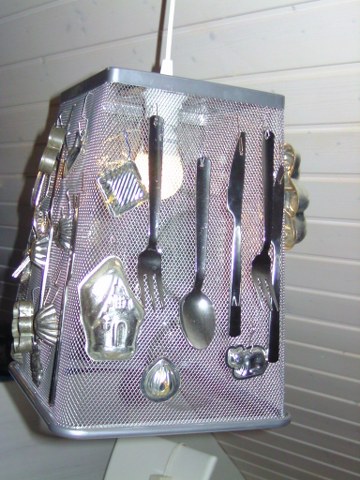
Description: This is hack number 3 with all the items left over from the first two hacks BONUS cutlery. Maybe you remember number one and number two. The residues from cutlery BONUS I've added with small cookie cutters and kitchen utensils and a lamp socket scrued in the paper basket DOKUMENT.
Hung up all the items with the little hooks for hanging curtains DIGNITET. Then you need just to drill a few holes in the parts. This is in the other hacks already described and shown. And you're done. Great lamp for the dining table, less than 10 euro per piece and of curse a unique peace of art. Also: Good storage for cookie shapes that are actually needed just for X-mas! LOL
~ Beate, Lauchheim
Built-in Entertainment Center
Materials: Besta, Integral, Akurum
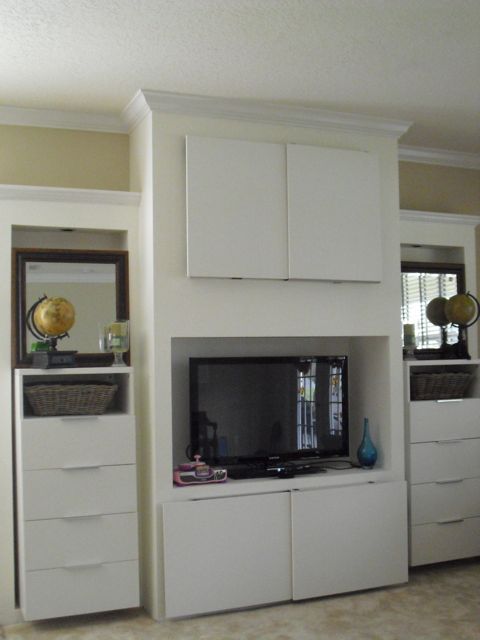
Description: Here's What I Used:
2 Besta Frames
8 drawers (Inreda drawers, Besta drawer fronts)
8 drawer pulls (Strecket Handles)
4 Akurum doors
2 Integral rails
wood from Home Depot**
Accessories--mirrors, candles, globes, baskets(Ikea BYHOLMA)
Here's What I Did:
I measured all the built-in spaces first so that I knew the correct measurements and which Ikea frames would work.
I took a Besta drawer front to Home Depot and tried to match the color for the wall paint
Tape off surrounding area,spackle,sand and paint the built-in area
Assemble and install the Besta frames and drawers
For the Integral rail and Akurum door slides, I had to do some math and figure out what kind of wood I would need in order to get the rail to attach to the wall (because they are meant to work with the Ikea kitchen cabinets). Once I got the wood, I cut it to size, pre-drilled some holes and attached it to the wall. After that, I could then install the railing system without any issues. The bottom doors on the built in are still Akurum doors, but I had to turn them sideways and mark new railing placements on them so that they would work for that opening.
See more of the entertainment system.
~ Loi, Orlando, FL
Ritva Curtains Transformed
Materials: Ritva curtains, Lummig curtain rod, gold spray paint, 12 yards of ribbon, fabric glue
Description: I saw another hack and thought I could do something similar to spruce up my apartment. I bought two sets of Ritva curtains for my living room and two Lummig curtain rods.
I took off the finials and spray painted them gold. While they dried, I measured the length of the curtains from the floor up and when they were just touching the floor, I marked the walls to put up the wall fixtures.
Once the finials were dry, I threaded the curtains onto the rod, added the finials, and hung the curtains.
To add the ribbon, I bought 12 yards of red, 2 inch grosgrain ribbon. I put a strip of fabric glue at the edge of the ribbon and folded it over about 1/4 inch to finish the edge. I put glue on about 1 inch of the ribbon and folded it over the top of the curtains.
Doing about 8-10 inches at a time, I put strips of glue on the edges of the ribbon and carefully (and gently) pressed it to the curtains. At the bottom, I did the same thing with the ribbon (finishing the raw edge and wrapping it around the curtain).
Now they look great and certainly nicer than plain Ikea curtains!
~ Sybil, New York
Budget Work Station
Materials: EKBY VIKTOR, EKBY M�NS, SPONTAN, STIG, RUSCH
Description: First off, sorry for the quality of the photo! The work station isn't actually crooked in real life, but apparently my iphone camera was going for an abstract look.
I wanted to make a workspace that didn't take up a lot of floor room as my bedroom is fairly small, and I was actually inspired by this makeup vanity for small spaces (http://www.ikeahackers.net/2011/03/makeup-vanity-for-small-spaces.html); originally I thought I'd do something similar with a shelf and table legs, but i ended up just deciding to mount a shelf lower on my wall to serve as a work station that would fit my laptop.
I grabbed the EKBY M�NS shelf brackets in black along with an EKBY VIKTOR shelf in black to serve as the desk portion of my workspace, and then I purchased the SPONTAN magnet board in white to use as a memo and idea display. I got a work lamp to go on the shelf but I can't remember exactly which model I bought. It was on sale for $5.99 at the time, but I can't seem to find it on the website. I wanted a chair that sat a bit higher up so I bought a STIG bar stool, and then I bought three RUSCH wall clocks to represent three different time zones above the whole setup. Overall I think everything cost between $50 and $60, and it was really simple to put together in under two hours. I used a stud finder to attach the shelf to the wall and therefore didn't need a power drill, which was an added bonus. Very pleased with how everything turned out!
~ Megan, Brooklyn
The Stacker Bedside Table Hack
Materials: 1 Corras Bedside Table
Description: 2005.... The year I purchased this Ikea Corras bedside table. After purchasing new side tables a few years ago... this was moved into a closet. Last weekend, I decided it was time to throw it out....
My husband wheeled it outside and left it on the back porch till trash day.
Two days later...I was sitting on the porch looking at the table when it happened. I had a vision! To repurpose my Ikea Corras bedside table into a wall shelf unit. I never thought I'd have "the gift" to hack Ikea!
I located my very handy husband James and asked, "Will you slice this in half for me?
With my vision and his skills.. we started by removing the casters, then James measured and pencil marked the center lines equally all the way around the table. He used a circular saw to slice it in half. He then measured, marked and sliced the adjustable shelf.
He screwed the top half (from the inside using 1 3/4 inch screws) to the bottom half joining the two halves together. He screw small strips of strapping metal on the backs of each corner on both halves to reinforce them. He put four 3 inch L brackets on the wall and screwed the unit in place.
Corras bedside table (Original) measurements: 15d x 20w x 20h
Corras Stacker (Hack) measurements:
7 1/2d x 20w x 40h
I'm very proud of my (our) first Ikea hack ;)
~ Merritt & James
Monday, 28 November 2011
TRONES Shoe Cabinet Shabby Chic Makeover
Materials: 4 TRONES shoe cabinets
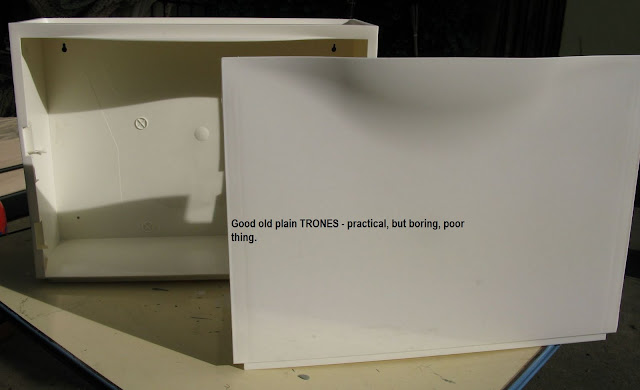
Description: I wouldn't call this an IKEA hack, it's more like a shabby chic makeover. We have several TRONES shoe cabinets, which we not only use for shoes, but also in the bathroom, for separating the washing and for stuff like toilet paper, cat litter, etc.
1. The white TRONES were perfect for our very small hallway, but ... sooooo boring.
2. I took them outside and removed the lids.
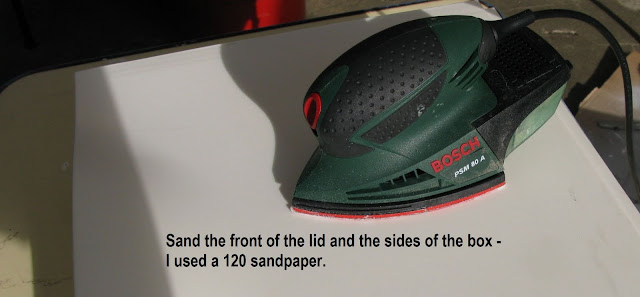
3. I sanded the front of the lid and and the sides of the box with a 120 paper.
4. Prime with plastic primer. I used a grey one because it will show through the paint nicely later and give the lid a used and wooden look. I prefer water soluble primers and paints - first, because I'm a messy worker and second, because the brushstrokes show more clearly with water soluble paints and I love that effect.
Note: do not paint the inner sides of the lid. I tried it because I didn't want the plastic to show when I open the cabinet, but even a thin layer of paint gets in the way and may make opening and closing difficult.
5. I found this great old board in our landlord's attic where he hoards lots and lots of beautiful boards. Best of all: I'm allowed to take whatever I want from there!
This board is thick and heavy and gives the new TRONES cabinet stability. Also, I didn't have a thing to do with it except a bit of dust-removing - it fit exactly and was just perfect! It must have been painted with a white chalk paint once and now looks like a piece of driftwood, including some rusty old iron staple thingies, which I of course did not remove.
We screwed all four TRONES together (note: do not fasten the screws too tight - the plastic might warp and the lids won't fit in anymore) and screwed the board on top of it.
6. This is how it looks when you come down the stairs - and you can see how really small the space in our hallway is (entrance door at the left, kitchen door at the right).
7. Voila! New shabby chic shoe cabinet! I made another one for the bathroom, it's not finished yet but I will blog it in the next days.
Hope you like it - if you have questions regarding supplies or anything, let me know.
See more of the shabby chic shoe cabinet.
~ Ms. Liquorice, Germany
How-to: Ledberg Lighting wiring hack
Materials: soldering iron, solder, flux, heat shring tubing
Description: The Ikea Ledberg lighting is great but not flexible. All you can do is connect it as one long strip from the package. If you want to connect the strips some distance apart, you have to get creative.
If you are careful you can remove the plastic connector and re solder it to a length of wire to allow the light to be moved and still work as a plug in to the strip. I took my soldering iron and melted the little circular tab about one inch in from the connector block to remove the strip from the plastic case and very carefully un soldered the connector.
I re soldered wire to the light strip and replaced it in the plastic case. If you re heat the original tab, it will hold the strip in place. I then re soldered the connector onto the wire and covered the connections and connector with heat shrink tubing. Be careful to match the polarity of the wire when re doing the connections. You can add as much wire as you need and place the light strips wherever you want.
~ John B, Fort Lauderdale, FL.
Skewered Ikea Lamp Shade
Materials: Possibly Ollsta. Not sure because I got it on clearance.
Description: I found a floor lamp and what seems to be an Ollsta style lamp shade for 10 bucks in the Ikea Clearance section. SCORE! The problem was that it literally gave off no light....
My husband and I quickly remedied that problem by cutting slits horizontally and weaving in BBQ skewers. Let there be light! The end!
See more of the skewered lamp shade.
~ Andrea and ClIff Currie, Sunny San Diego California
Mosaic Coffee Table
Materials: Klubbo coffee table
Description: I had this chocolate Klubbo coffee table for quite some time. It's getting some chips and wear so I decided to give it a new layer so a new look.
I got some turquoise, magenta and ceramic mosaic tiles. Some of the tiles were nipped into 4 tine squares.
Scratches were made on the table surface for a better adhesion of the tiles to the former veneer surface. The tiles were then glued to the table top according to my design.
The tiles were left to dry overnight. On the following day, grouting was then done to fill up the gaps in between the tiles. Grouting and cleaning up the grout were the most tedious steps as there were 5 sides to work on ( the 4 sides and the top). I used unsanded grout. After drying, some grout actually sunk in. So I had to grout a second layer to create smooth surface.
I took some effort to clean away the access grout, then to finally achieve a smooth surface. I got some grout waterproofing liquid and applied onto the white grout. This helps protect the white grout from staining.
~ Wai Hoong, Singapore
Better than sticking the kid in the actual dresser drawer
Materials: Malm chest of drawers (2), Sniglar bed (1), Ivar side unit (2). Also a Pax wardrobe.
Description: We're a family of five living in a small, two-bedroom flat. The two teenage girls share a room, and Junior Muppetface Bananas, age 4½, sleeps in the "master bedroom" (ha) with us. When he was a baby he slept in our bed, then he got his own, and the room which is about ten metres square got more and more cramped.
And then he needed a bigger bed (his, while not a crib, was crib-sized). What were we to do? We needed to be able to open the door to the room, after all! Ikea assures us every year that the company caters for those of us with limited space - well, we all know that ain't true. The options are actually very limited and unimaginative. (Also, in Sweden they still operate in a 1980s dream world where we all live in big flats or houses and a standard double bed is, indeed, 180 cm wide. That's minimum then. They don't offer any bed frames here for a bed that is 140 cm wide except the Malm, and that adds on so much on the sides that you don't save any space in the end at all!)
After ranting for a good while I submitted to the necessity of hacking. I also made my husband submit. We're both really un-handy people so I tried to come up with a solution that involved as little building as possible. The enclosed photos aren't great, but they show the important bits. (The room is actually so small it's hard to step back and get everything in the frame!)
The Sniglar bed frame was bought second-hand, and the legs were sawn off. It was then placed on top of two Malm chest of drawers (also bought second-hand but for all the hassle that was we shouldn't have bothered, frankly, but that's another story). Our biggest problem was how to support the bed on the inside, against the wall. Originally I'd planned to use two adjustable height desk legs (Vika Kaj), but as we were sawing and sanding away like merry elves I remembered that we had some Ivar side units in the cellar that might do the trick for nothing. We sawed two of those off to the same height as the Malms, drilled a hole in them for one of those wooden plug things and a corresponding hole in the bed, banged the whole lot together with loads of wood glue, secured it some more with metal L-shaped brackets, realised it was still not super-stable dammit so used another bracket to secure the Ivar bit to the skirting board, and then shoved the Malms in underneath. Hey ho, job done! The chest of drawers are 48 cm deep or so, and the bed frame is 75 cm wide, so the majority of the bed is supported by the Malms, with the Ivar bits just propping the inside up so to speak.
At the bottom end of the bed is a Pax wardrobe, which is just put together normal style. The only "hacky" thing about it is we put the back on white side out, facing the kiddie bed so to speak. I'm going to hang a curtain in front of it on "our" side, because there is no room for doors. We still haven't figured out how to secure the wardrobe to the wall or anything else, but we'll think of something. Probably this will involve borrowing a bad-ass drill from a friend, one that will hopefully be powerful enough to punch a hole in our concrete-and-rock bad-ass wall (there's a reason why the Ivar unit was secured in the skirting board).
The result is a bigger and more comfy bed for Muppetface Bananas, in a more secluded corner, with room for his and my clothes underneath, and a whole wardrobe with room for clothes for my husband and even some leftover space for my skirts. Also a little more privacy for us, since the wardrobe sticks out a bit and becomes a half wall.
~ bani, Uppsala, Sweden
Subscribe to:
Comments (Atom)


