Materials: 12x30 gorm shelving system, metal braces, fabric, 4 Ikea Gosa Slan pillows, staple gun, twin size foam mattress pad, 4
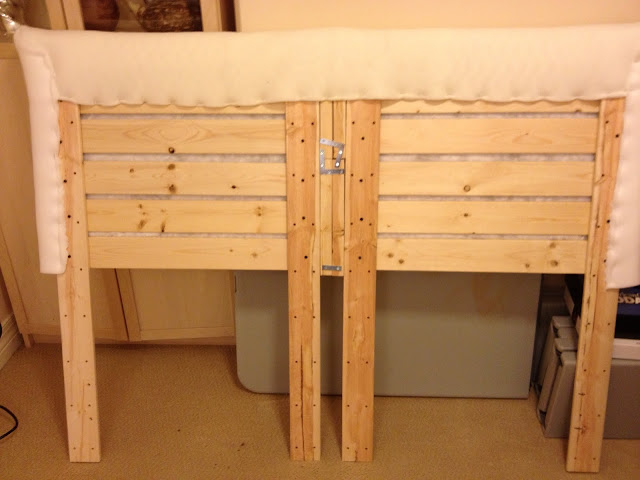
Description: I wanted to use all of the fantastic bargains I got over Presidents' Day weekend. Since there was a comforter and a duvet set and a Gorm, obviously the Gorm must become bed. The Gorm was the smaller size of 12x30 shelf and included 4 shelves and 4 posts. I cut the posts down to 45 inches (don't throw away the other 23 inches because its the perfect size for a bedside table or shoe rack)
I put the 4 shelves together with metal braces until it felt sturdy. Be careful not to screw anything into that tiny half inch trim because it tends to crack. I screwed into the shelves only.
With the 4 posts I attached to the back of the shelf set (which by now is about 60 x 24). The 2 outer ones are butted up right against the sides and the 2 inner ones are butted up as close to the inside as possible. As it turned put for me, with my basic metal bed frame that converts from full to queen, drilling out 3/8 inch holes along the inside of the posts makes it a full size and the outside of the posts makes it a queen size. This headboard is fully exchangeable between sizes.
If I were to make this again, at this point here I would take a 60 inch length of half circle plain moulding and add it across the top of the headboard. Due to the edge of the shelf it pokes up a bit in the center which I can see in the finished product. A simple piece of moulding would have smoothed it out.
I took 4 of the Gosa Slan, which is the cheapest bed pillow Ikea sells, currently $1.50 each. I fluffed them in the dryer with a wet washcloth for a few minutes and then cut them open and dumped the stuffing out. Remade the pillow into approximately 24 x 60 size and added the stuffing back in. I stapled this to the front of the wood headboard.
I took a twin size foam mattress pad (about $10) and wrapped it around the top and sides and stapled it. If I had fabric that was about 80 inches wide and 30 inches tall then I would have simply stapled it around the edges and covered up the foam, leaving the back unfinished. I didn't have enough width for that so I ended up pinning the sides of the fabric and sewing them. This is a bit more time consuming but it does leave the back with a nicer more finished look.
I did paint the wood posts because I knew they would show with my full size bed. If I had wanted to get really crazy I might have plugged the holes with little round wood beads.
~ Toni, Utah


No comments:
Post a Comment