Thursday, 24 March 2011
3-in-1 Expedit Kitchen Counter
Materials: Expedit Shelf, Vika Amon Table Top, Capita Legs
Description: So my wife and I were setting up our first home, and it's a small but beautiful white box of a place with a minimalist excuse of a kitchen along one wall of the living room.
We figured we needed some sort of dining table, plus more kitchen counter space, space to work at our laptops, plus general storage... all without taking up precious living room space. What better solution than to use the Expedit bookcase on its side as a storage base for a kitchen/dining counter!
Sure, we've seen lots of hacks with Expedit shelves, Capita legs and various table tops, but I thought I'd just share the little touches that made this project extra special.
1) Ingredients: One Expedit Shelf, assembled. Check!
2) The underbelly of my Vika Amon table top. Note the asymmetrical positioning of the Capita legs, cuz of my cantilevered design!
3) Since I knew the cantilevered top would have to take a lot of stress, I figured that I had to secure the Capita Legs to the Expedit with more than just double sided foam tape. This is a closeup of how each Capita leg base was screwed into the Expedit. I had to chisel away bits of plastic to fit the screw heads. (The bits of 3M tape were just there to help me position the legs accurately.)
4) The metal cap hides the screws completely!
5) The penultimate step... just before popping the table top onto the plastic feet.
6)The gap under the table top is perfect for keeping our 2 laptops and with mice and cables away for mealtimes!
7) The table top floats away from the wall for more comfortable seating (no one likes to be squeezed against the wall). The resultant gap is perfect for keeping table-top accessories like utensils and tissues. Our Nespresso machine lives there now.
8) The finished Kitchen-counter/Dining-Table/Work-Station. 3-in-1! Completed with a few Kassett boxes and Stig stools. The open shelving lets light through to our kitchen, with space to display our books and knick-knacks.
Enjoy!
P.S. The curvy wooden thing is an stool I made as a freshman design+build project in architecture school. Cost me a bomb to fly that back home to Singapore from Pittsburgh, but it is so happy to have the place of honour at our dining table! (And it's way more comfortable than the Stig stools!!)
~ ucn, Singapore
Pax with yesterday's news
Materials: Pax
Description: I decided to decorate the back of my Pax Tonnes with newapaper from the 60s and 80s. It took a weekend to cover all 200x236 cm.
~ Samuele Orsini, Italy
STOLMEN in the kitchen
Materials: STOLMEN, MUDDUS table
Description: This is not a real hack, just a new use to an IKEA item, but since I have not seen STOLMEN used in the kitchen, I thought I'd show it to you.
When a whole cupboard full of plates fell from the wall, we knew we had to find another kind of shelf, that is not fixed to the wall. Also we were looking for a small breakfast table for the kitchen.
So we went to IKEA and found STOLMEN. The poles are fixed to the ceiling and the whole structure is really solid. I had always wanted a cookbook stand, and the STOLMEN shoe rack is just perfect. The clothes rail makes a good pole for kitchen rolls, I just fixed it with two of the many allen keys you get from IKEA.
In the future I plan to buy 2 STOLMEN hooks and 2 small metal boards, screw everything together and lay the clothes pole into the hooks (too short now.)
That the MUDDUS table fits perfectly between the two poles is an added bonus that we didn't plan. (Those things never work, when you plan them).
See more of the Stolmen kitchen.
~ Susanne, Antequera, Spain
Wednesday, 23 March 2011
Makeup vanity for small spaces
Materials: Ekby Gruvan shelf; Vika Curry legs; Godmorgon box; Kolja mirror; Gilbert stool
Description: My bedroom isn't very large so I needed a small makeup vanity. I'm the type that likes to see all my makeup because if I don't see it, I won't use it. The Ekby Gruvan works great for this reason.
Connect 4 Vika Curry legs to a Ekby Gruvan shelf (I used the 48 1/2 inch). If you need a larger surface area, the Ekby Gruvan table top would work too.
The Godmorgon box with compartments fits perfectly on top of the shelf for more storage.
To finish off the vanity, the Kolja mirror is hung on the wall and the Gilbert stool works great with the small area.
Acrylic trays from the local craft store fit perfectly between the shelf and glass to store all of my makeup.
This was such an easy project and took less than an hour. The part that took the longest was organizing the makeup!
~ Annie, Fairfield, CA
Bathroom business
Materials: IKEA EFFEKTIV
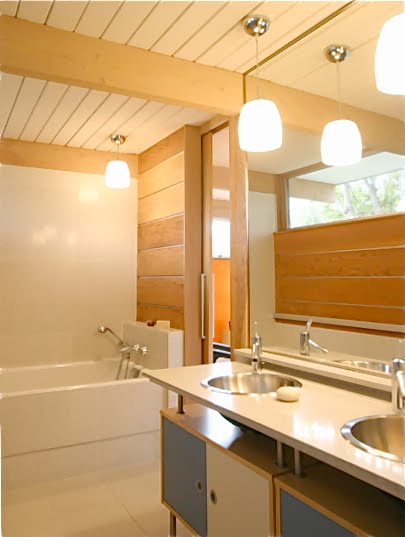
Description: The modularity of Ikea's office furniture makes it far more useful than the typical bathroom vanity cabinet. Cabinets and tops combined with Ikea Capita or Utby legs allow open shelf storage for out of sight but plugged in and ready to go hairdryers, curling irons,shavers etc.
~ Mark J. Marcinik, San Francisco, California
From NEY to YEY
Materials: Micke desk, designer wallpaper
Description: My husband bought this desk for our sons room (he is 2.5 years old) and in his room there are a firecar-bed which is red, closets are white and some textiles are blue.... and this horrific desk was orange!!!! So... I just beautified it.
I have used wallpaper from PIP STUDIO (the birds, butterflies and bugs) and a leather-look wallpaper I don't know the brand of and the door is a wallpaper-test i got from a local painter-shop.
All together, I would guess it cost 50 kroner, less than 10 euro or 10 dollars.
And best of all: Our son can now learn to draw, paint and write at a desk that is made for him.
See more of the Micke desk.
~ Trollmora, Norway
Tuesday, 22 March 2011
Geektastic lighting
Materials: Hemma Cord Set, copper wire, blank printed circuit boards
Description: I wanted to create some lighting for my apartment that would have a very geeky feel. After looking around and finding nothing I wanted I decided to create something from circuit boards.
I purchased blank printed circuit boards from ebay.
I used copper wire and insulated wire. (Local hardware store.)
I hooked this all into a Hemma cord set, well 3 of them for the 3 lights.
I wired the circuit boards together with the copper wiring visible as one square and two triangles. I tried using 5 of them but it was very heavy, the 3/4 seemed to be a good look and weight, they are hung with cup hooks using the hooks that came with the cord set.
I then suspended the Hemma fixture inside with insulated wiring. The piece that screws together allows for a good tight hold and the lights have held up very well for several months.
The circuit boards create a lot of visual interest because they have many different levels of light they let through. The light also creates a great visual on the ceiling above them.
Total cost was around $50 with materials left over.
~ Sara Reller
Subscribe to:
Posts (Atom)