


Andrea tipped me on this bookcase (they look like billies) modified to have 96 channels of DMX controlling many tiny red, green, blue LEDs. Click to play the video. Impressive effect.
link
Update!
After posting this, Timothy, the creator of this LED bookcase contacted me with details of his hack. Click here for a downloadable pdf to make your own DMX controlled LED bookcase. Also see his other LED creations on youtube.
Monday 30 June 2008
Saturday 28 June 2008
Weekend Project #2: Go fly kite!
Summers are for picnics and fun in the sun. Wendy Cook of Mother Rising sends me this project for an Ikea kite (based on this one). Best thing is, you'll be putting old Ikea bags to good use.
Wendy's Ikea kite


What you'll need:
Wendy's Ikea kite


What you'll need:
- 1 sheets of colored 8 1/2" x 11" construction paper
- 1 8" bamboo skewer
- 1 Ikea bag cut in a 1" wide spiral all around for the tail
- 1/2"wide masking tape or scotch tape
- 1 bit of baker's twine - 6 to 10 feet for a child or a roll of kite string for an adult
- a twig to wind the string upon
- Scissors
- Hole punch
- Fold a sheet of 8 1/2" x 11" paper in half to make a 8 1/2" x 5 1/2" rectangle.
- Fold again in a diagonal 1/2" from the top folded edge, and 3" from the bottom folded edge.
- Fold back one side forming the kite shape. You won't need a stick here because the folded paper acts as a spine.
- Place skewer from point to point horizontally at the top of the kite and tape down securely.
- Cut the Ikea bag into a long spiral and tape to the base of the kite.
- Flip kite over onto its back and fold the front flap back and forth until it stands straight up.
- Punch a hole in the folded area approx. 1/3 down from the top point.
- Tie one end of the string to the hole and wind the other end around the twig.
- Let it soar!
Friday 27 June 2008
Make a compact banquette from kitchen cabinets
Eugene does a fabulous job with this banquette, constructed from kitchen cabinets.
 "I needed to build a kitchen banquette for my house, but the options for having one custom-built or buying modern benches was just too expensive." he says. "I then came up with an idea to use Ikea kitchen wall cabinets (Akurum) to use as the base/seating of the banquette. Using the cabinets served two purposes: (1) seating and (2) storage.


 "I needed to build a kitchen banquette for my house, but the options for having one custom-built or buying modern benches was just too expensive." he says. "I then came up with an idea to use Ikea kitchen wall cabinets (Akurum) to use as the base/seating of the banquette. Using the cabinets served two purposes: (1) seating and (2) storage.

The seat cushions were custom made with vinyl by an upholsterer. I had to build wood supports behind the cabinets to give the seating area sufficient room away from the wall. I also attached small wood risers to the bottom of the cabinets to give sufficient clearance for opening the cabinet doors. The cabinets, risers, shims and cushions were all screwed to each other. The seat back cushions used Velcro for attachment to the wall. The table and light are from Ikea... the stools were from another store."
See other Ikea banquette hacks:
Thursday 26 June 2008
Good looking Gronos
The Grono lamp is definitely a hacker favourite. Its smooth rectangle shape opens it to lots of possibilities. Here are a few.
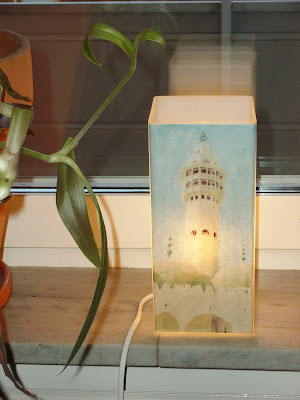
Decoupage a Grono
Ingalill spent half an hour pimping this lamp. She found the picture and printed it, d�coupage it on and finished with a coat of varnish.
Have a Grono pARTy
Jen of Painted Fish Studio threw a pARTy, where her friends gather at her house and make an art/craft project. The object in the limelight was the Grono and at the end of the evening, out came a delightful array of Grono lamps, pimped to perfection.

 Paper is used as the main decorative element, stuck onto the lamp with gel matte medium
 - which takes longer to dry but more forgiving when it comes to placement than glue.
 Lovely aren't they? See pics of other Grono lamps.
Knitted Grono lamp shades
Michaela finds the Grono lamp too frugal. "It craved for an overlay. The milky background is just the right stage for a knitted lace cover in alpaca-silk-yarn," she says.


See other Grono hacks:
> Palm leaf textured Grono lamp shade
> Grono as hanging bathroom lights
> Hand painted Grono lamp
> More Grono hacks including one with moo minicards
Decoupage a Grono
Ingalill spent half an hour pimping this lamp. She found the picture and printed it, d�coupage it on and finished with a coat of varnish.

Have a Grono pARTy
Jen of Painted Fish Studio threw a pARTy, where her friends gather at her house and make an art/craft project. The object in the limelight was the Grono and at the end of the evening, out came a delightful array of Grono lamps, pimped to perfection.

 Paper is used as the main decorative element, stuck onto the lamp with gel matte medium
 Lovely aren't they? See pics of other Grono lamps.
Knitted Grono lamp shades
Michaela finds the Grono lamp too frugal. "It craved for an overlay. The milky background is just the right stage for a knitted lace cover in alpaca-silk-yarn," she says.


See other Grono hacks:
> Palm leaf textured Grono lamp shade
> Grono as hanging bathroom lights
> Hand painted Grono lamp
> More Grono hacks including one with moo minicards
Tuesday 24 June 2008
Bathroom towel rack and toiletries shelf hack
Nathan has this great idea of using an Ikea coat hooks as supports for a towel rack. Sadly, I can no longer find these smart looking coat hooks on Ikea's site.
 He says, "This hack involves two Ikea wall mount coat hooks. A hole was drilled 1/2 way through each one, to accommodate a dowel. Then a piece of 1/4" pine was cut to fit the length of my wall section, and the depth of the coat hangers, which have now become
supports for a shelf and a towel rack."
 He says, "This hack involves two Ikea wall mount coat hooks. A hole was drilled 1/2 way through each one, to accommodate a dowel. Then a piece of 1/4" pine was cut to fit the length of my wall section, and the depth of the coat hangers, which have now become
supports for a shelf and a towel rack."
Monday 23 June 2008
Vestby light filter panels
 Chris uses a Vestby (right) wardrobe panel as a filter for his windows.
He says, "Probably one of the simplest hacks out there. I had the Vestby sitting in my closet for years, I never bothered calling to get the many missing parts (the cloth that covers the front of the wardrobe, the missing rod to hang clothes, etc) but was cleaning in the closet a few days ago and thought I could probably use the panels for something rather than just throwing them away.
You just gotta attach them to the window whatever way works. For the skylight I used push pins temporarily as the skylight (and all the Sheetrock around it, it's all water damaged) is getting replaced in a few days.

 For the other window (up near the ceiling) I used a weird long hook I had in a picture hanging kit. Just one was needed to hold it in place."
see more of chris' window filter.
Saturday 21 June 2008
Weekend Project #1: Hack a Lego table
One of the suggestions from this post was for weekend projects and I thought it was a great idea. A fun project that could be done in a day or two or less. Here's one from Josie I think would be great for a Sunday afternoon. Am sure the kids would love it too!
Josie's Lego Table

 What you'll need:
 Here's how:
 If you want to copy this one exactly the measurements for the cut-outs are as follows:
Have a Weekend Project? Send it over to ikeahacker [at] gmail [dot] com.
Josie's Lego Table

 What you'll need:
- 47" Ingo dining table ($69.99)
- 4 Trofast buckets ($1.50 each)
- Lego 15"x 15" base plates
- Clamp work lamp (featured here is a discontinued Ikea lamp, but any lamp will do)
- Jigsaw
- Safety glasses
- Sand paper
- Liquid Nails
- Paint (optional)
 Here's how:
- Assemble the Ingo dining table as per instructions.
- Decide how may buckets you will be using.
- Measure the table from underneath. Why? Because there are wooden supports with this table that would interfere with any cuts you would make for the buckets. Once you have avoided them, with the remaining space, subtract the amount of space required by the number of buckets you will be using and add a few inches in between.
- Trofast has a few sizes of buckets. We used the white ones that are $1.50. There are some that are more shallow but wouldn't hold very many Legos. Also, when measuring the buckets and when cutting the holes, you would think you could just cut an oval shaped insert. But no, you need to cut a rectangle because the Trofast buckets have corners underneath the support lip that stick out requiring a 90 degree cut in the wood.
- After measuring the rectangles for cutting we drilled in with a bit large enough to pass a jigsaw blade through it. Then cut out all four holes.
- Sand the edges lightly so there aren't any slivers!
- Paint if you want.
- Glue down Lego baseplates, we used Liquid nails for plastic. Let dry over night and up to 24 hours.
- Insert buckets and go build!!
 If you want to copy this one exactly the measurements for the cut-outs are as follows:
- From the top measure down 2.25".
- From the sides measure in 4".
- Each rectangle that you cut needs to be 7" across x 10.75" long.
- And in between each rectangle there is 3.75".
Have a Weekend Project? Send it over to ikeahacker [at] gmail [dot] com.
Friday 20 June 2008
a touch of faux
The first hack I've received so far using faux animal print. And this Svansbo table set (can't find it on Ikea's site) by Georgion turned out pretty amazing.
Georgion says, "This one is the Svansbo table set, like the one you have on your site with floral painting on it, only I have the set of nesting tables.

 I took the upper wood veneer table and resurfaced it with a faux crocodile hide and then primed, painted and varnished it. The lower white veneer table is resurfaced in a faux python print.
 I love some of Ikea's designs but cannot stand people coming into my home and pointing and saying Ikea, lol."
Thursday 19 June 2008
Hackeas: Quick and cheap to the rescue
I've not done quickie hacks for a while, so here are a few to fill a spare hour.
The first two are from Quari.
Really, REALLY cheap laptop stand
"My laptop spends a lot of time on the kitchen table (googling measurements for recipes mostly - how many teaspoons in a quart?) So I wanted to put it on an angled stand for easier typing and to allow airflow to keep it cool in a hot Australian summer. Then I found the Lamplig trivet for $8.95. Taking one trivet and a couple of rubber furniture feet that cost about $2 for pack of 4 at any hardware shop, I now have an angled laptop stand in cool stainless steel that allows airflow around the whole underside of the laptop. I thought it might need some rubber or anti-slip stuff on some of the rungs but my Dell laptop seems to stay put by itself."

Nifty narrow shelves for novels
"I wanted small deep shelves to keep novels in that wouldn't take up too much space in a narrow hallway. As I rent my place I couldn't affix anything to the walls so it had to be sturdy and self-supporting. Rather than the old planks and bricks option I got a few Lerberg cd shelves for $10 each, assembled them and turned them on their side. Instant novel bookcase that's also really easy to move around and I can just add more shelving as I need it."

Frame it anew
What to do when the frame is great but the picture is not what you're looking for? Carl solves this easily.
 original picture
"I recently noticed that my local Ikea (Ottawa, Canada) had a sale going on for the Erikslund (link points to currently available Erikslund pictures, can't find this one) 'By the sea picture' at $4 CAD, that is an amazing price for the size and style of frame involved, but I am not too crazy about the actual pictures. You pop out the staples from behind, pull out the original poster board and affix your own pictures onto it with two sided tape. If you want a cleaner job you can add matting and use glue instead.
I used three pictures out of a Telus Mobility 2008 calendar to quickly see if my idea would work. It added a lot of color to the bathroom and I am happy with it."

Line up your DVDs
Always wondered how some people have their DVD collection lined up in perfect rows?
 Vitezslav lets us in on the secret - just stick a piece of cardboard as stopper.
 See more of vitezslav's dvd stopper.
Updated! February 25, 2009
Philips vinyl stopper

He says, "As any vinyl fan knows the Expedit bookcase is perfect for record storage. However, unless you have it completely against a wall, the records slide out of the back.


Some scrap MDF and a few drywall screws later - problem solved! I do recommend using the clamps and pre-drilling the MDF, you only get one shot at Ikea particle board!"
Sponge dryer
Wendy says, "This is not a fancy hack, more of a simple solution. I dislike the idea of a constantly wet/damp sponge. So I got myself a Blanken shower caddy and stuck it to the splash back of my kitchen sink. Now my sponges can dry out after I use them. I even keep the rubber plug in there 'cause water collects in the hollow underneath and then mildrew grows.

The first two are from Quari.
Really, REALLY cheap laptop stand
"My laptop spends a lot of time on the kitchen table (googling measurements for recipes mostly - how many teaspoons in a quart?) So I wanted to put it on an angled stand for easier typing and to allow airflow to keep it cool in a hot Australian summer. Then I found the Lamplig trivet for $8.95. Taking one trivet and a couple of rubber furniture feet that cost about $2 for pack of 4 at any hardware shop, I now have an angled laptop stand in cool stainless steel that allows airflow around the whole underside of the laptop. I thought it might need some rubber or anti-slip stuff on some of the rungs but my Dell laptop seems to stay put by itself."

Nifty narrow shelves for novels
"I wanted small deep shelves to keep novels in that wouldn't take up too much space in a narrow hallway. As I rent my place I couldn't affix anything to the walls so it had to be sturdy and self-supporting. Rather than the old planks and bricks option I got a few Lerberg cd shelves for $10 each, assembled them and turned them on their side. Instant novel bookcase that's also really easy to move around and I can just add more shelving as I need it."

Frame it anew
What to do when the frame is great but the picture is not what you're looking for? Carl solves this easily.
 original picture
I used three pictures out of a Telus Mobility 2008 calendar to quickly see if my idea would work. It added a lot of color to the bathroom and I am happy with it."

Line up your DVDs
Always wondered how some people have their DVD collection lined up in perfect rows?
 Vitezslav lets us in on the secret - just stick a piece of cardboard as stopper.
 See more of vitezslav's dvd stopper.
Updated! February 25, 2009
Philips vinyl stopper

He says, "As any vinyl fan knows the Expedit bookcase is perfect for record storage. However, unless you have it completely against a wall, the records slide out of the back.


Some scrap MDF and a few drywall screws later - problem solved! I do recommend using the clamps and pre-drilling the MDF, you only get one shot at Ikea particle board!"
Sponge dryer
Wendy says, "This is not a fancy hack, more of a simple solution. I dislike the idea of a constantly wet/damp sponge. So I got myself a Blanken shower caddy and stuck it to the splash back of my kitchen sink. Now my sponges can dry out after I use them. I even keep the rubber plug in there 'cause water collects in the hollow underneath and then mildrew grows.

Wednesday 18 June 2008
Cut corners for a corner desk
Okay, I get it right this time. This one definitely is an Ivar! Dave builds a corner desk by modifying the 30" corner shelves that normally go with the 20" side rails to attach to the 12" side rails.

Here's what Dave did.
1. Start with the 30"x30"x20" shelf (Ikea part 737.637.09). My 89"-tall unit has four identical shelves above the desk - adjust to your needs.
2. Flip the shelf over and remove the stiffener (shown below as the dark vertical line).
3. Mark off a diagonal line beginning 11-1/8 from the back of the sides of the shelf:

4. Carefully remove the metal support channels from the sides of the shelf where the cuts will be made to avoid damaging the tabs that hold them in place, or cracking the thin rabbeted edge of the shelf.
5. Make the cut and, using a router, plane, file, sandpaper, or cornering tool, round off or chamfer the fresh-cut edge.
6. Using the cut-off piece as a template, restore the notches to accommodate the 12" side rails:
7. Cut and file the edges of the metal support to match the rounded ends of the original equipment and re-attach them.
8. Drill and countersink a new screw hole about 3-1/2 inches from one end of the stiffener.
9. Trim about 2-1/4 inches from the same end of the stiffener and re-attach it to the bottom of the shelf.
10. Finish - or not - as you see fit, and enjoy!
(If you look at the picture of my finished project, you may notice that I didn't complete steps 8 and 9 - I just reattached the stiffeners and left it for later.)
 I also want to thank 2Furnish, a new sponsor for this site. You may have noticed their link appearing in the listing on your left. 2Furnish is a UK conservatory furniture specialist offering conservatory furniture in a range of materials including cane, wicker and rattan. Furniture styles range from the very classic to modern eye catching contemporary designs. Do drop by for a peek.

Here's what Dave did.
1. Start with the 30"x30"x20" shelf (Ikea part 737.637.09). My 89"-tall unit has four identical shelves above the desk - adjust to your needs.

2. Flip the shelf over and remove the stiffener (shown below as the dark vertical line).
3. Mark off a diagonal line beginning 11-1/8 from the back of the sides of the shelf:

4. Carefully remove the metal support channels from the sides of the shelf where the cuts will be made to avoid damaging the tabs that hold them in place, or cracking the thin rabbeted edge of the shelf.
5. Make the cut and, using a router, plane, file, sandpaper, or cornering tool, round off or chamfer the fresh-cut edge.
6. Using the cut-off piece as a template, restore the notches to accommodate the 12" side rails:

7. Cut and file the edges of the metal support to match the rounded ends of the original equipment and re-attach them.
8. Drill and countersink a new screw hole about 3-1/2 inches from one end of the stiffener.
9. Trim about 2-1/4 inches from the same end of the stiffener and re-attach it to the bottom of the shelf.
10. Finish - or not - as you see fit, and enjoy!
(If you look at the picture of my finished project, you may notice that I didn't complete steps 8 and 9 - I just reattached the stiffeners and left it for later.)
***
 I also want to thank 2Furnish, a new sponsor for this site. You may have noticed their link appearing in the listing on your left. 2Furnish is a UK conservatory furniture specialist offering conservatory furniture in a range of materials including cane, wicker and rattan. Furniture styles range from the very classic to modern eye catching contemporary designs. Do drop by for a peek.
Tuesday 17 June 2008
Hide your CDs
Adriana doesn't like her technology showing and decides to hide it in a cabinet.
She says, "I bought an Ivar Gorm shelving unit ($20) to put into the cabinet and hold my CDs and technology, but then realized it wouldn't work the way i wanted.
So, I decided to modify.
On an Ivar Gorm, the vertical pieces of wood are about 1x4, so I kept two of the four intact. The other two, I cut into pieces and made them legs that sit on each shelf.

 So, I assembled the back according to directions and the 1x4s for the front acted as legs. The legs are only attached to the shelf above. They are not attached to the shelf below.

 Someone who cared could do a better job. Mine was really in the moment when I realized my original plan would not work, and, if I didn't do it when it hits me, it won't get done. So, you can see I cracked the wood because I did not have the right screws.
But, it works and no one sees my stuff."
She says, "I bought a
So, I decided to modify.
On a

 So, I assembled the back according to directions and the 1x4s for the front acted as legs. The legs are only attached to the shelf above. They are not attached to the shelf below.
 Someone who cared could do a better job. Mine was really in the moment when I realized my original plan would not work, and, if I didn't do it when it hits me, it won't get done. So, you can see I cracked the wood because I did not have the right screws.
But, it works and no one sees my stuff."
Monday 16 June 2008
Ceramic tiles to the rescue
JoBeth from Singapore has an old Ikea table (name long forgotten) that little sis destroyed and Dad saved. All you need to re-create this tiled table top, which I think will look great on a lack coffee table, are a hammer, ceramic tiles in different colours, tile adhesive, grout, a sponge and an eye for colour coordination.
 See JoBeth's tiled table top instructions.
 See JoBeth's tiled table top instructions.
Subscribe to:
Posts (Atom)


