paul turns the benno cd tower into a wine rack.
"i needed some kind of very narrow wine shelf that had to fit in between my book shelf and the loudspeakers. the power socket on the wall there has to be reachable, too.
after a while of pondering the possible constructions it came to me to just slightly modify a benno cd tower.
step 1
just build it as it is meant to be but leave out the back wall. don't worry, it's still quite stable (at least if connected to something else).
step 2
mount the new wine shelf laterally to an existing object. i connected the shelf to the cupboard with those nifty connector screws by ikea. just ask nicely at their spare parts counter. but i've heard that you can get those connectors also at the hardware store.
i wanted to get as many bottle spaces in the shelf as possible, preferably looking square, so i mounted the shelf boards with a 3 hole spacing - in my case i had still shelf boards left from another benno.
step 3
fill bottle spaces nicely with bottles - letting the necks stick through the back towards the wall. each space takes up to 2-3 bottles (depending on their diameter). if you like (and have enough booze), place one bottle decoratively standing on the top.
and you're done!
possible improvements: as the bottles tend to roll around when lying alone in their spaces, some kind of dimple in the shelf boards could help - or just stack'em to the brim!"
Home Decorating Photos, Interior Design Photos, Home Decorating Pictures, House Interior & Exterior Design Pictures, Home Decor & Improvement Ideas.
Wednesday, 31 October 2007
Tuesday, 30 October 2007
hacks at ikea philadelphia
kath spotted these hacks at ikea philadelphia! nice work, ikea.
"a while back, my husband and i were at ikea in philadelphia, and we saw a monitor stand made from a galant half-round table top and some 4" capita legs. before that we had only seen the galant half-rounds used as an end-cap for a galant table. we thought it was a great idea, since i still have an old monitor that's pretty heavy and needs that support, and so we bought the supplies and assembled it at home (pix below).
this past weekend, we were back at ikea philadelphia and i guess since the galant half-round wouldn't match the alve desk, someone had the brilliant idea to make a monitor shelf made from what i believe to be an adel kitchen cabinet door (though it might have been a spare alve door they had around, i'm not quite sure which) and the capita legs (pix below). i'm not sure if this hack is a local hack or not, but i thought it was fun to see them use their own products in unconventional ways."
Monday, 29 October 2007
create a ceiling sculpture
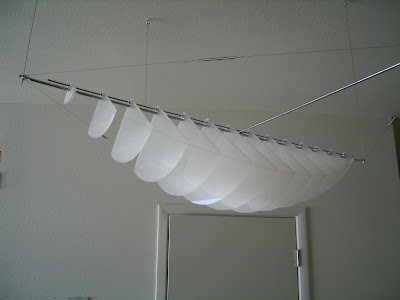
diwa previously won kudos for his good looking laundry hamper, even a nod from la apartmenttherapy. he does it again with this ceiling sculpture.
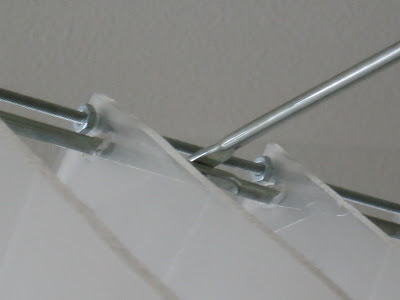
"it started when i bought an extra ivar brace frame by mistake. i was looking at it and thinking, 'i am sure i can do something fun with this'. i was intrigued by the idea of hanging it from a ceiling. my idea was to make a light fixture out of it, but i never really integrated any lights into it. i do plan to add small LEDs between the plexi panels someday, but for now, it remains a sculptural ceiling fixture.
some hand-cut 1/4 inch plexiglass, steel cable, fishing line, tension springs and the versatile ivar brace was all i used and yes, a threaded rod and nuts to hold the plexi in place."
Saturday, 27 October 2007
skinny shoe storage that holds 36 pairs
dana was tight on space and found a slim solution for off-season shoe storage. most of all, i like how she painted the shoe boxes to blend with the colour scheme on the facing wall.
dana used small screws to fasten 4 units of trones shoe boxes together from the side. the fronts are painted with rustoleum's standard blue, green and light gray spray paint. the tops and exposed side are finished with rustoleum's aluminum paint to blend with the frame of the wall.
view more of dana's slim shoe storage.
Friday, 26 October 2007
it's a wrap for the oddvar
simon has a small ikea hack, as he terms it, to share with us.
"last month, we bought an oddvar chair (can't find the link on ikea's website). to improve the look, we bought an asian newspaper and wrapped it around the pieces of the chair using paste before assembling it. finally, we used 'thick' varnish to protect the newspaper and make the chair washable."
Thursday, 25 October 2007
pax wardrobes to organise your entire office
some years ago, i remember ikea having home office fittings for the pax wardrobe system. i was so tempted to buy it because i could just close the doors and the office, together with all my mess would disappear. but finally, the thought of working out of a closet was just too claustrophobic for me. nonetheless it is good see that jen has made the pax wardroble office work. [via apartmenttherapy home tech, thanks anna!]
2 pax wardrobes with drammen doors hold jen's entire office. i would suggest a pax pull out shelf (with a wooden shelf placed in it for thickness) for the laptop and to avoid having to work with the cabinet under her feet.
click to see jen's home office on apartmenttherapy.
2 pax wardrobes with drammen doors hold jen's entire office. i would suggest a pax pull out shelf (with a wooden shelf placed in it for thickness) for the laptop and to avoid having to work with the cabinet under her feet.
click to see jen's home office on apartmenttherapy.
Tuesday, 23 October 2007
inspiration: matthias' besta combination
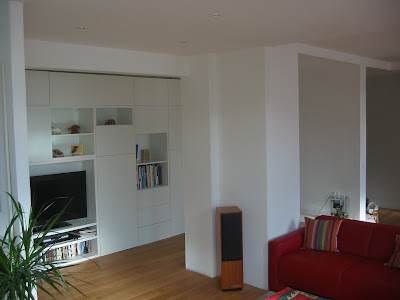
matthias, from paris, sends us some eye candy. i like how the cabinets disappear into the wall.
"you will find attached a few picture of how i stacked several besta storage combination in order to have a full wall of storage for display as well as a media center.
i have 4.50 meters (14.5') width and i left approximately 10 centimeters (4") behind the cabinets for all the cables and for cooling the hi-fi system that is inside the closet. no handles for the drawers and doors as i installed a push and release system bought at an hardware store for a few euros each."
Monday, 22 October 2007
one bunk bed into 2 and a bench to boot
one of the wonderful things about ikea hacking is how furniture is repurposed and made useful again. that is especially true with children's furniture.
so i love how rob turned the mydal bunk bed into single bed and even used up the redundant ladder.
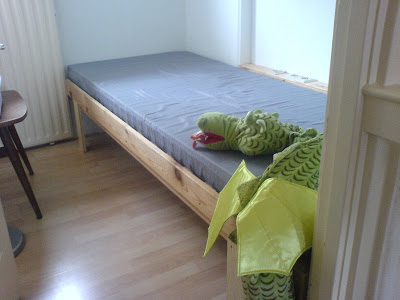
rob says, "i turned a mydal bunk bed into two single beds and a kids bench. i removed the top bed, which i then attached to the walls of the room.
i didn't need the header, footer and ladder. instead i used those remaining parts to make a kids bench.
the header and footer of the bed became the seat (with a little modification to the spacing). the ladder made the armrests and legs. i could reuse some of the original screws, and needed about 16 more (size 4x40mm) to complete the armrests.
that makes two beds and a bench for 70 euro ($129)."
Friday, 19 October 2007
how to change the colour of your scale
sarah's new bathroom colours didn't match the ikea scale she had. no worries. 20 minutes later, she had a scale in the blues she wanted.
"i found the pattern for my shower curtain on the bed bath and beyond site and was able to blow it up using a photoshop filter. the ikea kilan scale is approximately 9" x 9" but due to only having letter size paper i split the image in half and printed it out on two sheets.
once printed i cut out the new design and used doublestick tape to secure it on the scale. i then used clear contact paper (which can be purchased for cheap at home depot) to secure the new design in place."
see more of sarah's kilan scale colour change
Thursday, 18 October 2007
bemz second chance contest winner!
we have a winner! the judges, katarina of bemz, susan of ikeafans and i have reached a unanimous decision.
and the winner is ...
simone and bubo!
simone's heartwarming story of an abandoned cat ... her spending nights coaxing him into a cat carrier and eventually giving him a new home won us over. she gave him a second chance and as they say, a good turn deserves another.
simone gets $500 to spend at bemz. congrats simone and have fun picking out your new slipcover!
also, to all who took part and voted, thank you.
go here to view all entries.
a norrebo window seat
chris tore up a norrebo shelving unit to create a bookcase and a window seat to fit his space perfectly!
here's what he did:
1. build up a two-shelf high norrebo bookcase unit against the wall with the taller window.
2. use the remaining third shelf of our norrebo package to build a window seat against the other window.
3. use the cushions, which were the perfect width and height, from his spare lillberg couch for his new window seat.
see more of chris' norrebo bookcase and window seat.
Wednesday, 17 October 2007
brightens autumn evenings too
tamy tipped me on these gorgeous lanterns by matthew mead some time back. well, they were for summer but they are just as apt for fall.
take an ikea isig lantern. with some double sided tape, line the inside of the glass with two sheets of paper back-to-back. repeat until all 4 sides of the lantern, including the door, are covered.
matthew's decorative paper is downloadable from here.
elsewhere, yvonne of yvestown is making her skruvsta slipcover pattern available for$15 $25 (includes one white fabric pattern fit to size, sewing instructions and postage). very handy is you're the sewing type and want to make a funky slipcover of your own. you'll need to email her if you're interested in purchasing the pattern.
> go here for more info on the pattern.
> click this link to view yvonne's cath kidston skruvsta slipcover.
update! lisa tipped me that yvonne is making her skruvsta pattern available but has to increase the price to $25 to cover shipping costs. click here to buy.
take an ikea isig lantern. with some double sided tape, line the inside of the glass with two sheets of paper back-to-back. repeat until all 4 sides of the lantern, including the door, are covered.
matthew's decorative paper is downloadable from here.
***
skruvsta slipcover patternelsewhere, yvonne of yvestown is making her skruvsta slipcover pattern available for
> go here for more info on the pattern.
> click this link to view yvonne's cath kidston skruvsta slipcover.
update! lisa tipped me that yvonne is making her skruvsta pattern available but has to increase the price to $25 to cover shipping costs. click here to buy.
Tuesday, 16 October 2007
projects page update
checking in on the projects page. (it's a hack collection via the instructables ikea hacks group). two new instructables up.
one is a malm bed with underbed lighting by dpocius.
and the other james' ingolf ikea chair stretched into a bench. loving this!
go to the projects page to view them.
one is a malm bed with underbed lighting by dpocius.
and the other james' ingolf ikea chair stretched into a bench. loving this!
go to the projects page to view them.
stolmen and jarpen bookshelves
lucian marries the stolmen with jarpen for a wall of good-looking bookshelves.
"after searching for months for the perfect modern, open bookshelves, i noticed the stolmen line. but the shelves seemed too weak to hold hundreds of pounds of books. not to mention two young boys and the occasional earth quake. so, i modified them quite a bit.
i used the stock stolmen poles and end brackets. they are very sturdy.
for the shelves, i used jarpen shelves because they are nice and thick and are of good quality oak veneer. the only problem with this is that the shelves are in different widths than the stolmen drawers, so i was not able to mix in a few drawers.
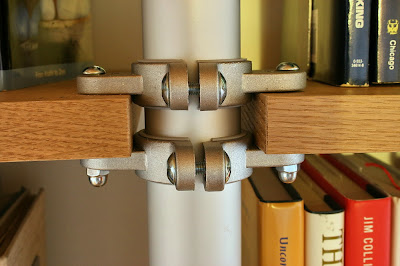
for the middle brackets, i used two double ended brackets. i did this because i was worried that a single bracket may not be able to hold the weight of both shelves. especially if my son climbed them like a ladder. i had to put a bolt through the brackets and shelf board to lock the brackets and shelf together as a system.
i wanted the shelves to look light and simple so i screwed an extruded aluminum L shaped strip to the wall. when the shelf is set on the aluminum L strip, it covers the portion screwed to the wall so it becomes almost invisible.
the whole thing took quite some time to put together. measurements have to be pretty exact because the wall brackets have to align exactly with the stolmen brackets on both left and right shelves. even 1/8 inch (off) starts causing problems. also, it is rock solid and doesn�t jiggle at all when pulled on. it required 175 drill holes and 96 screws."
Saturday, 13 October 2007
blog action day! reusable ikea totes
oct 15 is blog action day. a day bloggers around the web unite to put a single important issue on everyone�s mind - the environment. since i won't have internet access on monday, i'm posting this early - a simple hack to remind us to reuse and recycle. better yet, upcycle. here, marlo shows us how to add a little creative chic to scrap.
marlo says, "after hanging 6 sets of hedda curtains, my friend julie gave me all of the scrap fabric she trimmed off the bottom of each curtain. i used that material to make some reusable shopping/grocery tote bags that i call �Tote2Go!� i used a plastic grocery bag as the template to create the totes. each tote is handmade in my seattle, wa studio; fully lined and reinforced at the seams using only reclaimed, repurposed or remnant fabric. it even folds into its own pocket for portability!
you can get a tote2go from here.
eames hacking?
i'll be heading out of state tomorrow with some friends for a bit of a r&r. we're going to the mountains, well, sort of, more like the foothills but it'll still be cooler, and a respite from the tropical heat. i won't be posting on monday but will be back with more hacks on tuesday. i hope you have a great weekend too.
in the meantime, i digress but it does look like furniture hacking is catching on. i stumbled across these eames hacks on designsponge (via notcot and core77). the project by 6 students from the university of the arts, philadelphia, was in honour of eames 100th anniversary.
click to see eames hacks.
delia's hat and coat rack
delia from the uk put together this simple coat and hat storage system, which would be great for a small landing strip.
needed:
1 stolmen two-drawer chest in black-brown, measuring 110x50 cm (43" x 19")
1 4-pack of capita 16cm (6") legs
1 lack floating shelf in black-brown measuring 110 cm (43")
2 packs of 4cm (1.5") blecka hooks
instructions:
"first, i attempted to fill the bracket holes in the top surface of the stolmen chest with polyfilla mixed with black/red acrylic paint. this wasn't entirely successful (probably the mix was too wet), so i'll buy a piece of glass for the top and use etching spray to put one narrow stripe (or maybe two) along each underside edge of the two short sides of the glass. this will hide the holes, and protect the top. after assembling the chest, i attached the capita legs onto the underside, fixed the shelf to the wall and placed the hooks directly below the shelf.
i used only five of the eight purchased hooks and left enough space between to add more if required. a long narrow mirror below the shelf with a couple of hooks either side would also have looked good, but we need hooks more than we need another mirror."
Friday, 12 October 2007
a twist on the skimra shades
a nice play on the skimra lamp shades from alex. the shades come in 3 sizes and assorted colours, so this can turn out to be a really fun arrangement.
materials:
skimra lampshades 2x 6" and 2x 9"
some uplamp that i can't find on the ikea website. i think it was discontinued because i was able to buy it for $9.99, and it was normally $19.99.
also used some clear nylon thread (available in the ikea fabric section) and some ceiling hooks, i think if i were to do it again, i would've bought 100lb test fishing line.
instructions:
most of the skimra i just hung using doubled nylon thread tied to the light-bulb attachment rings inside them, and looped them up to the ceiling hooks. i should have bought one more, because odd numbered groupings tend to look better than even numbered ones. for the rightmost one, i was able to use one of the 6" skimra upside down inside the 9" one to create a slightly different look to it.
(the blinds, carpet and lounge chair are also ikea. bookcase is from blu dot, lamp is from CB2, and the couches are vintage.)
Wednesday, 10 October 2007
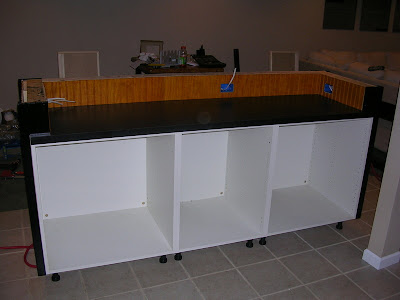
a home bar from kitchen furniture
bill built his son a basement bar! he has got to be the luckiest bloke on the block.
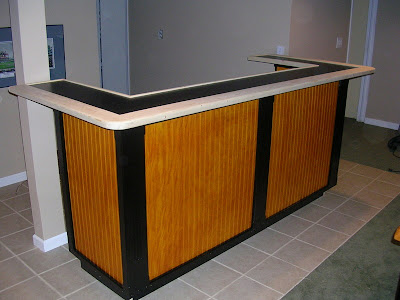
bill says, "below are two photos of a basement bar i built for my son. in order to get it down into the basement we needed a modular design. we decided to use ikea kitchen base cabinets and build up from there. we used two 30-inch and one 24-inch cabinets to build the eight-foot, U-shaped bar.
cabinets were locked together and 1x2 screwed to the end to give an extra 3/4-inch for the corner moldings. a 6-inch high stud wall was used on three sides of the top to support the bar top. a 2x6 was screwed to the stud wall and the bar top screwed to the 2x6. 2x6 and 3/4-inch, particle board bar top were screwed together using pocket screws. used plastic legs and clips for the toe kicks. worked great.
the cabinets were then wrapped with 11/32-inch beadboard plywood. beadboard was stained with General Finishes water-based poly tinted with TransTint dye. two coats gave the color we wanted and we were done. this saved lots of time. pine moldings and trim were primed and given two coats of black paint.
raw wood you see on the bar top is the hand rail and that will be painted black to match the other moldings.
the whole project took under a month to build, finish, move and assemble and cost about $425."
Tuesday, 9 October 2007
hanna's craft mirror
another malma mirror. this one's from hanna. i just love the picture below of hanna, a swedish journalism student who makes crafty things couple of days a week. seen here embellishing her ikea mirror, while her cat, smilla, snoozes.
"the mirror with the big wood frame is the ikea malma (which i can no longer find on ikea's website), and it looks like it was made for decorating, painting or decoupaging on. the mirror invite it, being plain unpainted wood as it is. i love that about ikea, that you get the chance to be creative on your own! i also got the glass marbles from ikea."
see more of hanna's ikea mirror. do browse her blog too. it's full of crafty little things.
Monday, 8 October 2007
turn ugly old tables into work of art
melsky, an artist, does her thing on two vika amon tables.
"the first thing i did was sand it really well. then i filled in some of the gaps where the wood had splintered with wood putty. then i sanded again. i gave it three coats of primer with zinsser bull's eye primer-sealer stain killer 123, which is an excellent base coat for wooden furniture."
then, she started painting the background colour and added roses, leaves and stars in Golden brand acrylic paint. Lastly, she painted on two coats of water based urethane clear finish.
she adds, "though i'm moving to sadly ikea-less syracuse, NY, i look at pieces of pre-fab inexpensive furniture differently now, as something that can be made into something else and not just cheap furniture that you keep until it falls apart."
see more of melsky's table. the tables, however, have been sold.
she also does mirrors.